
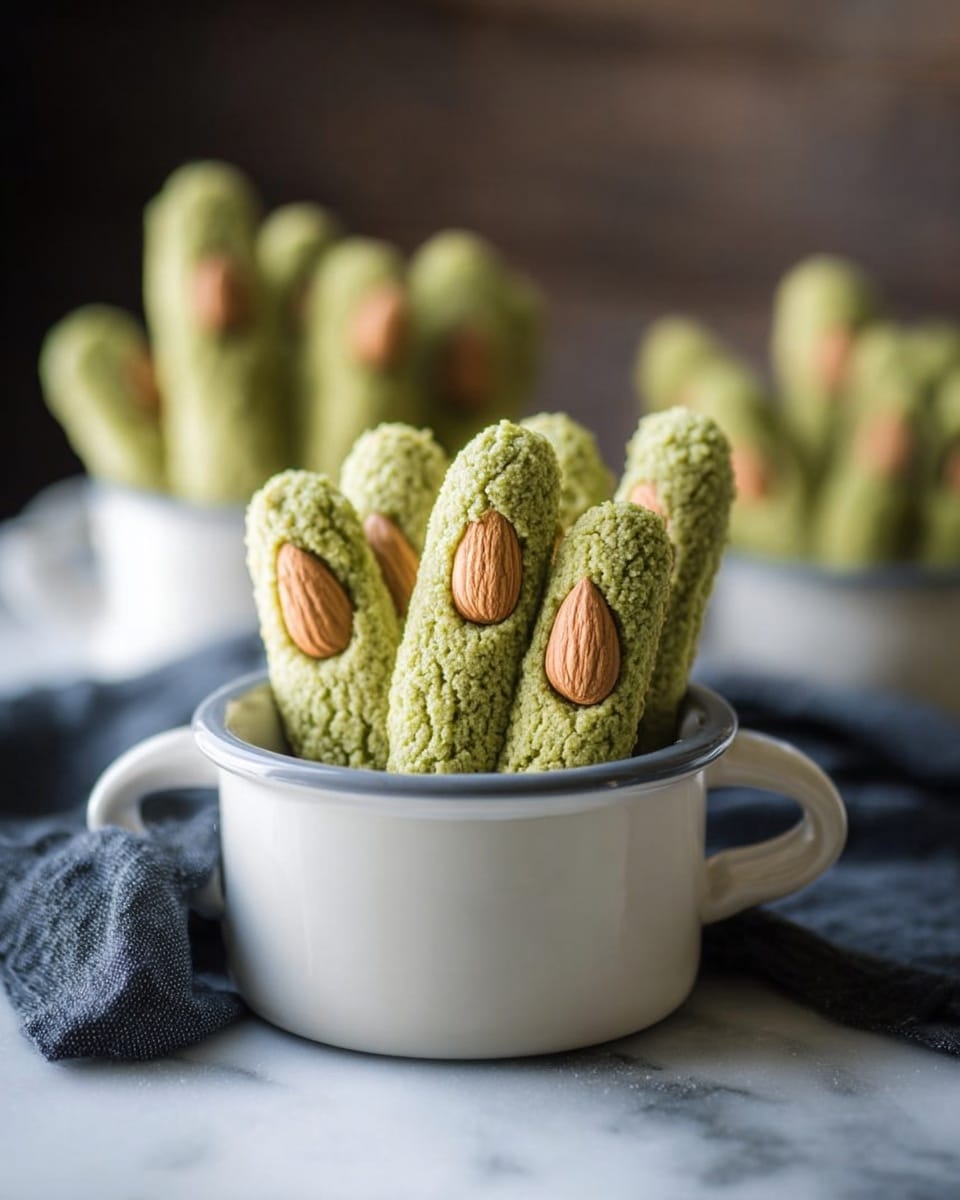
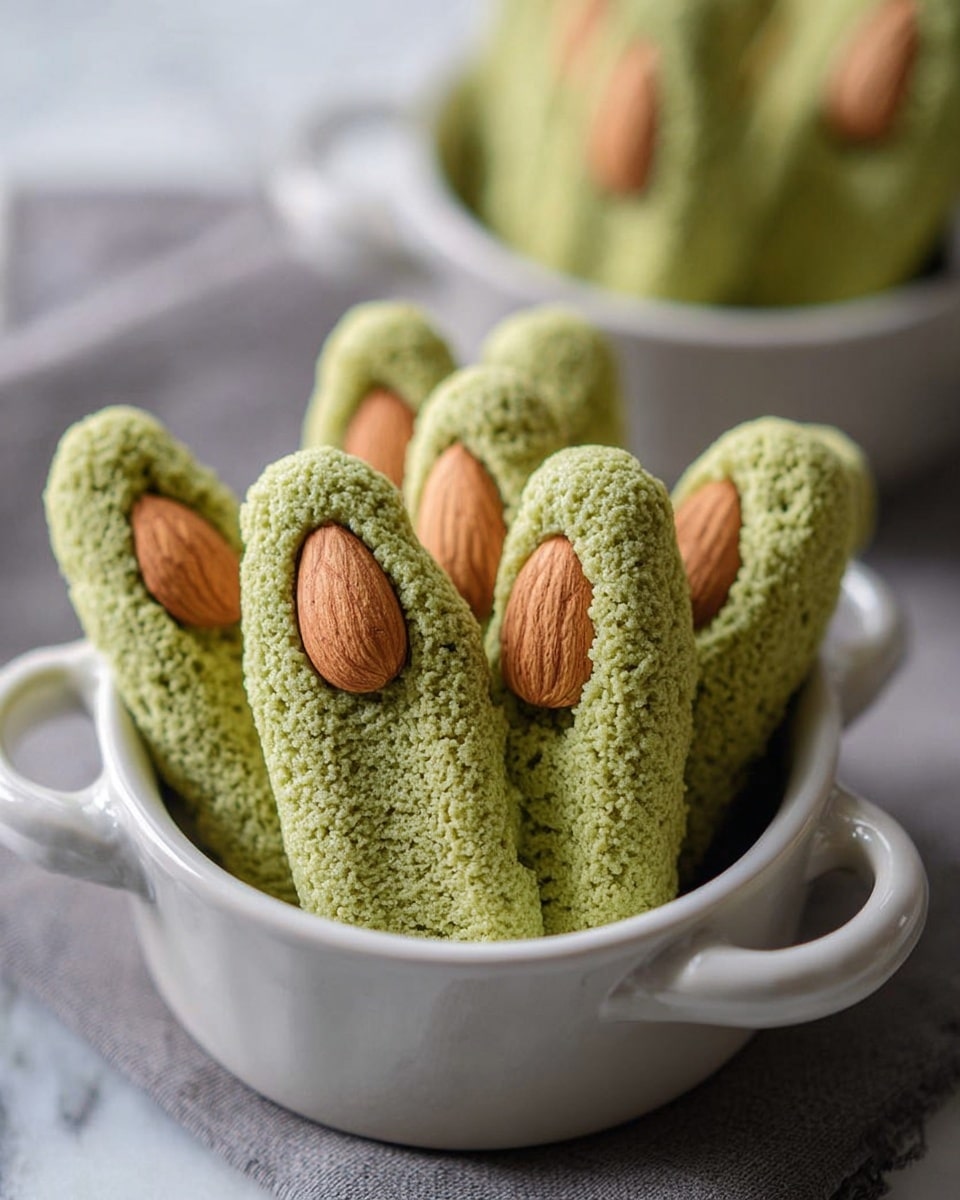
Witches’ Fingers Cookies Recipe
If you’re on the hunt for a Halloween treat that’s equal parts spooky and delicious, you absolutely have to try this Witches’ Fingers Cookies Recipe. These creepy little cookies are as fun to make as they are to eat, with their delicate green color, crisp texture, and almond “nails” that give them that eerily perfect finger look. Trust me, once you bake these, they’ll disappear faster than you can say “trick or treat!” So let’s dive in—I’ll walk you through each step to make sure your kitchen fills with that enchanting aroma and your cookies come out perfect.
Why This Recipe Works
- Unique Texture: The meringue base makes these cookies crisp on the outside but slightly chewy inside, unlike typical sugar cookies.
- Natural Coloring & Flavor: Matcha powder not only gives a gorgeous green hue but also adds subtle earthy notes that balance sweetness.
- Easy Yet Impressive: Minimal ingredients and straightforward steps create spooky, professional-looking treats.
- Perfect for Halloween: Those almond “fingernails” make these cookies an Instagram favorite and a crowd-pleaser at any Halloween party.

Ingredients & Why They Work
Every ingredient in this Witches’ Fingers Cookies Recipe is carefully chosen to deliver great taste and texture. Most are pantry staples, and the highlight here is the matcha powder, which will surprise you with its vibrant color and subtle flavor. Here’s a quick rundown of why each one matters.

- Egg whites: The main structure of the cookies; whipping them gives you that light, airy meringue base.
- Cream of tartar: Stabilizes the egg whites so they whip up nicely and hold their shape, which is key for those finger shapes.
- Vanilla extract: Adds warmth and depth to balance the green tea’s earthiness.
- Matcha powder: Provides the signature green tint and a subtly grassy, slightly sweet flavor; I usually buy mine at health stores in bulk to keep it fresh.
- Powdered sugar: Sweetens and helps create that crisp exterior; it dissolves better than granulated sugar in this recipe.
- Whole almonds: For the creepy “fingernails”—it’s best to use fresh, whole almonds with pointy ends for the most realistic effect.
Tweak to Your Taste
One of the things I love about this Witches’ Fingers Cookies Recipe is how easy it is to personalize. Maybe you want them a little less sweet or you’re thinking of trying different flavors for the “fingers”—go for it! Baking is all about making a recipe your own.
- Variation: I’ve sometimes swapped vanilla for almond extract to amp up the nuttiness, which my friends loved for a more intense almond finger vibe.
- Dietary modifications: If you’re avoiding caffeine, swapping out matcha for natural green food coloring and a tiny hint of mint extract works well, though you’ll lose that lovely earthy taste.
Step-by-Step: How I Make Witches’ Fingers Cookies Recipe
Step 1: Whip the Egg Whites to Soft Peaks
Start by separating your egg whites carefully—no yolk allowed here, or the meringue won’t whip properly. Using a stand mixer is easiest, but a handheld mixer works fine too. Whip the egg whites and cream of tartar on high speed until they form soft peaks—that’s when the peaks flop over gently when you lift the beaters. This is crucial because it ensures your cookies will have a nice light structure.
Step 2: Blend in Vanilla and Matcha
Next, add your vanilla extract and matcha powder. The matcha can clump a bit, so mix slowly on low speed until the green is evenly distributed. This part is always fun because you’ll start seeing that witchy green color come alive in your batter.
Step 3: Add Powdered Sugar Gradually
This step tests your patience, but it’s worth it. Add powdered sugar one tablespoon at a time, mixing gently after each addition. Keep whipping until stiff peaks form—when you lift the beaters, the peaks should stand straight up without drooping. This ensures your cookies set firm in the oven.
Step 4: Pipe Your Witchy Fingers
Fill a piping bag with the green meringue and line a baking sheet with parchment paper. Pipe about 3-inch long wavy lines to look like creepy fingers. Don’t be afraid to get creative—some fingers I made are straight, some are crooked. Then, press a whole almond at the end of each finger with the pointy end sticking out like a gnarly fingernail.
Step 5: Bake Low and Slow
Bake your fingers low and slow at 225°F (about 110°C) for 60 to 90 minutes. I usually aim closer to 90 minutes for that perfect crispy exterior. Keep an eye on them so they don’t brown—if they start to turn color, pull them out sooner. Once out, let them cool completely on the sheet before enjoying or storing.
Pro Tips for Making Witches’ Fingers Cookies Recipe
- Room Temperature Egg Whites: Let your egg whites sit at room temp for 30 minutes before whipping—they’ll reach soft and stiff peaks faster and fluffier.
- Matcha Quality Matters: Use high-quality matcha powder for the best color and flavor; lower-quality powders can taste bitter and dull.
- Piping Bag Control: Try piping a few fingers on parchment first to get a feel for pressure and shape before committing to the whole batch.
- Baking Time Patience: Resist the urge to crank up the oven to speed things up—low and slow baking is key to the perfect texture without browning.
How to Serve Witches’ Fingers Cookies Recipe
Garnishes
I usually keep it simple with just almonds for the “fingernails,” but if you want to get extra festive, you can dust the fingers lightly with edible green glitter or even a tiny brush of tinted icing near the nail for a fresh, spooky look. A little red gel near the base of the “nail” makes for a great creepy detail if you’re going for full-on horror vibes.
Side Dishes
These cookies are perfect on their own with a cup of hot tea or cider, but if you want to go the extra mile at your Halloween party, I love serving them alongside pumpkin fudge or dark chocolate-covered pretzels for contrasting flavors and textures—your guests will be impressed!
Creative Ways to Present
For a party, try arranging your witch fingers on a rustic wooden board next to a cauldron-shaped bowl filled with green punch or “witch’s brew” lemonade. You can even nestle the fingers in a bowl of green-tinted shredded paper or moss faux grass for that forest witch vibe. Kids love the theatrical setup—it makes the cookies feel even more magical.
Make Ahead and Storage
Storing Leftovers
I store leftovers in an airtight container at room temperature between layers of parchment paper to keep them crisp. They usually last about 4 to 5 days, but honestly, mine rarely last that long!
Freezing
You can freeze these cookies very successfully by placing them in a single layer on a baking sheet, freezing until firm, then transferring to a freezer-safe bag. Thaw at room temperature when you’re ready to enjoy. Just be sure they’re completely cooled before freezing to avoid sogginess.
Reheating
If you want to refresh your cookies’ crispiness after storage, pop them in a 300°F oven for 3-5 minutes—watch carefully so they don’t brown. This little warm-up brings back the perfect witchy snap.
FAQs
-
Can I use regular green food coloring instead of matcha in this Witches’ Fingers Cookies Recipe?
Yes, you can substitute green food coloring for matcha, but keep in mind you’ll lose the subtle earthy flavor that matcha gives. If you want to mimic some of the matcha’s taste, consider adding a drop of mint or almond extract. The cookies will still look festive, but matcha adds an extra layer of flavor and a natural green color.
-
Why is cream of tartar important in this recipe?
Cream of tartar stabilizes the egg whites when you whip them, helping them hold air and form firm peaks. Without it, your meringue might deflate or not hold shape during baking, resulting in flat or dense cookies.
-
My meringue is sticky and doesn’t form stiff peaks—what did I do wrong?
Often, this happens if there’s any yolk in the whites or if your mixing bowl or whisk had any grease. Make sure your tools are squeaky clean and dry. Also, fresh room-temperature eggs whip better. Finally, add the powdered sugar slowly and fully incorporate it to reach stiff peaks.
-
Can I make these cookies gluten-free?
Great news—this Witches’ Fingers Cookies Recipe is naturally gluten-free since it’s made from egg whites, sugar, matcha, and almonds. Just double-check your almond and matcha sources to avoid cross-contamination if sensitive.
Final Thoughts
These Witches’ Fingers Cookies have become a Halloween tradition in my house. Every year when I whip up that green batter and pipe out those creepy digits, I feel like I’m mixing a little magic in the kitchen—and watching my family’s faces as they give them a nibble never gets old. If you love baking but want something a bit different this Halloween, this recipe is definitely the treat you’ve been looking for. So go ahead, try it out, and get ready for some serious “oohs” and “aahs.” Happy haunting in your kitchen!
Print
Witches’ Fingers Cookies Recipe
- Prep Time: 20 minutes
- Cook Time: 1 hour 30 minutes
- Total Time: 1 hour 50 minutes
- Yield: 12 servings
- Category: Dessert
- Method: Baking
- Cuisine: American
- Diet: Gluten Free
Description
Witches’ Fingers Cookies are delicate, crispy meringue cookies tinted with matcha powder and topped with whole almonds to resemble spooky fingers. Perfect for Halloween or themed parties, these cookies are light, airy, and visually striking with a subtle green tea flavor.
Ingredients
Meringue Base
- 4 separated egg whites about 1/2 cup
- 1/4 teaspoon cream of tartar
- 2 teaspoons vanilla extract
- 2 tablespoons matcha powder
- 1/2 cup powdered sugar
Topping
- 1/2 cup whole almonds
Instructions
- Whip Egg Whites: Working with either the base of your stand mixer or a bowl and your hand mixer, add the egg whites and cream of tartar. Whip on high until soft peaks form, which will flop over slightly when you lift the whisk.
- Add Flavor: Add the vanilla extract and matcha powder, blending gently until fully combined into a smooth green mixture.
- Incorporate Sugar: Carefully add the powdered sugar, about 1 tablespoon at a time, continuing to whip until stiff peaks form. The mixture should hold a firm peak on your finger or mixer when pulled out.
- Pipe Cookies: Spoon the mixture into a piping bag. Line a couple of baking sheets with parchment paper. Pipe about 3-inch squiggly-lined rows of the green meringue mixture until all batter is used.
- Add Almonds: Place a whole almond at the end of each piped line with the pointed end facing outward to resemble a fingernail.
- Bake: Bake the cookies at 225 degrees Fahrenheit for 90 minutes, keeping a close eye to avoid burning. The longer you bake, the crisper they become.
- Cool and Serve: Remove from oven and let the cookies cool on the baking sheets for at least 15 minutes to firm up before enjoying.
Notes
- Use fresh egg whites at room temperature for better volume when whipping.
- If you don’t have matcha powder, you can substitute with finely ground green tea powder or omit for plain meringue cookies.
- Make sure no yolk gets into the whites, as fat can prevent proper whipping.
- Keep an eye on baking time; cookies may need up to 90 minutes to dry out fully but watch for browning which indicates overbaking.
- Store cookies in an airtight container at room temperature to maintain crispness.
Nutrition
- Serving Size: 1 cookie
- Calories: 70 kcal
- Sugar: 8 g
- Sodium: 5 mg
- Fat: 2 g
- Saturated Fat: 0.1 g
- Unsaturated Fat: 1.5 g
- Trans Fat: 0 g
- Carbohydrates: 10 g
- Fiber: 0.5 g
- Protein: 1 g
- Cholesterol: 0 mg


