

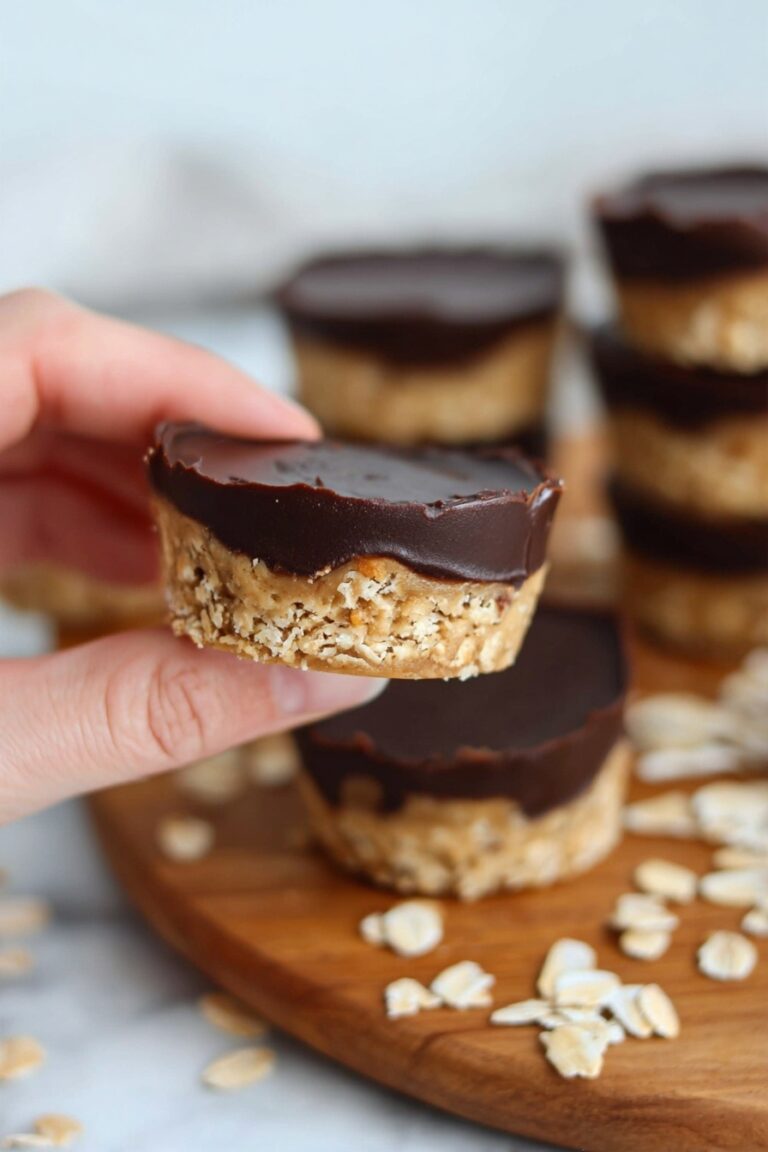
Vegan Gluten-Free Kit Kat Cookies Recipe
If you’re craving a treat that’s both indulgent and friendly to your dietary needs, then you’ve got to try this Vegan Gluten-Free Kit Kat Cookies Recipe. Trust me, these cookies have all the crunch and chocolatey goodness you want in a Kit Kat but without any gluten or animal products. The best part? They’re surprisingly easy to whip up and perfect for sharing (or not—no judgment here!). So, stick around because I’m about to walk you through every delicious step.
Why This Recipe Works
- Simple, wholesome ingredients: Using almond flour and natural sweeteners keeps these cookies nourishing without compromising flavor.
- Perfect texture balance: Crisp cookie layers with creamy fudge and a smooth chocolate coating mimic the classic Kit Kat experience.
- Allergy-friendly options: Easily customizable with tigernut flour for a nut-free treat that everyone can enjoy.
- No complicated equipment: You don’t need fancy gadgets—a rolling pin, a baking sheet, and a little patience are all it takes.

Ingredients & Why They Work
Let’s chat about these ingredients that come together so perfectly in this Vegan Gluten-Free Kit Kat Cookies Recipe. Each one brings a little something special, and I’ve shared some tips on picking the best versions so your cookies come out spot-on every time.

- Blanched almond flour (or tigernut flour): Almond flour makes these cookies tender but sturdy enough to hold the fudge layers. Tigernut flour works great if you need to skip nuts.
- Coconut sugar: Gives a gentle caramel-like sweetness without refined sugars—plus a subtle depth that pairs amazing with chocolate.
- Ground flaxseed: Acts as an egg replacement, binding everything together while adding omega-3 benefits. I love grinding mine fresh for extra flavor.
- Coconut oil: Adds moisture and healthy fats—the secret to a soft but crisp cookie edge.
- Dark chocolate: Choose a good-quality vegan variety for the fudge filling and coating so you get that rich chocolatey hit.
- Peanut butter (or Sunbutter): Creamy and smooth, it mixes into the chocolate fudge filling for that classic Kit Kat flavor.
- Vanilla extract: Just a splash to round out the sweetness and add warmth.
Tweak to Your Taste
One of the things I love about this Vegan Gluten-Free Kit Kat Cookies Recipe is how adaptable it is. I’ve tried a few twists over time, and you can easily tailor it to your taste or dietary needs. Feel free to play around—there’s no wrong way!
- Variation: Sometimes I swap peanut butter for Sunbutter to keep it nut-free, and honestly, it’s just as dreamy. If you want a little extra crunch, mix in some finely chopped nuts or seeds into the fudge.
- Sweetener swaps: If you prefer maple syrup, you can adjust the wet ingredients slightly, but coconut sugar really balances the cookie’s texture beautifully.
- Chocolate options: Dark chocolate with 70% cacao works best for that bittersweet edge, but if you want it sweeter, semi-sweet vegan chocolate is also great.
Step-by-Step: How I Make Vegan Gluten-Free Kit Kat Cookies Recipe
Step 1: Whisk Together Dry Ingredients
Start by preheating your oven to 350°F (175°C). Grab a medium mixing bowl and stir together your almond flour, coconut sugar, ground flax, and salt. Make sure the ground flax is fresh if possible—I use a little coffee grinder just for this purpose, and it really amps up the flavor.
Step 2: Mix in the Wet Ingredients and Form Dough
Next, add the melted coconut oil, water, and vanilla extract. I like to start with a spatula to bring everything together, then get in there with clean hands to knead the dough gently until it’s smooth and easy to roll. If it feels too crumbly, a tiny splash more water should help.
Step 3: Roll Out and Cut Your Cookies
Place your dough between two sheets of parchment paper to avoid sticking, then roll it out to about ⅛ inch thick. For that authentic Kit Kat look, cut your rectangles roughly 3.5 by 0.75 inches using a knife or pizza cutter. Don’t toss the scraps—they’ll get re-rolled to make more cookies! Transfer them all carefully (parchment and all) onto your baking sheet, so they keep their shape.
Step 4: Bake and Cool the Cookie Bars
Bake your cookie bars in the preheated oven for 8-10 minutes. The edges should be just set and slightly golden. Remove from the oven and, while still warm, separate the rectangles if they stuck together, then transfer carefully to a wire rack to cool completely. Trust me, cooling fully is key before adding any frosting.
Step 5: Make the Fudge Filling
While the cookies cool, melt the dark chocolate gently—either in a double boiler or microwave in short bursts—and stir in the peanut butter. Let it cool for about 10 minutes so it thickens up to a spreadable fudge consistency, kind of like frosting. This step is crucial because if it’s too runny, it won’t layer well.
Step 6: Assemble Your Kit Kat Layers
Grab three cookie bars per Kit Kat. Spread a generous layer of fudge on one, stack another cookie on top, add a second fudge layer, and finish with the last cookie. That’s your classic triple-layer bar. Place these on a lined baking sheet and pop them in the freezer for 15-20 minutes to set the fudge.
Step 7: Dip in Chocolate Coating
Finally, melt the remaining dark chocolate with coconut oil over low heat, stirring often for a smooth finish. One at a time, dip your frozen Kit Kat bars into the chocolate coating, letting the excess drip off before placing them back on the baking sheet. Drizzle any leftover chocolate for a fancy touch, then freeze again briefly to set everything perfectly.
Pro Tips for Making Vegan Gluten-Free Kit Kat Cookies Recipe
- Freshly Ground Flax: Grinding whole flax seeds right before baking gives you maximum binding power and flavor—don’t skip this step.
- Don’t Overbake the Cookies: These cookies firm up as they cool, so pull them out just as the edges turn golden to avoid a dry texture.
- Freeze for Cleaner Dipping: Freezing the assembled bars before dipping lets the fudge set and prevents melty, messy chocolate coating.
- Choose Quality Chocolate: Using good vegan chocolate makes a huge difference—you really taste the richness in every bite.
How to Serve Vegan Gluten-Free Kit Kat Cookies Recipe

Garnishes
I usually keep it simple with these cookies because their flavors already shine, but if you want to get fancy, a sprinkle of crushed sea salt on top of the chocolate coating before it sets is divine. It adds a little pop that contrasts sweet and enhances the chocolate, making each bite even more addictive.
Side Dishes
Serve these cookies with a cold glass of almond or oat milk for that classic treat vibe. They’re also lovely alongside an afternoon cup of coffee or a tea that has nutty or chocolate undertones. For a party, I like to pair them with vegan vanilla ice cream for a quick, show-stopping dessert.
Creative Ways to Present
For holidays or gift-giving, I stack a few Kit Kat bars and wrap them with twine and a sprig of fresh rosemary for a cozy, homemade touch. You can also dip them halfway in white vegan chocolate for a pretty contrast. Lining a pretty platter with parchment and arranging the cookies in a zigzag pattern always looks impressive at gatherings.
Make Ahead and Storage
Storing Leftovers
I store leftover bars in an airtight container in the fridge, layered with parchment paper so they don’t stick together. They keep well for up to a week, though honestly, they never last that long in my house.
Freezing
Freezing is a lifesaver for prepping ahead. I freeze the uncoated cookie layers and fudge separately, then assemble and coat when ready. Or freeze the finished bars for up to three months. Just thaw in the fridge before dipping or serving.
Reheating
Because these are cookies and fudge, reheating isn’t really necessary. But if you want a slightly softer texture, I pop one in the microwave for 10-15 seconds. Just don’t overdo it or the chocolate coating can melt too much.
FAQs
-
Can I make this Vegan Gluten-Free Kit Kat Cookies Recipe nut-free?
Absolutely! Swap the almond flour for tigernut flour to avoid nuts completely. Also, use Sunbutter or another seed butter instead of peanut butter for the fudge filling. The flavor and texture remain delightful with these substitutions.
-
How do I keep the fudge from being too runny?
After melting the chocolate and mixing in peanut butter, let the fudge cool for about 10 minutes to thicken. It should become spreadable but not liquidy. If it’s still runny, place it in the fridge for a few minutes before using.
-
Can I use regular flour instead of almond flour?
You can, but the texture and crumb will differ. Almond flour gives these cookies their tender, slightly chewy foundation while keeping them gluten-free. Using regular flour removes the gluten-free aspect but might produce a denser cookie. For best results, stick to almond or tigernut flour.
-
Do I have to refrigerate these cookies?
Because of the fudge layers and chocolate coating, refrigeration helps keep them firm and fresh longer. You can store them at room temperature for a short time, but they’re best kept chilled to avoid melting or softening.
Final Thoughts
This Vegan Gluten-Free Kit Kat Cookies Recipe has quickly become one of my favorite homemade treats. It hits that perfect balance of nostalgia and health-conscious tweaks, so you can indulge without guilt. Whether it’s for a cozy afternoon snack or a party pleaser, these cookies always bring smiles. I can’t wait for you to try making them yourself—you’re going to love how much fun and flavor are packed into every bite!
Print
Vegan Gluten-Free Kit Kat Cookies Recipe
- Prep Time: 40 minutes
- Cook Time: 10 minutes
- Total Time: 50 minutes
- Yield: 12 bars
- Category: Dessert
- Method: Baking
- Cuisine: American
- Diet: Gluten Free
Description
This Healthy Kit Kat Recipe is a delicious gluten-free and vegan treat that features homemade almond flour cookies layered with rich peanut butter fudge and coated in dark chocolate. Perfect for a guilt-free indulgence, these bars combine crunchy cookies, creamy filling, and a smooth chocolate coating for a satisfying snack or dessert.
Ingredients
Cookies
- 1 ¼ cup blanched almond flour (or tigernut flour) (115g)
- 3 Tbsp coconut sugar
- 1 Tbsp ground flax
- ⅛ tsp salt
- 3 Tbsp melted coconut oil
- 1 Tbsp water
- 1 tsp vanilla extract
Fudge Filling
- 2 Tbsp dark chocolate
- 3 Tbsp peanut butter (or Sunbutter)
Chocolate Coating
- 1 cup dark chocolate (5oz)
- ½ Tbsp coconut oil
Instructions
- Preheat oven: Preheat your oven to 350 degrees Fahrenheit to prepare for baking the cookie base.
- Mix dry cookie ingredients: In a medium-sized bowl, combine the almond flour, coconut sugar, ground flaxseed, and salt thoroughly.
- Add wet ingredients: Stir in the melted coconut oil, water, and vanilla extract. First, mix with a spatula then knead the dough gently with your hands until fully combined.
- Roll out the dough: Place the dough between two sheets of parchment paper and use a rolling pin to flatten it out to approximately ⅛ inch thick.
- Cut cookies: Use a knife or pizza cutter to slice the dough into rectangular pieces about 3.5 inches by 0.75 inches. Remove excess dough and set aside.
- Bake cookies: Transfer the cookie sheet with parchment and dough pieces to the oven and bake for 10 minutes until set.
- Cool cookies: Take them out of the oven, carefully separate the cookies using a knife or pizza cutter, and allow them to cool on the pan for 5-10 minutes before moving to a wire rack to cool further.
- Prepare fudge filling: Melt the dark chocolate gently, then stir in the peanut butter until smooth. Let the mixture cool for about 10 minutes until it thickens to a frosting-like consistency.
- Assemble Kit Kats: Spread the fudge evenly onto three cookie pieces per Kit Kat, layering two layers of fudge with three cookies. Place the assembled bars on a lined baking sheet and freeze them to set.
- Melt chocolate coating: In a small saucepan over low heat, melt the dark chocolate and coconut oil together, stirring frequently until smooth.
- Dip assembled Kit Kats: Remove bars from the freezer and dip each one individually into the melted chocolate coating, ensuring full coverage.
- Set coated bars: Place the dipped bars back on the lined baking sheet. Drizzle any remaining chocolate over the bars for decoration and allow them to set completely.
Notes
- Use tigernut flour as a nut-free alternative to almond flour.
- Grind your own flaxseed using a coffee grinder for fresher flavor and better texture.
- Ensure the fudge filling has thickened before assembling to prevent slipping during freezing.
- Freeze assembled bars until firm before dipping to make chocolate coating easier and neater.
- Store the finished Kit Kats in an airtight container in the refrigerator or freezer for longer shelf life.
Nutrition
- Serving Size: 1 bar
- Calories: 230 kcal
- Sugar: 8 g
- Sodium: 35 mg
- Fat: 16 g
- Saturated Fat: 7 g
- Unsaturated Fat: 8 g
- Trans Fat: 0 g
- Carbohydrates: 17 g
- Fiber: 3 g
- Protein: 5 g
- Cholesterol: 0 mg


