
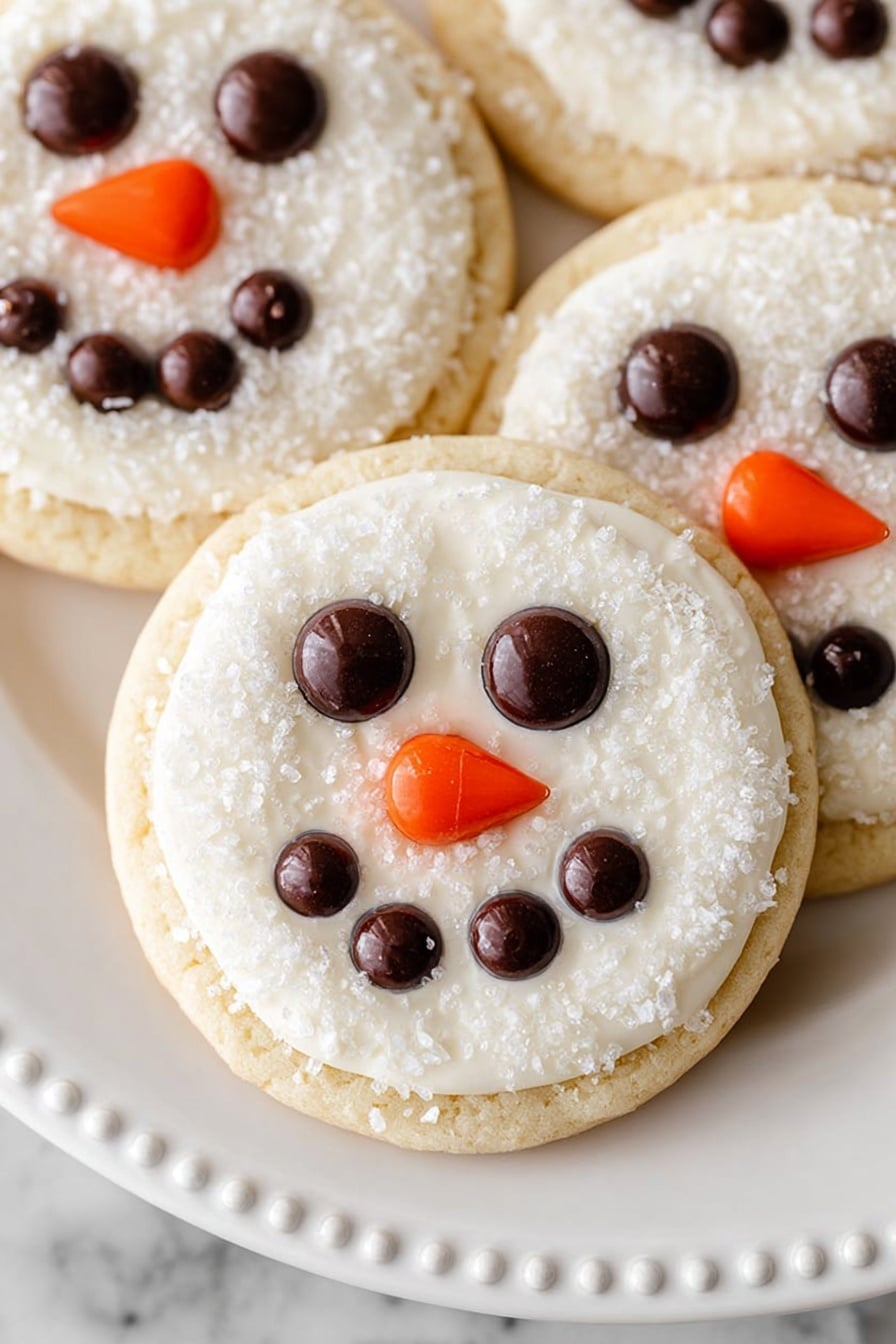
Snowman Face Cookies Recipe
If you’ve been hunting for a fun and festive cookie to brighten up your holiday season, you’re going to love this Snowman Face Cookies Recipe. Trust me, these cookies aren’t just adorable—they taste fantastic, too! Imagine soft, tender cake-like cookies topped with creamy buttercream frosting and decorated with cute little faces that bring a smile to everyone who sees them. Whether you’re baking with kids or just looking for something cheerful to share, this recipe delivers every time. So grab your apron, and let me walk you through making these delightful snowman faces that are just as fun to decorate as they are to eat!
Why This Recipe Works
- Soft Cake Mix Base: Using white cake mix as the cookie base keeps these cookies tender, moist, and easy to shape for decorating.
- Buttery Frosting: The homemade buttercream frosting creates the perfect snowy canvas that holds the decorations in place beautifully.
- Simple, Playful Decorations: Using candies like M&Ms and orange dots makes decorating fun, accessible, and results in charming snowman faces every time.
- Quick and Kid-Friendly: This recipe is straightforward enough for kids to join in, turning your kitchen into a festive playground.

Ingredients & Why They Work
The ingredients list might look simple, but each element plays a vital role in making these snowman face cookies a holiday favorite. The cake mix forms the soft cookie dough, while the butter and powdered sugar create that luscious frosting that sticks just right. Candies add character and texture, turning plain cookies into eye-catching treats. When shopping, pick your favorite white cake mix, and consider high-quality butter and fresh powdered sugar for the best flavor and smooth frosting.
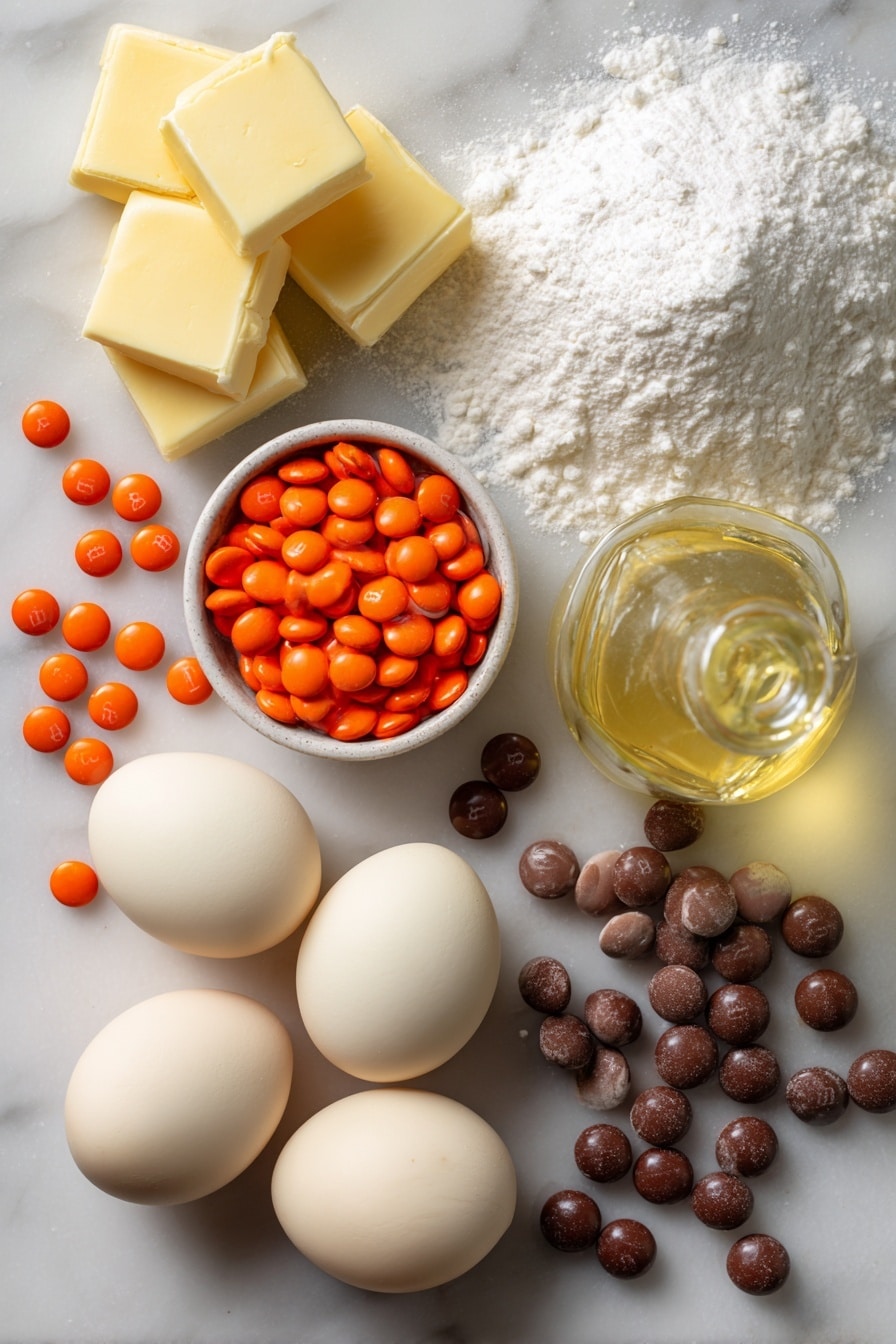
- White cake mix: This is the base for the cookie dough—makes the cookies soft and cake-like instead of crunchy.
- Eggs: Helps bind the dough together and adds moisture.
- Canola oil: Keeps the dough tender; you can swap for vegetable oil if needed.
- Unsalted butter: Softened, it creates creamy buttercream when beaten, giving you smooth frosting.
- Powdered sugar: Sweetens and thickens the frosting; make sure it’s fresh to avoid clumps.
- Vanilla extract: Adds warm, rich flavor to the buttercream.
- Salt: Balances sweetness and enhances flavors in the frosting.
- Milk or cream: Adjusts buttercream consistency for easy spreading.
- White sanding sugar: Sprinkled over frosting for extra sparkle and texture.
- Orange Dot candies: Perfect for the snowman’s carrot noses with their bright pop of color.
- Regular brown M&Ms: Use these for the eyes—they’re just the right size and shade.
- Mini brown M&Ms: Arrange these for the mouth to create a cute smile.
Tweak to Your Taste
I love how flexible this Snowman Face Cookies Recipe is—you can easily make it your own! Over the years, I’ve experimented softly swapping colors and candies to match different party themes or dietary needs. Don’t hesitate to get creative; the base cookie and frosting are a fantastic canvas for any idea you toss in.
- Gluten-Free Variation: I’ve used a gluten-free white cake mix before, and it works just as well, so don’t shy away if you need a gluten-friendly option.
- Vegan Adaptation: Swap eggs for flax eggs and use vegan butter in the frosting to make these vegan-friendly with a similar texture and taste.
- Flavor Boost: Try adding a pinch of cinnamon or nutmeg to the dough for a warm holiday twist I personally found delightful.
- Colorful Faces: Use colored sanding sugar or different candies to create snowmen with scarves and hats if decorating for a bigger party.
Step-by-Step: How I Make Snowman Face Cookies Recipe
Step 1: Preheat and Prepare Your Stations
Start by preheating your oven to 350°F (175°C). Line two baking sheets with parchment paper—this is key for easy cookie removal and less mess. I like to have everything ready ahead of mixing: parchment down, cookie scoop nearby, and space to cool the cookies once baked. This prep stage keeps everything running smoothly.
Step 2: Mix the Cookie Dough
Grab a large bowl and combine the white cake mix, two large eggs, and half a cup of canola oil. I usually mix with a handheld mixer for about a minute until everything is blended into a smooth, sticky dough. It’s important not to overmix here; just until the ingredients are combined to keep the cookies tender.
Step 3: Scoop and Bake
Using a medium cookie scoop (about 1.5 tablespoons), drop balls of dough onto your prepared sheets about two inches apart. Leave space because they spread slightly but stay mostly thick. Bake them for 9 to 11 minutes, keeping an eye on the edges—they should look set and just starting to get golden but the centers still soft. Once out of the oven, let them rest on the sheets for a few minutes before transferring to a wire rack to cool completely. This step prevents breakage when frosting.
Step 4: Whip the Buttercream
While the cookies cool down, it’s frosting time! In a large bowl, beat ½ cup softened unsalted butter until creamy. Then gradually add 2 cups powdered sugar, 1 teaspoon vanilla extract, and ¼ teaspoon salt. Start with 1 tablespoon milk or cream and add more if needed to get a smooth, spreadable consistency—not too runny or stiff. I sometimes switch to a small offset spatula here to efficiently spread the frosting.
Step 5: Frost and Decorate Your Snowmen
Spread a generous layer of buttercream on each cooled cookie, then immediately sprinkle some white sanding sugar on top to give that frosty sparkle effect. Now for the fun part: add an orange Dot candy in the center for the nose, two regular brown M&Ms for eyes, and curve mini brown M&Ms into a smile. As you decorate, keep the frosting soft so the candies stick well. Let the frosting set for at least 30 minutes before serving.
Pro Tips for Making Snowman Face Cookies Recipe
- Don’t Skip Cooling: Frosting warm cookies can melt the buttercream and ruin your decorations. Patience pays off!
- Use an Offset Spatula: It helps spread frosting evenly and quickly without tearing delicate cookies.
- Plan Your Candy Placement: Lay out candies before frosting so you can decorate efficiently without the frosting drying out.
- Sanding Sugar for Sparkle: Sprinkling sanding sugar immediately after frosting keeps the sugar sticking and looks like fresh snow.
How to Serve Snowman Face Cookies Recipe
Garnishes
I usually keep the garnishes simple and sweet to highlight the cute snowman faces—just sanding sugar, orange Dot candies, and M&Ms. But on occasion, I’ve added tiny edible glitter or small sprinkles to give a festive shimmer. Fresh mint leaves or a small candy cane next to the cookies on a plate makes a pretty holiday touch if you want to glam things up while keeping it edible.
Side Dishes
These cookies go wonderfully with a warm cup of black coffee or a glass of cold milk. For holiday gatherings, I like to pair them with hot chocolate bar fixings—think whipped cream, marshmallows, and peppermint sticks. They also work nicely alongside spiced nuts or a cheese platter if you’re serving a sweet and savory spread.
Creative Ways to Present
For parties, I’ve arranged these snowman face cookies on wooden trays layered with holiday-themed napkins and fresh pine sprigs—it’s a real crowd-pleaser! Wrapping individual cookies in clear cellophane tied with colorful ribbon makes adorable edible gifts too. My favorite presentation is stacking a few in a tall glass jar decorated with string lights for an instant festive centerpiece.
Make Ahead and Storage
Storing Leftovers
Once decorated, store your snowman face cookies in an airtight container at room temperature. I’ve found they stay fresh and soft for about 3-4 days, but honestly, they rarely last that long in my house! Keeping candies intact is easiest at room temp rather than the fridge, which sometimes melts the frosting.
Freezing
The cookie dough freezes beautifully! I like to scoop dough balls onto a baking sheet, freeze them until solid, then transfer to an airtight container or freezer bag. They last up to 3 months this way. When you’re ready for fresh cookies, bake straight from frozen, adding a couple more minutes to the baking time. Just decorate after they cool.
Reheating
For best results, I don’t reheat decorated cookies since the frosting can soften or run. But if you have plain baked cookies leftover, reheating for 10-15 seconds in the microwave refreshes their softness nicely. Then just cool before adding frosting and decorations.
FAQs
-
Can I use homemade cake mix instead of store-bought for this Snowman Face Cookies Recipe?
Absolutely! If you prefer homemade cake mix, just make sure it’s a white or vanilla flavor and includes the typical dry ingredients (flour, sugar, leavening). The key is to keep the dough soft and tender, so avoid heavy mixes that might produce denser cookies.
-
How do I prevent the frosting from melting while decorating?
Make sure your cookies are completely cool before frosting. I like to let them cool on a wire rack and give them about 20 minutes after baking. Also, work in a cool room and frost quickly to keep the buttercream firm enough to hold the candy decorations.
-
Can I substitute different candies for the snowman’s face?
Definitely! Feel free to use raisins, chocolate chips, or even mini candies you have on hand. Just pick items that stick well on frosting and are the right size for eyes, noses, and mouths.
-
Is this recipe kid-friendly for baking and decorating?
Yes! This Snowman Face Cookies Recipe is super kid-friendly. The dough is easy to scoop, and decorating with candies is a fun hands-on activity. Just supervise kids around the oven, and have fun together.
Final Thoughts
Honestly, this Snowman Face Cookies Recipe has become one of my go-to festive treats because it brings joy in every step—from mixing dough to that final pop of candy decorations. I love how these cookies light up a room and bring out everyone’s inner child. If you’re looking for an easy, crowd-pleasing holiday cookie that’s as fun to make as it is to eat, you’ve found your winner. So please, give this recipe a try—you’ll impress your guests and create some treasured holiday memories, one adorable snowman face at a time!
Print
Snowman Face Cookies Recipe
- Prep Time: 20 minutes
- Cook Time: 11 minutes
- Total Time: 31 minutes
- Yield: 18 cookies
- Category: Dessert
- Method: Baking
- Cuisine: American
- Diet: Vegetarian
Description
These charming Snowman Face Cookies are delightful treats perfect for winter celebrations. Made from a simple white cake mix dough, they are soft and moist, topped with creamy vanilla buttercream and decorated with colorful candies to create festive snowman faces.
Ingredients
Cookies
- 1 (15.25 ounce) box white cake mix
- 2 large eggs
- 1/2 cup canola oil
Buttercream
- 1/2 cup unsalted butter, softened
- 2 cups powdered sugar
- 1 teaspoon vanilla extract
- 1/4 teaspoon salt
- 1-2 tablespoons milk or cream
Decoration
- 1/2 cup white sanding sugar
- 18 orange Dot candies for noses
- 36 regular brown M&Ms for eyes
- 90 mini brown M&Ms for mouths
Instructions
- Preheat Oven: Preheat the oven to 350 degrees F and line two baking sheets with parchment paper to prevent sticking and ensure even baking.
- Make Dough: In a large bowl, combine the white cake mix, eggs, and canola oil until a dough forms, ensuring all ingredients are mixed thoroughly but not overworked.
- Portion Cookies: Use a medium cookie scoop to drop portions of dough onto the prepared baking sheets, spacing each cookie about 2 inches apart to allow for spreading.
- Bake Cookies: Bake the cookies for 11 minutes until the edges are set and lightly golden. Remove from the oven and allow to cool for a few minutes on the baking sheet before transferring to a wire rack to cool completely.
- Prepare Buttercream: In a large bowl, beat the softened butter with an electric mixer until smooth and creamy. Gradually add powdered sugar, vanilla extract, salt, and 1 tablespoon of milk or cream, mixing until the frosting is smooth. Add additional milk if the consistency is too thick to spread.
- Frost Cookies: Spread a layer of buttercream on each cooled cookie using a knife or small offset spatula, covering the surface evenly.
- Add Sprinkles: Sprinkle white sanding sugar over the frosted cookies immediately to add sparkle and texture.
- Decorate Faces: Place an orange Dot candy in the center of each cookie for the nose, two regular brown M&Ms for the eyes, and arrange mini brown M&Ms in a curved line to form the mouth, mimicking a snowman face.
- Set and Serve: Allow the frosting to set at room temperature before serving your festive snowman cookies.
Notes
- Store the decorated cookies in an airtight container at room temperature for 3-4 days to maintain freshness.
- Undecorated cookies can be frozen for up to 3 months in an airtight container or freezer bag; thaw completely at room temperature before frosting and decorating.
- Use parchment paper or silicone baking mats to prevent cookies from sticking and to ease cleanup.
- Adjust the amount of milk or cream in the buttercream to achieve desired spreading consistency.
- For a firmer decoration, chill cookies briefly after frosting before adding candies.
Nutrition
- Serving Size: 1 cookie
- Calories: 180 kcal
- Sugar: 15 g
- Sodium: 120 mg
- Fat: 9 g
- Saturated Fat: 3.5 g
- Unsaturated Fat: 5 g
- Trans Fat: 0 g
- Carbohydrates: 22 g
- Fiber: 0.5 g
- Protein: 1 g
- Cholesterol: 25 mg


