
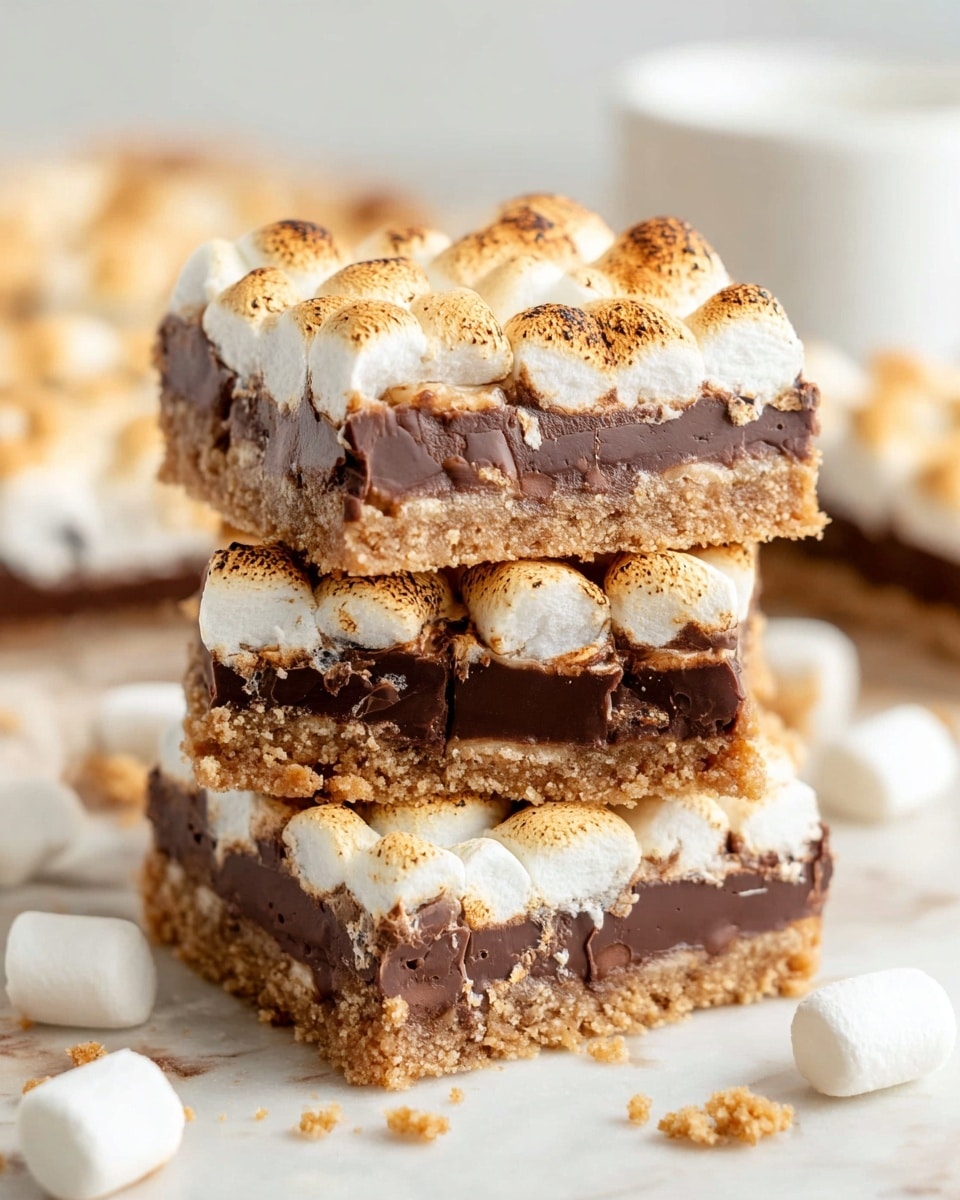
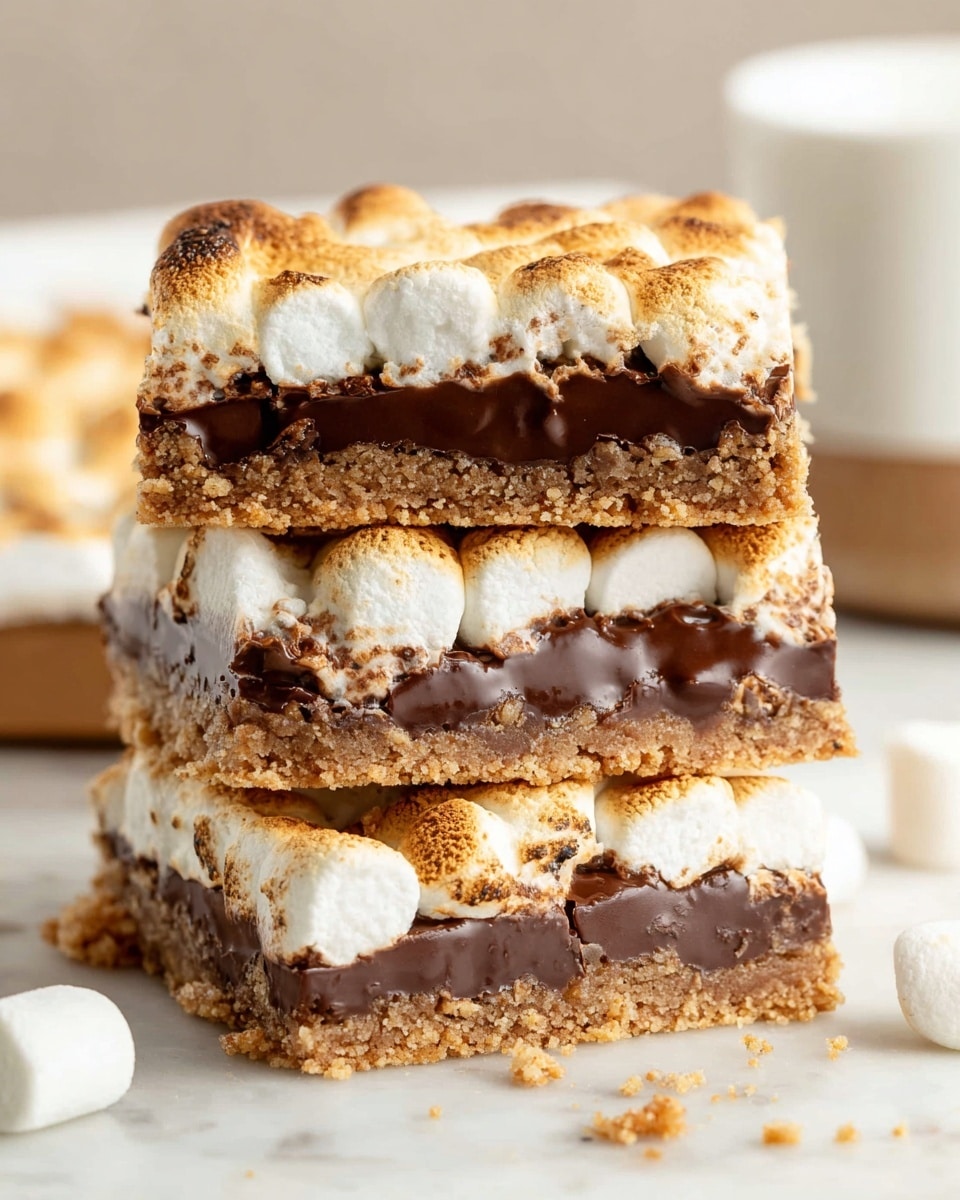
S’mores Bars Recipe
I’m so excited to share this S’mores Bars Recipe with you—because honestly, it’s one of those treats that brings back all the good memories of summer nights around the campfire but in an easy, mess-free bar form. If you love the classic combo of graham crackers, melty chocolate, and gooey marshmallows, you’re going to adore these bars. They’re perfect for parties, potlucks, or just when you want a nostalgic treat without the smoke or bugs!
What makes this S’mores Bars Recipe stand out is how simple it is, yet it delivers all the magic of traditional s’mores without any fuss. Whether you’re making them for a quick dessert or a crowd-pleaser, these bars hold together beautifully and cut cleanly if you chill them first. Trust me, once you try them, you’ll have a new favorite go-to dessert that’s both reliable and irresistibly delicious.
Why This Recipe Works
- Classic Flavors Made Simple: This recipe captures the nostalgia of s’mores with minimal ingredients and fuss.
- Easy-to-Handle Bars: Chilling the bars after baking ensures clean cuts and less mess compared to traditional s’mores.
- Quick Bake Time: The entire process takes under 30 minutes, making it a fast fix for sweet cravings.
- Customizable Layers: You can easily swap chocolates or marshmallows to fit your taste or dietary needs.

Ingredients & Why They Work
The ingredients in this S’mores Bars Recipe come together to give you that perfect balance of crunchy, melty, and gooey, making every bite a nostalgic delight. Here’s why each one plays a key role and a few tips for picking the best.

- Graham cracker crumbs: They form the crunchy, buttery base—look for fresh, finely crushed crumbs to avoid a gritty texture.
- Butter: Melted butter binds the crumbs to make a sturdy crust; make sure it’s fully melted but not hot when mixing to avoid clumping.
- Powdered sugar: Adds just the right touch of sweetness and helps with crust texture, making it tender but firm.
- Hershey Chocolate Bars: Classic milk chocolate bars melt evenly; using an exact size helps to cover the crust evenly.
- Mini marshmallows: These create that iconic gooey top layer that toasts beautifully under the broiler—don’t substitute with large marshmallows here as texture and even browning change.
Tweak to Your Taste
I love how flexible this S’mores Bars Recipe is—feel free to add your twist! Sometimes I sneak in a pinch of cinnamon in the crust or swap out milk chocolate for dark or even peanut butter cups for a nutty twist.
- Variation: One time, I layered chopped nuts between the chocolate and marshmallows, and it gave the bars an amazing crunch and depth.
- Dietary tweaks: Using dairy-free chocolate and vegan marshmallows works wonders for a plant-based version that still satisfies sweet tooths.
- Seasonal change: Around fall, I like sprinkling a pinch of pumpkin spice over the marshmallows just before broiling for an autumnal flair.
Step-by-Step: How I Make S’mores Bars Recipe
Step 1: Prep the Crust with Care
Start by preheating your oven to 350°F and greasing a 9×13-inch pan with non-stick spray. Mix your graham cracker crumbs, powdered sugar, and melted butter well—make sure the butter isn’t too hot or the sugar might clump. Spread this mixture evenly in your pan, then press down firmly with your fingers to pack it tightly along the bottom and sides. This step is key for a firm crust that holds the toppings—don’t rush it! Bake for 5 to 8 minutes until the edges just start to golden; you’ll notice it hardens beautifully once cooled.
Step 2: Melt the Chocolate Layer
Once your crust has cooled a bit, line the top with your Hershey bars, covering the entire surface. Pop it back in the oven for about 3 minutes until the chocolate gets glossy and starts melting—this is the moment when the magic begins. Keep an eye on it to avoid over-melting or seizing. Let cool for a minute or two before moving on.
Step 3: Toast the Marshmallows to Perfection
Now it’s time for the mini marshmallows—pack them closely together on top of the melted chocolate. Switch your oven to broil and slide the pan in, but here’s where you’ve gotta be vigilant! Marshmallows only take about 2 minutes to toast and can quickly go from golden to burned. Stare at them, and as soon as they become beautifully browned, pull them out. Let the whole pan cool completely; I prefer popping mine in the fridge afterward to firm up the bars for easy slicing.
Step 4: Slice and Serve with Ease
Cutting these bars can get sticky because of the marshmallow top, so here’s a trick: heat your knife under hot water, dry it immediately, then slice. Repeat if the knife starts sticking mid-cut. You’ll get clean, Instagram-worthy squares ready for sharing—although I won’t blame you if you keep most for yourself!
Pro Tips for Making S’mores Bars Recipe
- Even Crust Packing: Use your fingers to firmly press the crust mixture so the base won’t crumble after baking.
- Marshmallow Watch: Broil time varies, so stand by the oven; marshmallows can burn in seconds.
- Chill Before Cutting: Refrigerating the bars makes slicing clean and less sticky—worth the extra wait.
- Knife Trick: Dipping your knife in hot water between cuts prevents gooey marshmallow from sticking and tearing your bars.
How to Serve S’mores Bars Recipe
Garnishes
I like to keep it classic by sprinkling a few extra mini marshmallows or tiny chocolate chips on top for presentation, maybe even a light dusting of powdered sugar for that sweet finishing touch. For a grown-up twist, a sprinkle of sea salt or chili powder can add unexpected flavor magic.
Side Dishes
These bars pair wonderfully with fresh fruit like strawberries or a scoop of vanilla ice cream to balance the sweetness. For a fun gathering, put out some milk or hot chocolate alongside—the nostalgic vibes can’t be beat.
Creative Ways to Present
For parties, I sometimes cut the bars into bite-sized squares and arrange them on a wooden board with little skewers, turning them into easy finger food. Another fun idea is layering a few bars in mini mason jars for a cute, portable dessert option that guests love.
Make Ahead and Storage
Storing Leftovers
I usually store leftover S’mores Bars in an airtight container in the fridge. This keeps them fresh and maintains that toasty marshmallow texture without turning sticky or dry. They stay great for about 3-4 days this way.
Freezing
Freezing works well if you want to save a batch for later. Wrap the bars tightly in plastic wrap and then foil before placing them in the freezer. When you’re ready to eat, thaw them in the fridge overnight and enjoy almost like fresh.
Reheating
If you prefer warm S’mores Bars, pop one in the microwave for about 10-15 seconds or heat briefly in the oven at low temp. Just avoid overheating or the marshmallows can get tough.
FAQs
-
Can I use different types of chocolate for the S’mores Bars Recipe?
Absolutely! While Hershey bars provide that classic milk chocolate flavor, you can swap in dark chocolate, white chocolate, or even chocolate chips. Just remember the melting time might vary slightly, so keep an eye on the oven.
-
How do I prevent the marshmallows from burning during broiling?
Broiling marshmallows is a quick process, so you’ll want to watch them closely—literally stare at them! Keep your oven rack a bit lower if possible and pull the pan out as soon as they turn golden brown to avoid burning.
-
Can I make these bars ahead of time?
Yes! You can make them a day in advance and store them in the fridge. Chilling actually helps them set perfectly and makes slicing easier right before serving.
-
What’s the best way to cut these sticky bars?
Warm your knife under hot water, dry it off quickly, and slice through. Repeat as you cut to keep your knife from sticking to the gooey marshmallows.
Final Thoughts
This S’mores Bars Recipe holds a special place in my kitchen because it’s the perfect combo of nostalgia and ease, delivering that campfire dessert magic without the hassle. I hope when you make these bars, they bring you as much joy and sweet satisfaction as they did for me and my family. Give it a try and let me know how yours turn out—I’m betting they’ll become a new favorite fast!
Print
S’mores Bars Recipe
- Prep Time: 10 minutes
- Cook Time: 15 minutes
- Total Time: 25 minutes
- Yield: 16 servings
- Category: Dessert
- Method: Baking
- Cuisine: American
Description
Deliciously gooey and chocolaty S’mores Bars combining a crispy graham cracker crust, melted Hershey chocolate, and toasted mini marshmallows. Perfect for an easy-to-make treat that brings classic campfire flavor to your oven.
Ingredients
Crust
- 2 cups graham cracker crumbs
- 8 tablespoons butter, melted
- 1/2 cup powdered sugar
Topping
- 4 Hershey chocolate bars (4.4 ounce each)
- 1 package mini marshmallows
Instructions
- Preheat Oven: Preheat your oven to 350 degrees Fahrenheit and grease a 9×13 inch baking pan with non-stick butter spray to prevent sticking.
- Make Crust Mixture: In a medium bowl, combine graham cracker crumbs, powdered sugar, and melted butter. Stir well until the mixture is evenly moistened and resembles wet sand.
- Press Crust: Pour the mixture into the prepared pan, spreading it evenly. Use your fingers to firmly press the crust into the bottom and up the sides to form a packed, solid base.
- Bake Crust: Bake the crust in the preheated oven for 8 minutes or until the edges start to turn golden brown. Remove and let cool completely. The crust will harden as it cools.
- Add Chocolate Layer: Break the Hershey bars into pieces and lay them evenly over the cooled crust, covering it fully as best as possible.
- Melt Chocolate: Place the pan back in the oven for about 3 minutes until the chocolate just starts to melt and becomes glossy. Remove from the oven and allow to cool for 1-2 minutes.
- Add Marshmallows: Evenly pack mini marshmallows tightly together on top of the melted chocolate layer.
- Broil Marshmallows: Turn oven setting to broil. Place the pan in the oven and watch closely. Marshmallows will brown and toast within approximately 2 minutes — remove as soon as they start to brown to avoid burning.
- Cool and Set: Let the bars cool completely, then refrigerate to set further, which will help with cutting cleanly.
- Cut and Serve: Use a sharp knife warmed under hot water, dried immediately, and slice the bars. Repeat warming the knife if it gets sticky to ensure neat cuts. Serve and enjoy!
Notes
- The crust hardens as it cools after baking, so be sure to press it firmly before baking for best results.
- Watch marshmallows carefully under the broiler; they toast quickly and can burn or catch fire if left unattended.
- Refrigerating the bars before cutting helps to firm up the chocolate and marshmallow layers, making slicing easier.
- To cut without sticking, warm a sharp knife in hot water, dry it quickly, and slice immediately, repeating as necessary.
- Use full-size Hershey bars for the authentic flavor and texture of classic s’mores.
Nutrition
- Serving Size: 1 bar
- Calories: 220 kcal
- Sugar: 18 g
- Sodium: 110 mg
- Fat: 12 g
- Saturated Fat: 7 g
- Unsaturated Fat: 4 g
- Trans Fat: 0 g
- Carbohydrates: 27 g
- Fiber: 1 g
- Protein: 2 g
- Cholesterol: 20 mg

