

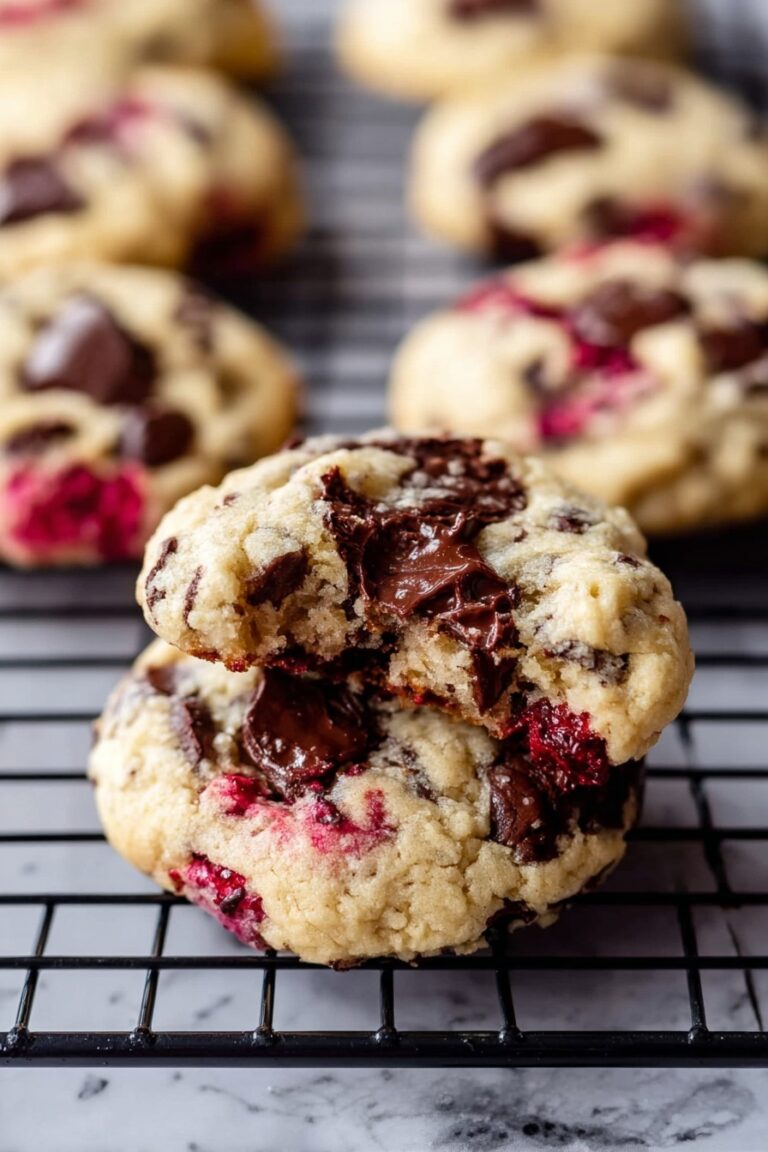
Raspberry Cookies with Frozen Fruit Recipe
If you’re on the hunt for a delightful twist on classic cookies, I’ve got a treat for you: my Raspberry Cookies with Frozen Fruit Recipe. These cookies are insanely soft, bursting with real raspberry flavor, and use frozen raspberries to make this scrumptious treat easy to whip up anytime — no fresh fruit needed! Trust me, once you try these, you’ll want to keep a batch handy for whenever those sweet cravings hit.
Why This Recipe Works
- Frozen Fruit Convenience: Using frozen raspberries means you can enjoy these cookies year-round without worrying about fruit going bad.
- Raspberry Syrup Magic: Slow-cooked raspberry syrup delivers intense natural flavor and gorgeous color, making the cookies truly vibrant.
- Gluten-Free Friendly: This recipe uses a multipurpose gluten free flour blend, perfect if you need to avoid gluten but don’t want to compromise on texture.
- Freezing the Dough: Freezing the dough before baking stops the cookies from spreading and helps them keep a thick, soft center.

Ingredients & Why They Work
Every ingredient in this Raspberry Cookies with Frozen Fruit Recipe plays a special role — from the natural sweetness of frozen raspberries to the structure-giving gluten free flours. I’ve learned through trial and error which combo works best and I’ll share tips so you buy exactly what you need.

- Frozen Raspberries: Use frozen to get bright flavor without the worry of fresh fruit spoilage or season limits.
- Granulated Sugar: The perfect balance to sweeten the raspberries and dough without overpowering natural tartness.
- Multipurpose Gluten Free Flour: Make sure your blend has xanthan gum for elasticity; it’s key for soft but sturdy cookies.
- Cornstarch: Adds a tender crumb and works well with gluten free flours to prevent any graininess.
- Baking Powder: This gives the cookies that lovely lift and crumb texture.
- Butter or Vegan Baking Stick: Butter adds richness while vegan sticks work well if you prefer dairy free options.
- Milk: I use regular milk, but any non-dairy milk will keep these cookies moist and blend flavors beautifully.
- Red Food Coloring: Just a drop makes the dough a lovely pink hue and highlights those raspberry bits, but it’s optional! Gel or paste coloring can be used in smaller amounts.
Tweak to Your Taste
One of my favorite parts about this Raspberry Cookies with Frozen Fruit Recipe is how easy it is to personalize. Whether you like a bolder tartness, want to cut down on sugar, or want to make these vegan, I’ll share some tasty variations so you can make them your own.
- More Tartness: I sometimes add a teaspoon of lemon zest to punch up the raspberry flavor — it’s like a little burst of sunshine in a cookie.
- Smaller Cookies: Use a smaller scoop and reduce baking time by a few minutes for perfect bite-sized treats (great for lunchboxes!).
- Vegan Version: Swap in a vegan butter baking stick and plant-based milk for a lovely dairy-free result without sacrificing texture.
- Color-Free: If you’re not a fan of artificial colors, the red food coloring is optional — the syrup and raspberries offer enough natural color on their own.
Step-by-Step: How I Make Raspberry Cookies with Frozen Fruit Recipe
Step 1: Crafting the Raspberry Syrup
Start by cooking 1 cup of frozen raspberries with ¼ cup of granulated sugar over medium heat. Stir constantly so it doesn’t stick or burn, until the raspberries break down and you get a syrupy mixture (about 10 minutes). It’ll be a bit chunky — that’s perfect! Pour it through a fine mesh strainer into a bowl to catch seeds and pulp, leaving you with about 2 to 3 tablespoons of luscious raspberry syrup to flavor your dough.
Step 2: Prepping Your Frozen Raspberries
While the syrup cools, take ½ cup of frozen raspberries and chop them gently into tiny pieces. Don’t overdo it — you want little pops of raspberry, not a puddle of juice. Toss them back in the freezer while you mix the dough, so they stay nice and firm.
Step 3: Mixing Your Dry and Wet Ingredients
Whisk together your gluten free flour, baking powder, cornstarch, and salt in a big bowl. In another small bowl, dissolve 2 tablespoons of cornstarch in 3 tablespoons of water until it looks thin — it’ll start thick but keep stirring; watery is what you want here. Now, cream your butter with 1 ¼ cups sugar until soft and fluffy (about 2-3 minutes using an electric mixer). Slowly add the cornstarch mixture, milk, and your beautiful raspberry syrup into the wet ingredients until combined. Gradually mix in your dry ingredients, just until folded together — avoid overmixing for tender cookies.
Step 4: Add Color and Fold in Frozen Raspberries
Add 3-4 drops of red food coloring if you’d like, and gently fold in your frozen chopped raspberries with a spatula. The dough will swirl into this gorgeous marbled pink. Be gentle here — too much stirring turns the dough slimy, and nobody wants that!
Step 5: The Essential Freeze
This step is a game-changer. Cover your dough with plastic wrap and pop it into the freezer for at least one hour. Don’t skip this! Freezing the dough stops the cookies from spreading too much while baking, so you get thick, luscious centers every time. It’s not just a suggestion — it’s a must.
Step 6: Scooping and Baking
Preheat your oven to 325°F. Use a large cookie scoop or ice cream scoop (2-ounce size) to make 12 large dough balls. Roll each in the reserved 2 tablespoons of sugar for a lovely sugary crust. Place dough balls on a parchment-lined baking sheet, spaced 3-4 inches apart. Bake for 15 minutes. If you only have one baking sheet, bake in batches and keep the extra dough balls frozen until ready.
Step 7: Final Shaping and Cooling
Right out of the oven, your cookies might look a bit rustic — no worries! Use a spatula to gently push them into a nice circle shape while still warm. Let them cool for about 5 minutes on the baking sheet before transferring to a wire rack. This little trick keeps them from crumbling apart, which I learned the hard way during my first batch!
Pro Tips for Making Raspberry Cookies with Frozen Fruit Recipe
- Keep the Dough Cold: Always keep your dough frozen or chilled between baking batches to prevent spreading and maintain the texture.
- Gentle Folding: Fold in the frozen raspberries carefully to avoid releasing too much juice and turning your dough slimy.
- Roll in Sugar: Rolling dough balls in sugar before baking gives the cookies a lovely sparkle and slight crunch on the outside.
- Reshape When Warm: Push the cookies into shape right after baking to prevent breakout and crumbling — patience pays off here!
How to Serve Raspberry Cookies with Frozen Fruit Recipe

Garnishes
I love sprinkling just a tiny pinch of powdered sugar over these warm raspberry cookies. Sometimes I also toss a few fresh raspberries on the plate for a natural garnish — it looks so inviting and adds a fresh fruit note alongside the tender cookie.
Side Dishes
These cookies pair beautifully with a hot cup of tea, milky coffee, or even a chilled glass of almond milk for a comforting snack. For dessert, serve alongside a scoop of vanilla ice cream or dollop of whipped cream to balance the tangy sweetness.
Creative Ways to Present
For birthday parties or gatherings, I’ve served these raspberry cookies stacked on a pretty plate with fresh mint leaves tucked between layers. Another fun idea is to drizzle melted white chocolate over the top for an elegant touch. They also make sweet edible gifts when wrapped in parchment with a ribbon!
Make Ahead and Storage
Storing Leftovers
I store leftover cookies in an airtight container inside the fridge, which keeps them fresh and soft for up to 3 days. I usually place parchment paper between layers to avoid sticking, especially if they’re still a little warm when stored.
Freezing
The dough freezes wonderfully! I wrap individual dough balls tightly in plastic wrap, then put them all in a zip-top bag. This way, you can bake fresh cookies anytime by just popping the dough balls right from the freezer onto the sheet — no thawing needed, which is a lifesaver on busy days.
Reheating
Reheat any leftover cookies in a low oven (about 300°F) for 5-7 minutes to revive their softness and warm that raspberry syrup goodness. Avoid microwaving if you want to keep them from turning gummy — the oven does a better job at preserving texture.
FAQs
-
Can I use fresh raspberries instead of frozen for this recipe?
You can, but frozen raspberries work best because they hold up during mixing and freezing, plus give a more concentrated flavor in the syrup. Fresh raspberries are softer and may release too much juice, making the dough too wet. If you do use fresh, try chilling the fruit before mixing and reduce any extra liquid in the recipe.
-
Is this recipe suitable for gluten intolerance?
Absolutely! I use a gluten free multipurpose flour blend with xanthan gum for structure. This way, people avoiding gluten still enjoy tender, well-textured cookies without any baking compromises.
-
Why is freezing the dough so important?
Freezing the dough ensures that the cookies hold their shape without spreading, which yields thick, soft-centered cookies instead of flat, crispy ones. It also lets the flavors meld beautifully. Don’t skip this step!
-
Can I make these cookies vegan?
Yes, simply swap in vegan butter or baking sticks, a plant-based milk (like almond or oat), and vegan-friendly sugar and food coloring. The texture and flavor stay just as delightful.
Final Thoughts
This Raspberry Cookies with Frozen Fruit Recipe quickly became one of my all-time favorites because it’s flavorful, versatile, and forgiving. The way frozen raspberries bring bright bursts of flavor into soft, sweet cookies always impresses family and guests. I really hope you give it a shot — it’s like baking a little pocket of raspberry joy you can keep in your freezer and enjoy whenever.
Print
Raspberry Cookies with Frozen Fruit Recipe
- Prep Time: 30 minutes
- Cook Time: 15 minutes
- Total Time: 1 hour 45 minutes
- Yield: 12 large cookies
- Category: Dessert
- Method: Baking
- Cuisine: American
- Diet: Gluten Free
Description
Delight in these gluten-free raspberry cookies featuring a sweet homemade raspberry syrup and a tender, marbled pink dough studded with frozen raspberries. Perfectly soft with a burst of fruity flavor in every bite, these cookies are a beautiful treat for any occasion.
Ingredients
For the Raspberry Syrup
- 1 cup frozen raspberries
- ¼ cup granulated sugar
For the Cookies
- 2 cups multipurpose gluten free flour (with xanthan gum included)
- 1.5 tablespoons cornstarch
- 1.5 teaspoons baking powder
- ½ teaspoon kosher salt
- ½ cup unsalted butter or vegan baking stick, room temperature
- 1 ¼ cups granulated sugar
- 2 tablespoons granulated sugar (for rolling)
- 2 rounded tablespoons cornstarch mixed with 3 tablespoons water
- 3 tablespoons milk
- 3 tablespoons raspberry syrup (prepared from above)
- 3 drops red food coloring
- ½ cup frozen raspberries, chopped into tiny pieces
Instructions
- Make Raspberry Syrup: In a medium saucepan over medium heat, combine ¼ cup granulated sugar and 1 cup frozen raspberries. Stir constantly for about 10 minutes until the berries break down and the mixture becomes syrupy but slightly chunky. Remove from heat.
- Strain Syrup: Pour the raspberry mixture through a mesh colander into a bowl, pressing gently to extract about 2-3 tablespoons of syrup. Set aside and allow to cool.
- Prep Frozen Raspberries: Roughly chop ½ cup frozen raspberries into small pieces without turning them into pulp. Return them to the freezer until ready to use.
- Mix Dry Ingredients: In a large bowl, whisk together 2 cups gluten free flour, 1.5 teaspoons baking powder, 1.5 tablespoons cornstarch, and ½ teaspoon kosher salt. Set aside.
- Prepare Cornstarch Mixture: In a small bowl, mix 2 rounded tablespoons cornstarch with 3 tablespoons water until thin and watery, initially thick and tacky.
- Cream Butter and Sugar: Using an electric mixer fitted with a paddle attachment, beat ½ cup unsalted butter and 1 ¼ cups sugar until soft and creamy, about 2-3 minutes.
- Add Wet Ingredients: Gradually beat the cornstarch water mixture, 3 tablespoons milk, and the cooled raspberry syrup into the creamed butter and sugar until pink and chunky.
- Incorporate Dry Ingredients: Slowly add the gluten free flour mixture a little at a time, mixing until just combined.
- Add Food Coloring: Mix in 3 drops of red food coloring evenly throughout the dough for a marbled pink color.
- Fold in Frozen Raspberries: Gently fold the chopped frozen raspberries into the dough using a spatula, taking care not to overmix to prevent sliminess.
- Freeze Dough: Cover the bowl with plastic wrap and freeze the dough for at least 1 hour. This step is crucial to prevent excessive spreading during baking.
- Preheat Oven and Prepare Baking Sheet: Heat oven to 325 degrees Fahrenheit and line a baking sheet with parchment paper.
- Scoop and Roll Dough Balls: Use a 2-ounce cookie scoop or ice cream scoop to portion dough into 12 large balls. Roll each ball in the reserved 2 tablespoons of granulated sugar to coat.
- Bake Cookies: Place the dough balls 3-4 inches apart on the prepared baking sheet. Bake at 325 degrees Fahrenheit for 15 minutes.
- Reshape and Cool: Immediately after baking, use a spatula to gently reshape each cookie into a circle. Let cool on the baking sheet for 5 minutes before transferring to a wire rack to cool completely.
- Store Extra Dough: Keep any extra dough balls frozen while baking the rest to maintain dough consistency.
Notes
- For smaller cookies, use a small scoop and bake at the same temperature for 13 minutes. Keep the dough frozen between batches.
- To make vegan, use dairy-free gluten free flour, vegan sugar, vegan baking sticks, non-dairy milk, and vegan red food coloring.
- All-purpose flour substitution: Use 2 packed cups (336 grams) of regular flour but still chill the dough before baking.
- Store baked cookies in an airtight container in the fridge for up to 3 days.
- Freeze dough balls wrapped in plastic wrap inside a zip-top bag for up to 30 days.
Nutrition
- Serving Size: 1 cookie
- Calories: 180 kcal
- Sugar: 15 g
- Sodium: 90 mg
- Fat: 8 g
- Saturated Fat: 5 g
- Unsaturated Fat: 3 g
- Trans Fat: 0 g
- Carbohydrates: 25 g
- Fiber: 2 g
- Protein: 2 g
- Cholesterol: 20 mg

