Pumpkin Patch Brownie Bites Recipe
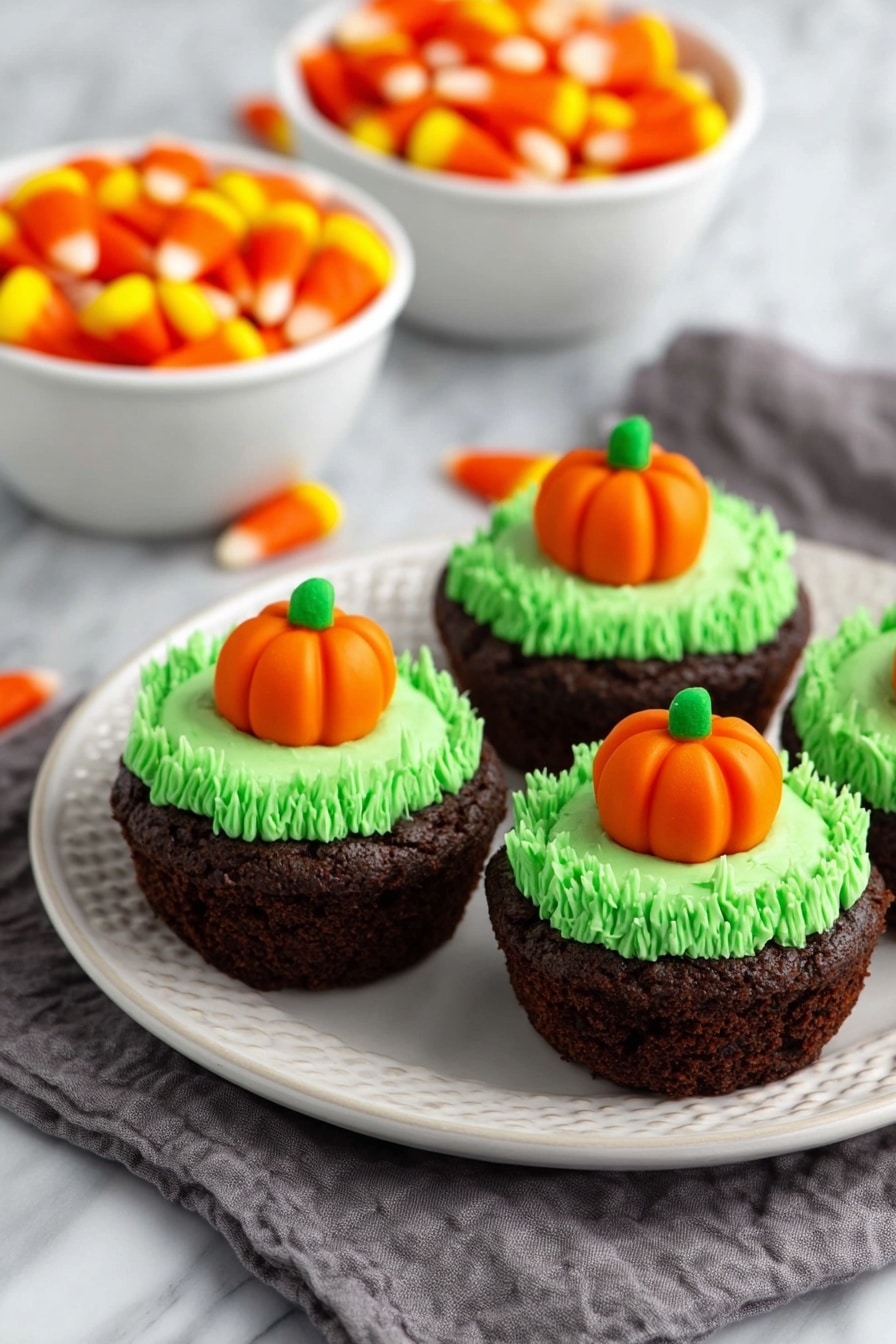
If you’re looking for a quick and irresistibly cute fall treat, you’re going to love this Pumpkin Patch Brownie Bites Recipe. These little bites combine fudgy brownies, creamy green “grass” frosting, and the cutest candy pumpkins perched on top — making them as fun to look at as they are to eat. I’ve made these a handful of times for friends and family, and trust me, they disappear faster than you can say “pumpkin spice!” Stick with me — I’ll walk you through all the tips and tricks to get these perfect every time.
Why This Recipe Works
- Easy & Quick Assembly: Using pre-made brownie bites and candy pumpkins means you can whip these up in about 30 minutes.
- Fun Visual Appeal: The green grass frosting and bright orange pumpkins create an inviting fall-themed treat perfect for parties or gifting.
- Customizable Sweetness: You control how much frosting you add, making these as rich or light as you prefer.
- No Baking Required: You can take a shortcut with store-bought brownie bites but also go homemade if you want to impress!
Ingredients & Why They Work
The success of this Pumpkin Patch Brownie Bites Recipe depends on a few fun ingredients that work beautifully together. Choosing good-quality brownie bites and the iconic Mellowcreme pumpkins really makes this treat pop—both in flavor and in fall vibes.

- Brownie Bites: I usually grab pre-packaged brownie bites to save time, but you can use homemade small brownies if you prefer. Just make sure they’re sturdy enough to hold the frosting and candy.
- Vanilla Frosting: This creates the ‘grass’ base in green color. Use your favorite brand or homemade vanilla frosting for the best texture and flavor.
- Green Food Coloring: Just a few drops go a long way—aim for a bright grassy green to make the pumpkins really stand out.
- Mellowcreme Pumpkins: These candy pumpkins are essential for that classic pumpkin patch look and add a sweet, chewy burst with every bite.
Tweak to Your Taste
One of the things I enjoy most about this Pumpkin Patch Brownie Bites Recipe is how easy it is to personalize! You can go as simple or as fancy as you want, making it perfect for your style and occasion.
- Variation: Sometimes I like to swap the vanilla frosting for cream cheese frosting to add a slight tang — it balances the sweetness and pairs nicely with chocolate.
- Dietary Mods: For gluten-free options, you can find gluten-free brownie bites or bake your own with gluten-free flour.
- Seasonal Twist: For Halloween, add edible glitter or small candy eyeballs next to the pumpkins for a playful look.
Step-by-Step: How I Make Pumpkin Patch Brownie Bites Recipe
Step 1: Prep Your Workspace & Ingredients
Start by lining a cookie sheet with parchment or wax paper — this makes cleanup a breeze and prevents the brownies from sticking. Then gather your brownie bites and candy pumpkins. If you’re coloring your frosting yourself, give it a good mix until you get a vibrant grass green shade. Trust me, a little more green looks better than too little here!
Step 2: Pipe the ‘Grass’ Frosting
Fill a piping bag fitted with a grass tip (or a small star tip if you don’t have a grass one) with the green frosting. If you don’t have piping tools handy, you can spread the frosting on the brownies with a knife or spoon—it’ll still taste amazing! When piping, hold the bag close and squeeze out short bursts to create little tufts of “grass.” Don’t worry about being perfect; the more rustic, the cuter.
Step 3: Place the Candy Pumpkins
Once your frosting “grass” is ready, gently press one mellowcreme pumpkin into the top of each brownie bite. They should stick nicely to the frosting, but if you find they’re slipping, a tiny dab of frosting under the pumpkin will help secure it. Arrange your pumpkin patch on the tray evenly spaced—everyone will appreciate the effort!
Step 4: Chill & Serve
Pop the whole tray into the fridge to let the frosting set for about 15 minutes. When you’re ready to serve, allow the brownie bites to come to room temperature for the best flavor and texture. These are ideal for fall parties, school treats, or just a cozy night in.
Pro Tips for Making Pumpkin Patch Brownie Bites Recipe
- Consistency Is Key: When coloring frosting, add color gradually and mix well to avoid uneven patches that can look messy.
- Piping Bag Hack: If you don’t have a piping bag, a zip-top bag with a tiny corner snipped off works perfectly for piping the grass.
- Choose Sturdy Brownies: I’ve learned the hard way that very soft brownies don’t hold the frosting and candy well, so a firmer brownie bite really shines here.
- Storage Tip: Store these in a single layer in an airtight container in the fridge to keep both the frosting and pumpkins looking fresh.
How to Serve Pumpkin Patch Brownie Bites Recipe

Garnishes
I usually keep garnishes simple since the candy pumpkins make such a statement. But if I’m feeling extra festive, I’ll dust a tiny bit of cinnamon or pumpkin pie spice over the frosting—it compliments the fall theme perfectly and adds a cozy aroma.
Side Dishes
Pumpkin Patch Brownie Bites pair wonderfully with a warm cup of spiced apple cider or a creamy latte. For a larger gathering, I like to serve them alongside caramel popcorn or roasted nuts for a little sweet and salty combo.
Creative Ways to Present
One year, I presented these on a large wooden board topped with fresh pine sprigs and mini hay bales for a full “patch” effect—the guests loved it! You can also arrange them in a pumpkin-shaped platter or line them up on a tiered cupcake stand to elevate the display.
Make Ahead and Storage
Storing Leftovers
After a party, I tightly cover whatever leftover brownie bites I have in an airtight container and keep them refrigerated. They stay fresh for about 3-4 days, and bringing them back to room temperature before serving really brings back the softness and flavor.
Freezing
Since the candy pumpkins don’t freeze well—they can get sticky or discolor— I don’t recommend freezing the finished assembled bites. However, you can freeze plain brownie bites if you want to prep in advance and frost them fresh later.
Reheating
If you want to enjoy the brownies warm, briefly microwave the brownie (without frosting or pumpkin) for about 10 seconds. Add frosting and pumpkin after reheating to keep everything intact and fresh-looking.
FAQs
-
Can I use other types of frosting for the Pumpkin Patch Brownie Bites Recipe?
Absolutely! While vanilla frosting is classic here, you can experiment with cream cheese frosting, buttercream, or even a lightly sweetened whipped cream. Just remember that the frosting needs enough structure to hold the candy pumpkin securely.
-
What if I can’t find Mellowcreme pumpkins? Any alternatives?
If you can’t locate these iconic candy pumpkins, mini pumpkin-shaped candies or even mini candy corns work well as a substitute. You could also use small pumpkin-shaped chocolates or gummy candies for a twist.
-
How do I prevent the frosting from melting or getting messy?
Keep the assembled brownie bites chilled before serving and avoid leaving them out too long at room temperature, especially if it’s warm where you are. Using a firm frosting also helps keep the “grass” texture intact.
-
Can I make the brownie bites from scratch?
Definitely! Making your own brownie bites is a delicious way to customize flavor and texture. Just bake a batch in a mini muffin pan or cut a brownie slab into bite-sized squares. I have a favorite homemade recipe that works wonderfully if you want to try it!
Final Thoughts
Making these Pumpkin Patch Brownie Bites has become a little tradition in my kitchen every fall, and I hope it becomes one in yours too. They’re simple enough for a weekday pick-me-up but charming enough to wow your guests on weekends and holidays. The best part is seeing the smiles when someone pops that perfect chocolate bite with a burst of sweet pumpkin on top — it’s pure cozy comfort. So grab your frosting bag, pick up those candy pumpkins, and let’s make a patch of sweetness together!
Print
Pumpkin Patch Brownie Bites Recipe
- Prep Time: 30 minutes
- Cook Time: 0 minutes
- Total Time: 30 minutes
- Yield: 36 brownie bites
- Category: Dessert
- Method: No-Cook
- Cuisine: American
- Diet: Vegetarian
Description
Delightful Pumpkin Patch Brownie Bites featuring rich brownie bases topped with green grass frosting and festive candy pumpkins, perfect for fall celebrations and Halloween treats.
Ingredients
Brownie Bites
- 36 brownie bites
Frosting
- 1 can vanilla frosting
- Green food coloring
Toppings
- 36 Mellowcreme Pumpkins (candy corn pumpkins)
Instructions
- Prepare the base: Place 36 brownie bites in a single layer on a cookie sheet lined with parchment paper or wax paper to prevent sticking and for easy cleanup.
- Color and pipe frosting: Add green food coloring to the vanilla frosting and mix until the desired shade is achieved. Transfer the green frosting to a piping bag fitted with a grass tip for a textured effect.
- Decorate brownies: Pipe green grass frosting onto the top of each brownie bite. Alternatively, you may simply spread the green frosting evenly over each brownie if you prefer a simpler look.
- Add pumpkin toppings: Place one Mellowcreme Pumpkin candy on top of each frosted brownie bite to resemble pumpkins in a patch.
- Store properly: Keep the brownie bites in an airtight container in the refrigerator until serving to maintain freshness. Serve them at room temperature for best texture and flavor. Avoid freezing to protect the candy pumpkins.
Notes
- Yield depends on the brownie bites used; check packaging as some brands may vary in quantity.
- You can substitute store-bought brownie bites with homemade brownies cut into bite-sized pieces.
- If you do not have a piping bag with a grass tip, use a small star tip or simply spread the frosting with a knife to create a decorative effect.
- Storage in the refrigerator is essential to keep frosting firm and candy decorations intact, but serving at room temperature enhances taste.
- Do not freeze brownie bites with candy pumpkins as this may affect the texture and appearance of the candy.
Nutrition
- Serving Size: 1 brownie bite
- Calories: 150 kcal
- Sugar: 18 g
- Sodium: 90 mg
- Fat: 7 g
- Saturated Fat: 3 g
- Unsaturated Fat: 3 g
- Trans Fat: 0 g
- Carbohydrates: 22 g
- Fiber: 1 g
- Protein: 1 g
- Cholesterol: 10 mg


