
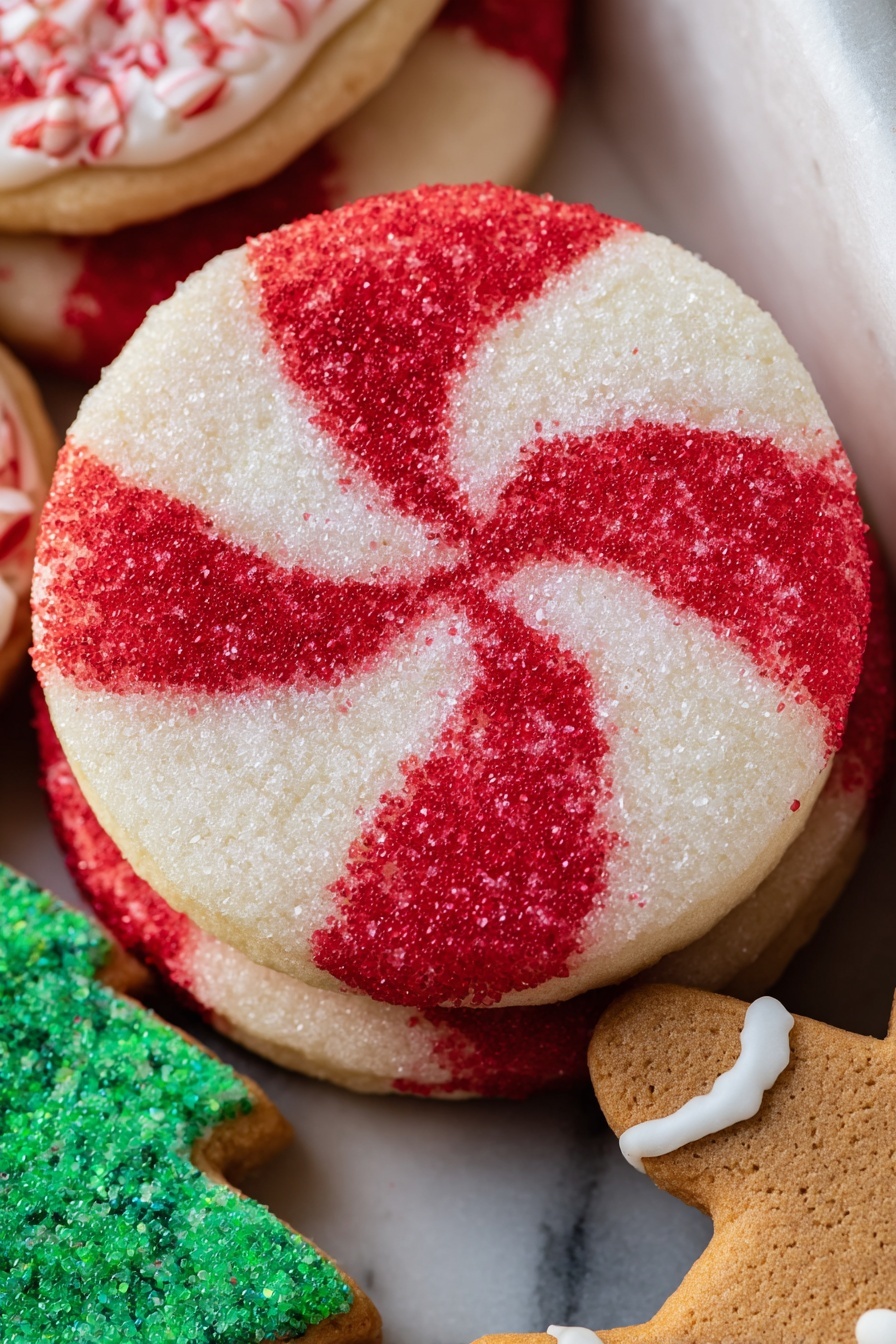
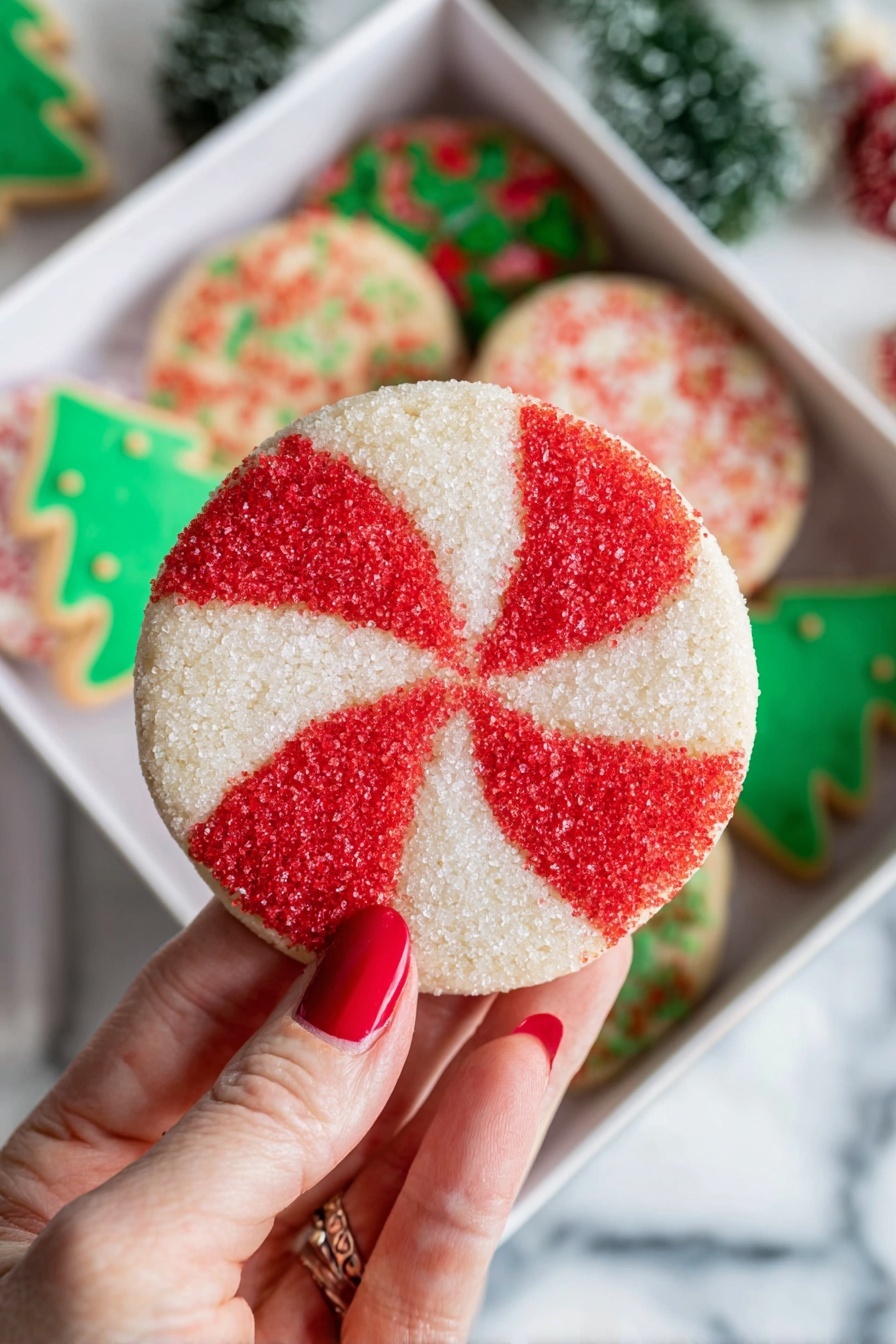
Peppermint Swirl Sugar Cookies Recipe
If you’re on the hunt for a cookie that’s festive, fun, and totally irresistible, you’ve just hit the jackpot. This Peppermint Swirl Sugar Cookies Recipe is one of my all-time favorites to bake—and share! The swirls of red and white sugar cookie dough paired with that cool peppermint hint make these cookies as delightful to look at as they are to eat. Trust me, once you try this recipe, you’ll want to bake a double batch every time the holidays roll around (or honestly, any time of year!). Let me walk you through every step so you nail these beauties perfectly at home.
Why This Recipe Works
- Perfect Texture: The combination of butter and sugar creamed properly gives you cookies that are chewy with just the right amount of softness.
- Eye-Catching Swirls: Dividing the dough and adding red gel food coloring creates a stunning peppermint swirl that looks professionally made.
- Balanced Peppermint Flavor: A touch of peppermint extract brightens the flavor without overpowering the cookie’s sweetness.
- Easy to Prep Ahead: You can chill or freeze the dough, making this recipe ideal to prep early and bake fresh whenever you want.

Ingredients & Why They Work
The charm of this Peppermint Swirl Sugar Cookies Recipe lies in its simple but thoughtful ingredients list. Each one plays a key role to build a tender cookie with a cool peppermint punch and that signature swirl.
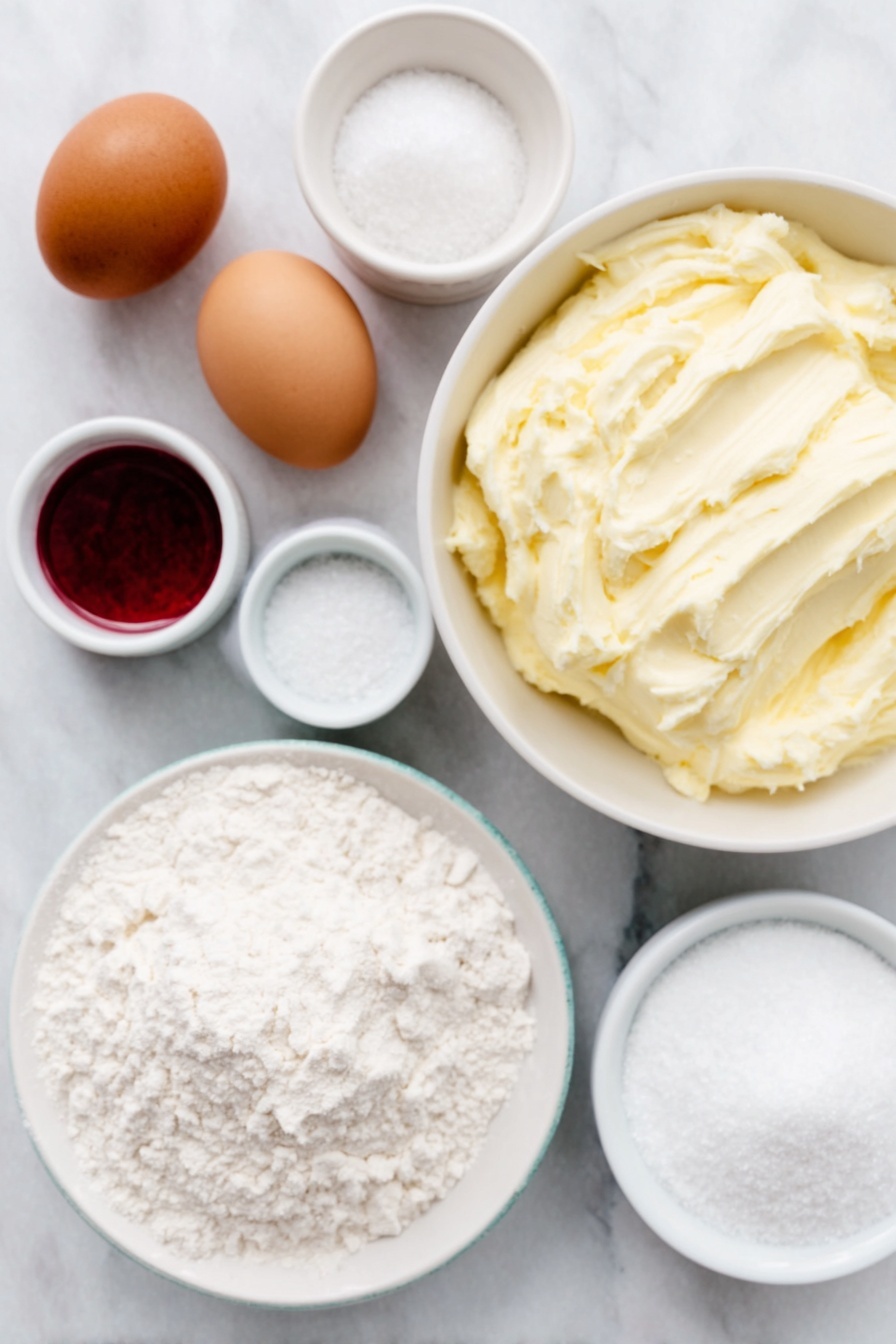
- Unsalted Butter: Room temperature butter creamed with sugar creates the base of a tender, chewy cookie.
- Granulated Sugar: Sweetens the dough and helps with that slightly crisp exterior after baking.
- Egg and Egg Yolk: Adds richness and binding power to keep those swirls intact.
- Peppermint Extract (optional): Gives cookies a fresh minty zing—perfect with the red and white color theme.
- Vanilla Extract or Vanilla Bean Paste: Rounds out the flavor, making these cookies taste cozy and homey.
- All-Purpose Flour: The sturdy base that gives the cookie structure without being too dense.
- Cornstarch: A little secret for extra softness and a melt-in-your-mouth feel.
- Fine Salt: Enhances sweetness and balances flavors beautifully.
- Baking Soda: Helps cookies spread just right and keeps textures light.
- Red Gel Food Coloring: Essential for that bold, clean color that won’t alter the dough’s texture like liquid dyes might.
- Granulated or White Sanding Sugar for Coating: Adds a delicate crunchy finish that’s so satisfying.
Tweak to Your Taste
One of my favorite things about this Peppermint Swirl Sugar Cookies Recipe is how customizable it is. Sure, the peppermint vibe is classic, but you can easily make it your own by switching up extracts or colors.
- Variation: Instead of peppermint, try almond extract for a nutty twist. I do this when I want a more subtle, cozy flavor profile that still looks impressive.
- Dietary modifications: Use a butter substitute and egg replacer if you need a dairy- and egg-free version, just keep an eye on the dough’s consistency as it might need a little extra flour or liquid.
- Seasonal Swirls: Swap the red gel food coloring for green or even blue for other seasonal celebrations or just for fun!
Step-by-Step: How I Make Peppermint Swirl Sugar Cookies Recipe
Step 1: Cream the Butter and Sugar Like a Pro
Start by beating your room temperature butter and sugar together on medium-high speed for a couple of minutes. You want the mixture to become lighter in color and fluffy—that’s the magic that gives these cookies their chewiness later. I usually stop and scrape down the bowl a couple of times to make sure everything is well combined.
Step 2: Add Eggs and Extracts
Next, toss in your large egg, egg yolk, peppermint extract (if using), and vanilla. Beat again at medium-high speed till smooth. Make sure to scrape your bowl again—getting everything mixed well is key to even flavor and texture.
Step 3: Mix in the Dry Ingredients
Turn your mixer down to low. Add in your flour, cornstarch, salt, and baking soda. Mix just until mostly combined, then scrape the sides and bottom again. Increase speed to medium for just a few seconds to bring it all together without overworking the dough.
Step 4: Split and Color Your Dough
Divide the dough evenly into two bowls. Now here’s the fun part! Add red gel food coloring to one bowl and start mixing with a spatula. Eventually, knead by hand to get that color evenly spread. I always wear gloves here to avoid red hands—it gets messy but so worth it!
Step 5: Form and Swirl Your Cookies
Scoop out teaspoon-sized balls from each color of dough. Roll them smooth and then place three red and three white balls alternating in a little ring. Press them together gently and curl your fingers around to round out the edges. Use your forefinger to gently swirl the colors in one direction to create that beautiful peppermint swirl look. If you like extra sparkle and texture, toss them lightly in sanding sugar.
Step 6: Chill, Bake, and Cool
Pop your cookies in the fridge for 30 minutes or freezer for 15 to help them hold shape when baking. Space cookies at least 2 inches apart on lined baking sheets—they spread a bit! Bake on the middle rack at 350°F for 11 to 13 minutes. Look for edges that feel set but aren’t browning. After baking, let them cool on the sheet for 15 minutes before transferring to a wire rack.
Pro Tips for Making Peppermint Swirl Sugar Cookies Recipe
- Cream Thoroughly: Whipping your butter and sugar until light and fluffy is key for chewy, soft cookies.
- Use Gel Food Coloring: It provides vibrant color without affecting dough texture like liquids sometimes do.
- Chill for Shape: Don’t skip chilling the dough balls to prevent over-spreading during baking.
- Watch the Bake Time: Since the color hides browning, rely on texture cues to avoid overbaking.
How to Serve Peppermint Swirl Sugar Cookies Recipe
Garnishes
I love sprinkling a little extra sanding sugar or crushed peppermint candy on top of these cookies just after they’re out of the oven—adds sparkle and a refreshing snap. For parties, a tiny dab of white chocolate drizzle is also a fun treat!
Side Dishes
These cookies are a perfect partner to a warm cup of cocoa or a peppermint-flavored latte. I like serving them alongside fresh whipped cream or a simple glass of cold milk to balance the sweetness.
Creative Ways to Present
For holiday gatherings, arrange these cookies in a circle on a platter with holly sprigs and candy canes nestled around them for a festive display. You can also stack them with parchment papers between layers in a clear jar with a big red ribbon for a beautiful edible gift.
Make Ahead and Storage
Storing Leftovers
Once your cookies are fully cooled, store them in an airtight container at room temperature. They stay fresh and soft for up to 5 days, though in my house, they rarely last that long!
Freezing
If you want to prep ahead, you can freeze the shaped dough balls for up to 2 months. When you’re ready to bake, just pop them from freezer straight into the oven, adding a couple extra minutes to bake time. Baked cookies freeze beautifully too—wrap them tightly and thaw at room temperature before serving.
Reheating
To bring frozen or leftover cookies back to fresh-from-the-oven softness, warm them in a 300°F oven for 5 minutes or microwave for 10-15 seconds. This revives their chewy texture and melts any sugar crystals just enough to make them irresistible.
FAQs
-
Can I skip the peppermint extract in this Peppermint Swirl Sugar Cookies Recipe?
Absolutely! The peppermint extract is optional, so if you prefer a classic vanilla sugar cookie or want to try almond extract instead, feel free to omit or substitute. The cookies will still have great flavor and texture.
-
Why do I need to chill the cookie dough before baking?
Chilling helps the dough firm up so the cookies hold their shape and don’t spread too much while baking. It also helps the flavors develop better. I never skip this step—it makes a noticeable difference in the final cookie appearance.
-
Can I make these cookies gluten free?
You can substitute the all-purpose flour with a gluten-free flour blend designed for baking. However, make sure the blend contains xanthan gum for structure, and keep an eye on dough consistency—it might require a slight adjustment in flour quantity.
-
How do I prevent the red food coloring from staining my hands?
I recommend wearing disposable or rubber gloves while kneading the red dough. That way you keep your hands clean and avoid accidental color transfer to other kitchen surfaces or clothes.
-
How long do these cookies stay fresh?
Stored properly in an airtight container at room temperature, these cookies remain fresh and soft for up to 5 days. If you want to keep them longer, freezing is your best bet.
Final Thoughts
This Peppermint Swirl Sugar Cookies Recipe holds a special place in my heart whenever the holidays roll around. It’s the kind of cookie you don’t just bake for yourself—you make it to share, to decorate around, to swap at cookie exchanges, and to bring big smiles. The swirl, the chewy vibe, and the light peppermint touch—they all come together so effortlessly. If you try this recipe, you’re in for a real treat that’ll get everyone asking for the secret. So grab your mixing bowl, pull on those gloves, and get ready to wow with these joyful little swirled gems!
Print
Peppermint Swirl Sugar Cookies Recipe
- Prep Time: 30 minutes
- Cook Time: 13 minutes
- Total Time: 43 minutes
- Yield: 24 cookies
- Category: Dessert
- Method: Baking
- Cuisine: American
- Diet: Vegetarian
Description
These Peppermint Swirl Sugar Cookies are festive, chewy treats featuring a beautiful swirl of red and white dough with a hint of peppermint flavor. Perfect for holiday celebrations or anytime you crave a sweet and colorful cookie.
Ingredients
Cookie Dough
- 1 cup unsalted butter, room temperature (226g)
- 1 3/4 cups granulated sugar (350g)
- 1 large egg + 1 large egg yolk (80g)
- 1 1/2 tsp peppermint or almond extract (optional) (8g)
- 1 tsp vanilla extract or vanilla bean paste (5g)
- 2 1/2 cups all purpose flour (325g)
- 1 Tbsp cornstarch (8g)
- 1 tsp fine salt (6g)
- 1/2 tsp baking soda (3g)
- Red gel food coloring (as needed)
Coating
- 1 cup granulated sugar or white sanding sugar
Instructions
- Preheat and Prepare Baking Sheets: Preheat your oven to 350°F (175°C) and line two large baking sheets with parchment paper or silicone baking mats. Set aside.
- Cream Butter and Sugar: In a large bowl, using a hand mixer or stand mixer with paddle attachment, beat 1 cup of room temperature butter and 1 3/4 cups granulated sugar together at medium-high speed for a couple of minutes until the mixture looks light and fluffy.
- Add Eggs and Extracts: Add 1 large egg plus 1 large egg yolk, 1 1/2 tsp peppermint extract (optional), and 1 tsp vanilla extract to the creamed butter and sugar. Beat at medium-high speed until fully combined, scraping the sides and bottom of the bowl as needed.
- Mix Dry Ingredients: On low speed, add 2 1/2 cups all-purpose flour, 1 Tbsp cornstarch, 1 tsp fine salt, and 1/2 tsp baking soda until mostly combined. Scrape the sides and bottom and increase speed to medium, beating briefly to ensure thorough mixing.
- Divide and Color Dough: Split the dough into two equal portions (about 490g each). Place one portion in a large bowl and add red gel food coloring. Mix with a spatula and knead by hand until the color is evenly distributed. Use gloves if desired to avoid staining.
- Form Dough Balls: Using a teaspoon, scoop teaspoon-sized portions from each dough color. Roll each into a ball and set aside.
- Create Swirls: Take three balls of each color (six total), arranging them alternately in a small circle (red, white, red, white, etc.). Press them together to close gaps and round the edges, then gently push stripes in the same direction to create a swirl effect. Repeat with remaining dough to make about 24 cookies.
- Coat in Sugar: Optional: Pour 1 cup granulated or sanding sugar into a small bowl and toss each dough ball to coat fully for added texture.
- Chill the Cookies: Chill the shaped dough balls in the fridge for 30 minutes or in the freezer for 15 minutes to firm up before baking.
- Arrange and Bake: Place cookies a few inches apart on prepared baking sheets. Bake one tray at a time on the middle oven rack for 13 minutes, until edges look set but not browned.
- Cool: Remove from oven and let cookies cool on the baking sheet for 15 minutes, then transfer to a wire rack to cool completely.
- Store: Store cooled cookies in an airtight container at room temperature for up to 5 days.
Notes
- For best texture, cream the butter and sugar until light and fluffy at the start.
- Space cookies about 2 inches apart on baking sheets to allow for spreading.
- Watch closely during baking; cookies should not brown but be set on the edges when done.
- Use gel food coloring to avoid altering dough consistency compared to liquid food coloring.
- Cookie dough can be refrigerated for up to 2 days or frozen for up to 2 months before baking.
- Unbaked shaped cookies can be stored in an airtight container in the fridge up to 2 days.
- Frozen cookie dough balls can be baked directly from freezer, adding a few extra minutes baking time.
- Baked cookies can also be frozen for up to 2 months.
- This recipe yields about 24 cookies and can be doubled if needed.
Nutrition
- Serving Size: 1 cookie
- Calories: 150 kcal
- Sugar: 15 g
- Sodium: 90 mg
- Fat: 7 g
- Saturated Fat: 4 g
- Unsaturated Fat: 3 g
- Trans Fat: 0 g
- Carbohydrates: 20 g
- Fiber: 0.5 g
- Protein: 2 g
- Cholesterol: 30 mg


