
Pan Fried Chicken Strips Recipe
Hey friend, I’m excited to share this Pan Fried Chicken Strips Recipe with you—it’s honestly one of those simple, no-fuss dishes that I keep coming back to when I want something crispy, flavorful, and downright comforting without a lot of hassle. These chicken strips get that golden crust you crave with just the right blend of spices and a double flour dip that keeps each bite perfectly crunchy. Whether it’s a quick dinner, a weekend snack, or even game day finger food, this recipe hits all the right notes.
I’ve found this Pan Fried Chicken Strips Recipe especially reliable when I want dinner on the table fast but still crave that homemade touch. You don’t need fancy ingredients or complicated steps, and the result feels special—like you really made something delicious from scratch. Plus, the tips I’ll share will help you avoid common pitfalls, so you’ll nail crispy, juicy chicken strips every single time.
Why This Recipe Works
- Simple but Flavorful: The seasoning blend is easy to mix but packs a punch that elevates plain chicken to irresistible.
- Perfectly Crispy Texture: Double-dipping in flour and egg ensures a crunchy coating that stays crispy without getting soggy quickly.
- Quick and Reliable: Ready in under 30 minutes, so it works great for busy weeknight dinners or last-minute guests.
- Versatile and Customizable: You can easily adjust spices or oil type based on your pantry or dietary preferences.

Ingredients & Why They Work
Each ingredient in this Pan Fried Chicken Strips Recipe plays a part in creating that perfect crispy outside and juicy inside. The seasoned flour combo adds flavor and crunch, while the egg helps the flour stick to the chicken for that satisfying coating. I love that the oil choice can be flexible, but I have a preference for non-GMO canola oil since it heats evenly and doesn’t overpower the chicken’s flavor.

- All-purpose flour: The base for the crispy coating—it soaks up the seasonings and crisps to a perfect golden brown.
- Kosher salt: Essential for flavoring the flour and seasoning the chicken evenly.
- Garlic powder: Adds that familiar savory punch without the mess of fresh garlic.
- Onion powder: Deepens the flavor profile, giving a subtle sweetness and aroma.
- Freshly ground black pepper: Adds warmth and a little bite to balance the other spices.
- Paprika: For color and a hint of smoky sweetness, making every bite a bit more interesting.
- Egg: Acts as glue for the breading to cling to the chicken strips perfectly.
- Chicken breasts: I prefer using fresh, skinless breasts for tenderness and a neutral canvas for flavor.
- Cooking oil (non-GMO canola oil): Great for frying because of its high smoke point and neutral taste.
Tweak to Your Taste
I like to keep the core ingredients steady because the method makes a huge difference, but you can absolutely play with the seasoning. Sometimes, when I’m feeling adventurous or cooking for spice lovers, I add a pinch of cayenne pepper to the flour mix for a little heat. Feel free to swap out the paprika for smoked paprika if you want a subtle smoky flavor that turns heads.
- Variation: Once, I swapped the chicken breasts for tender chicken tenders and found the cooking time reduced slightly—perfect for a speedy lunch.
- Healthier Twist: If you want to cut calories, try using a high-quality olive oil spray and shallow fry instead of deep frying—just watch the heat carefully.
- Gluten-Free: Use almond flour or a gluten-free flour mix instead of all-purpose flour for a gluten-free version that still crisps up nicely.
Step-by-Step: How I Make Pan Fried Chicken Strips Recipe
Step 1: Prepare Your Breading Station
Start by heating 1 cup of cooking oil over medium heat in a 12” cast iron skillet. It should reach about 350°F for perfect frying—if you don’t have a candy thermometer, just test a small drop of flour; it should sizzle gently but not burn. Meanwhile, whisk your flour with kosher salt, garlic powder, onion powder, black pepper, and paprika in a shallow dish so it’s ready when your chicken strips are prepped.
Step 2: Cut Chicken and Prep for Breading
Slice each chicken breast into strips about the thickness of your pinky finger—this thickness cooks quickly without drying out. Crack an egg in a small bowl and beat it with a fork. This will be your “glue” for the coating. I find the secret to great breading is a triple flour dip: roll the chicken lightly in the seasoned flour first, then dip in the beaten egg, go back into the flour again, and one last light roll in flour before frying. This triple-layer method delivers a wonderfully crispy crunch and seals in moisture.
Step 3: Fry Your Chicken Strips
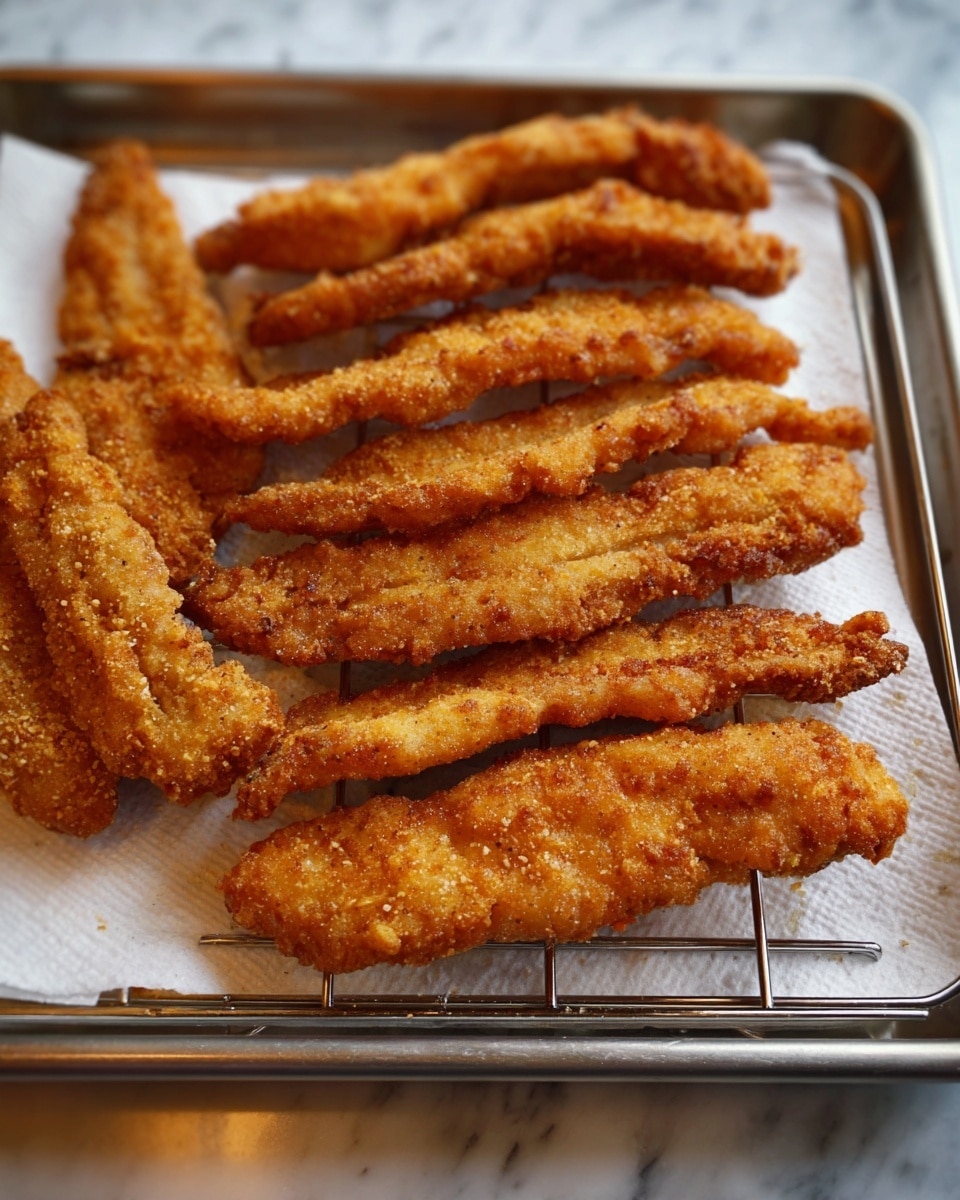
Carefully place each strip into the hot oil, giving them space so they don’t stick together. Cook for about 4 minutes on the first side without moving them—this helps build that golden crust. Flip with tongs or a fork, then cook another 3-4 minutes until the chicken reaches 160°F internally. You want it juicy, not dry, so a quick thermometer check is helpful here. Remove the strips and place them onto a cooling rack set over paper towels to drain excess oil.
Step 4: Serve Fresh and Enjoy!
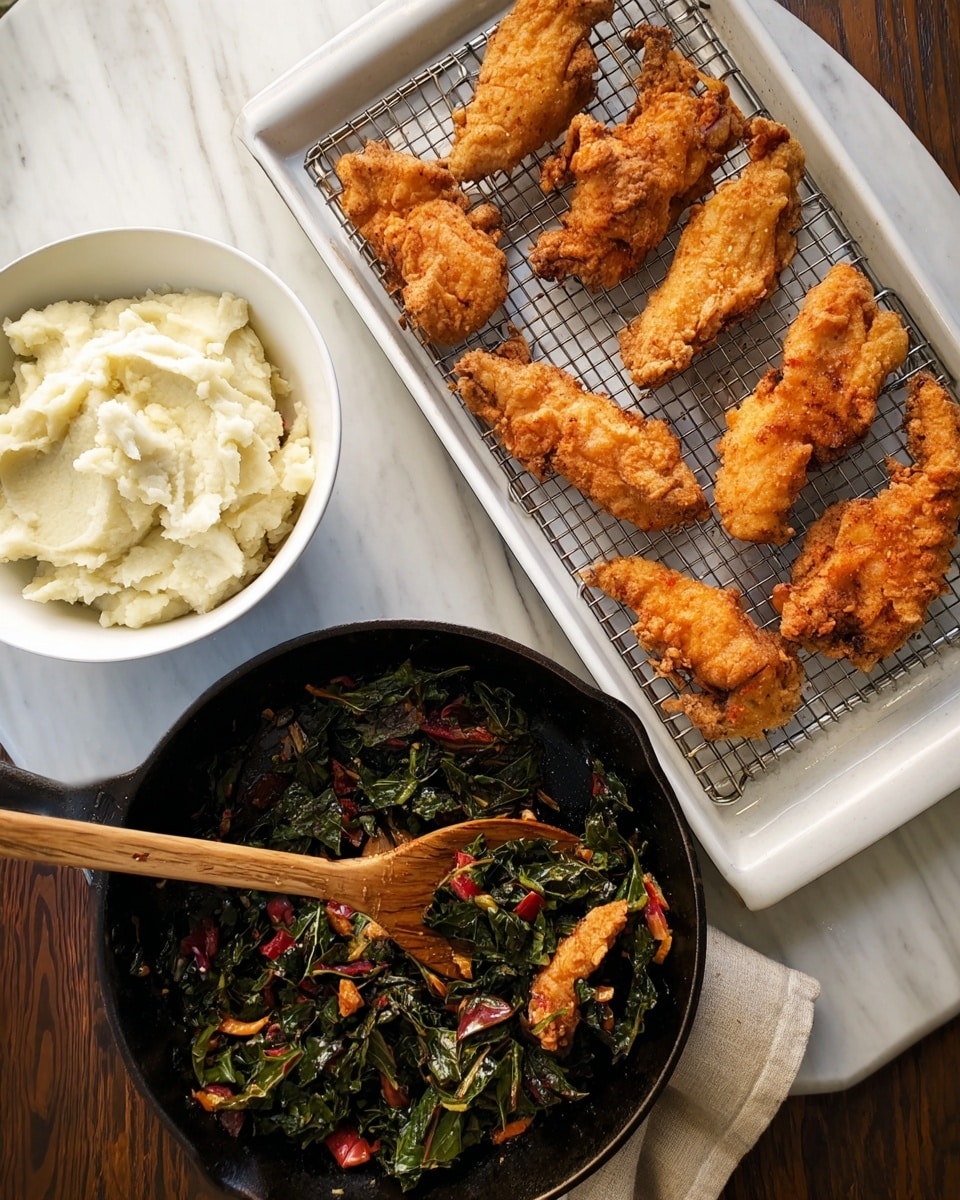
Serve your golden, crispy chicken strips immediately for the best texture, or keep them warm in the oven while you finish prepping sides. If you leave them out too long, they’ll lose some crispness, so timing is key. Trust me, once you nail this Pan Fried Chicken Strips Recipe, it becomes a go-to crowd-pleaser!
Pro Tips for Making Pan Fried Chicken Strips Recipe
- Control Your Oil Temperature: Use a thermometer or test with a small pinch of flour to keep oil between 350-360°F to avoid greasy or burnt strips.
- Don’t Crowd the Pan: Fry in batches so the temperature stays consistent and strips get crispy instead of soggy.
- Use a Cooling Rack: This keeps strips crispy by letting oil drip away instead of pooling underneath.
- Triple Flour Dip for Crunch: That extra roll in the seasoned flour before frying creates a robust crust that’s unbeatable.
How to Serve Pan Fried Chicken Strips Recipe
Garnishes
I usually keep garnishes simple—fresh lemon wedges are my favorite because a quick squeeze cuts through the richness and brightens up the flavor. Sometimes, I sprinkle chopped fresh parsley or cilantro on top for a pop of color and freshness. If you like a little extra zing, a drizzle of a mild hot sauce or honey mustard sauce on the side pairs beautifully.
Side Dishes
These chicken strips pair amazingly well with a crunchy coleslaw or simple green salad for contrast. I love making creamy mashed potatoes or crispy oven-baked fries alongside, especially when we’re in that classic comfort food mood. For a lighter option, steamed veggies or a fresh cucumber salad work nicely too—just depends on what you’re craving that day.
Creative Ways to Present
For parties or game day, I like to arrange the strips on a large platter lined with parchment paper, drizzling a variety of dipping sauces in small bowls around them—think ranch, barbecue, or spicy sriracha mayo. You can also skewer the chicken strips for easy grabbing, or turn them into sliders with mini buns and toppings for a fun twist that everyone loves.
Make Ahead and Storage
Storing Leftovers
After frying, let the chicken strips cool completely, then store them in an airtight container lined with paper towels to absorb any leftover oil. I’ve found this keeps them good in the fridge for up to 3 days, but the sooner you eat them, the better the texture and flavor stay.
Freezing
If you want to freeze, flash freeze the strips on a baking sheet first until solid, then transfer them to a freezer-safe bag. This trick stops them from sticking together. They’ll keep well for up to 2 months. When you’re ready, bake or re-fry them straight from frozen to regain crispiness.
Reheating
Reheat your leftovers in a preheated oven at 375°F on a wire rack for about 10 minutes to keep that crispy exterior. Avoid the microwave if you want to hold onto crunch—it tends to make the coating soggy, and nobody wants that.
FAQs
-
Can I use chicken thighs instead of breasts for this Pan Fried Chicken Strips Recipe?
Absolutely! Chicken thighs are a bit more forgiving and stay juicy longer. Just be sure to cut them into even strips for consistent cooking, and watch your cooking time, as thighs may cook a little faster or slower depending on thickness.
-
What’s the secret to making the coating extra crispy?
The triple-dip method is key: flour, then egg, then flour again, and one last light roll in flour before frying. Also, frying at the right temperature and not overcrowding the pan helps the strips stay crisp and golden.
-
Can I bake these chicken strips instead of pan-frying?
You can, but keep in mind the texture will be slightly different—less crispy and a bit drier. To bake, place the coated strips on a greased baking sheet and spray with oil. Bake at 425°F for about 15-20 minutes until cooked through, flipping halfway. It’s a good alternative if you want less oil.
-
How do I know when the chicken strips are cooked through?
Using a meat thermometer is the easiest way—check that the internal temperature hits 160°F, which ensures juicy, safe-to-eat chicken. If you don’t have a thermometer, cut the thickest strip to check that the juices run clear and there’s no pink inside.
Final Thoughts
Honestly, this Pan Fried Chicken Strips Recipe feels like a little magic trick I keep in my back pocket—it’s easy to whip up, crowd-pleasing for all ages, and flexible enough to customize however I want. If you give it a try, I bet it’ll quickly become one of your favorite go-to meals too. Trust me on this one: once you nail that crispiness and seasoning, you’ll be making these strips again and again!
Print
Pan Fried Chicken Strips Recipe
- Prep Time: 15 minutes
- Cook Time: 10 minutes
- Total Time: 25 minutes
- Yield: 4 servings
- Category: Main Course
- Method: Frying
- Cuisine: American
Description
Crispy, flavorful pan-fried chicken strips made with a seasoned flour coating and cooked to juicy perfection. Perfect for a quick dinner or snack, these chicken strips are easy to prepare and delicious served with your favorite dipping sauce.
Ingredients
For the Coating
- 2/3 cup flour
- 2 tsp kosher salt
- 1 1/2 tsp garlic powder
- 1 1/2 tsp onion powder
- 3/4 tsp freshly ground pepper
- 3/4 tsp paprika
For the Chicken
- 1 egg
- 2 chicken breasts
For Frying
- 1 cup cooking oil (non-GMO canola oil recommended)
Instructions
- Heat the oil: Heat the cooking oil in a 12-inch cast iron skillet over medium heat until it reaches 350 degrees Fahrenheit, using a candy thermometer for accuracy.
- Prepare the coating: In a shallow dish, whisk together the flour, kosher salt, garlic powder, onion powder, freshly ground pepper, and paprika to form the seasoned flour mixture.
- Prepare the chicken: Crack the egg into a small bowl and beat with a fork. Cut the chicken breasts into strips of desired size.
- Coat the chicken: Roll each chicken strip first in the seasoned flour until lightly coated, then dip in the beaten egg, and return to the flour. Roll again in the flour to ensure the strips are well coated. For extra crispiness, roll the strips a final time in the seasoned flour before frying.
- Fry the chicken: Carefully place each coated chicken strip into the hot oil and cook for 4 minutes. Use tongs or a fork to flip and cook for another 3 to 4 minutes until the internal temperature reaches 160 degrees Fahrenheit.
- Drain and serve: Place a cooling rack on a baking sheet lined with paper towels. Transfer the fried chicken strips onto the rack to drain excess oil. Serve immediately or keep warm in the oven until ready to eat.
Notes
- Use a candy thermometer to maintain proper oil temperature for crispy, non-greasy chicken strips.
- Adjust the amount of flour and egg if increasing the quantity of chicken strips.
- Non-GMO canola oil is preferred due to its high smoke point and neutral flavor.
- Make sure chicken strips reach an internal temperature of 160°F for safe consumption.
- For a spicier version, add cayenne pepper or chili powder to the flour mixture.
- Rest the coated chicken strips briefly before frying to help the breading adhere better.
Nutrition
- Serving Size: 1 serving
- Calories: 350 kcal
- Sugar: 1 g
- Sodium: 700 mg
- Fat: 20 g
- Saturated Fat: 3.5 g
- Unsaturated Fat: 14 g
- Trans Fat: 0 g
- Carbohydrates: 25 g
- Fiber: 1.5 g
- Protein: 30 g
- Cholesterol: 90 mg
