

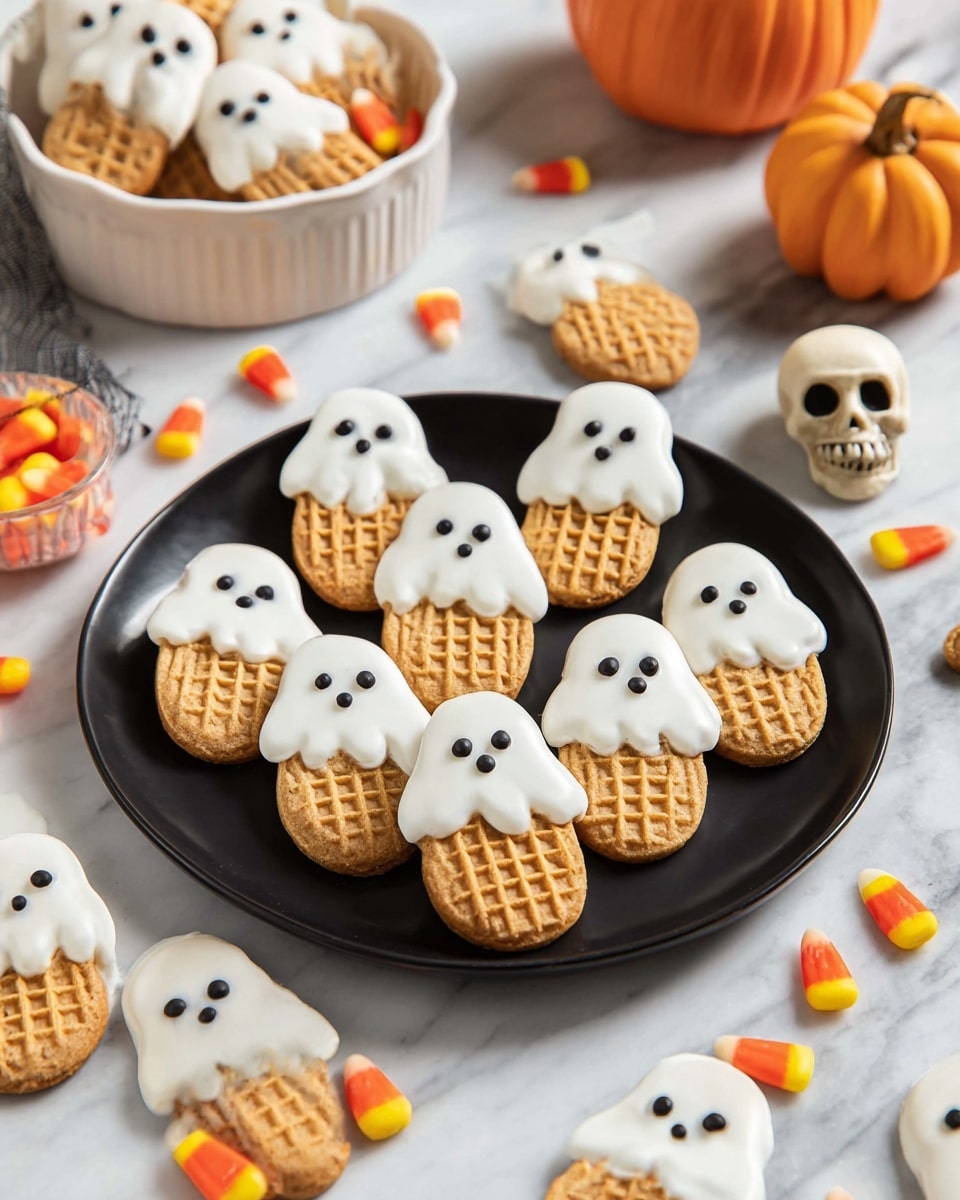
Nutter Butter Ghosts Recipe
If you’re looking for a delightfully spooky and easy treat to impress at your next gathering, you’ve got to try my Nutter Butter Ghosts Recipe. These adorable little ghost cookies are not only super simple to make but totally fan-freaking-tastic in taste and presentation. Trust me, once you dip those peanut butter cookies into silky white chocolate and add their little chocolate eyes and mouths, you’ll be hooked—and everyone will be asking for the recipe. Let’s dive into how you can make these ghostly goodies in your own kitchen!
Why This Recipe Works
- Simple ingredients: Using store-bought Nutter Butter cookies and melting chocolate keeps prep easy and fast.
- Playful presentation: The white coating turns these cookies into instantly recognizable ghost shapes that wow kids and adults alike.
- Versatile timing: They set quickly, so you can whip them up last-minute or prepare ahead of time for parties.
- Personal touch: Piping on different expressions lets your creativity shine and makes baking extra fun.

Ingredients & Why They Work
Every ingredient in this Nutter Butter Ghosts Recipe was chosen for simplicity and flavor harmony. The peanut butter cookies provide a familiar favorite base, and the melting chocolates create a smooth canvas that hardens fast without fuss. Here’s what you’ll need and why these choices make your ghost cookies shine.

- Nutter Butter Cookies: These peanut butter-filled cookies have the perfect shape and flavor to mimic ghosts with just a coat of white chocolate.
- Melting White Chocolate: Ideal for dipping and smooth coverage, this white coating sets hard so your ghosts keep their shape.
- Melting Chocolate: Used for eyes and mouths, it adds contrast and character to your ghostly treats.
Tweak to Your Taste
I love making this Nutter Butter Ghosts Recipe customizable for whatever mood or occasion I’m in. You can play around with expressions, coatings, or even add festive sprinkles for that extra pop of fun. After all, baking should always make you smile!
- Variation: I once added a tiny drop of orange gel food coloring to the white chocolate to get “pumpkin spice ghost” vibes—they turned out adorable and tasty!
- Dietary swaps: For gluten-free options, you can use allergy-friendly peanut butter cookies or experiment with vegan white chocolate coatings.
- Seasonal twist: Around Christmas, I use crushed peppermint candy sprinkled on wet coating to add a festive crunch.
Step-by-Step: How I Make Nutter Butter Ghosts Recipe
Step 1: Get Your Workspace Ready
First things first, line a cookie sheet with wax paper or parchment paper. This step keeps your ghosts from sticking as their white chocolate coating sets. Then place all your Nutter Butter cookies in a single layer on the sheet, ready for dipping.
Step 2: Melt That White Chocolate
Pop your white candy coating or melting white chocolate into a microwave-safe bowl. Heat in 30-second intervals, stirring gently between each, until the chocolate is silky smooth with no lumps. Patience here is key to avoid burning your chocolate—trust me, I’ve learned this the hard way!
Step 3: Dip or Spoon the Coating
Now for the fun part—dipping your cookies! I prefer to dip each Nutter Butter halfway to maintain a ghostly shape, but you can also spoon the coating over the top like a spooky little sheet draping the cookie. Just be sure to tap off any excess chocolate before placing them back on your parchment-lined tray.
Step 4: Add Their Faces
Before the coating hardens, grab a piping bag or even a plastic sandwich bag with a tiny corner snipped off. Use the melted chocolate to pipe eyes and little mouths—this is where your ghosts get personality! I like to mix it up with some scared, surprised, or silly faces for a little ghostly fun.
Step 5: Let Your Ghosts Set
Finally, place your cookie sheet somewhere cool and let the white coating harden completely—about 5 to 10 minutes usually does the trick. Once set, you can carefully peel your Nutter Butter Ghosts off the parchment and get ready to impress!
Pro Tips for Making Nutter Butter Ghosts Recipe
- Use Good Quality Coatings: I swear by white almond bark because it melts smoothly and hardens with a nice snap.
- Don’t Overdo the Chocolate: Tapping off excess coating before drying keeps your ghosts looking neat and tidy.
- Work Quickly with Faces: Add eyes and mouths before the coating sets so the melted chocolate sticks perfectly.
- Avoid Warm Rooms: If your kitchen is too warm, your white chocolate might not harden properly—chill briefly if needed.
How to Serve Nutter Butter Ghosts Recipe
Garnishes
I usually keep garnishes simple with this recipe because the ghosts themselves steal the show. Sometimes I’ll lightly dust with edible glitter for a magical shimmer or add a few festive sprinkles around the serving platter. These little flourishes just elevate the fun factor.
Side Dishes
This Nutter Butter Ghosts Recipe pairs beautifully with a cup of warm cider or a cold glass of milk. For Halloween parties, I like to set out a platter alongside pumpkin-shaped sugar cookies or popcorn tossed with cinnamon sugar for a sweet and salty combo everyone loves.
Creative Ways to Present
One fun idea I tried was serving these ghosts stuck into a block of Styrofoam wrapped in black cloth to mimic a haunted graveyard, with the cookies “floating” upright. Another time, I arranged them on a platter with candy eyes scattered around for a playful spooky vibe that had kids giggling. Get creative—you’ll love the reactions!
Make Ahead and Storage
Storing Leftovers
I store any leftover Nutter Butter Ghosts in an airtight container, layering them carefully between sheets of wax paper. This way, they stay fresh and crisp for up to 5 days—perfect if you want to make a batch ahead of time and enjoy snacks all week!
Freezing
Freezing these cookies works great if you want to prep well in advance. Just freeze them in a single layer on a baking sheet first, then transfer into a freezer-safe bag or container with parchment layers. When you want them, thaw at room temperature for 20-30 minutes—they keep their shape and taste beautifully.
Reheating
Since these are no-bake cookies with a chocolate coating, reheating isn’t necessary or recommended. They’re best enjoyed as-is—just bring frozen ones to room temp and enjoy their perfect trio of crunchy cookie, creamy peanut butter, and crisp white chocolate.
FAQs
-
Can I use regular white chocolate for the coating?
You can, but regular white chocolate can be trickier to melt smoothly and might not harden as firmly as almond bark or candy melts. For best results, stick to coatings designed to melt and set quickly to keep your ghosts looking sharp.
-
How long do Nutter Butter Ghosts stay fresh?
Stored in an airtight container layered with wax paper, these treats stay fresh and delicious for about 5 days at room temperature, making them great for prepping ahead of Halloween or parties.
-
Can kids help make these ghost cookies?
Absolutely! Kids especially love decorating the faces since they can get creative with emotions. Just handle the melting chocolate parts yourself or supervise closely to keep things safe and mess-free.
-
What’s the best way to pipe the eyes and mouth?
I use a small piping bag with a tiny round tip—or just a plastic sandwich bag with a tiny corner snipped off. Make sure the melted chocolate isn’t too runny for easy control, and practice on parchment first if you want perfection.
Final Thoughts
Honestly, this Nutter Butter Ghosts Recipe has become my go-to easy festive treat whenever I want to wow guests without fuss. They’re adorable, quick to make, and a guaranteed crowd-pleaser. I hope you enjoy making and sharing these cute little ghosts as much as I do—they’re a simple way to add some magic and joy to your snacks or parties. Give them a try—you’ll be smiling just like I do every time I peek at my plate full of spooky goodness!
Print
Nutter Butter Ghosts Recipe
- Prep Time: 15 minutes
- Cook Time: 5 minutes
- Total Time: 20 minutes
- Yield: 32 cookies
- Category: Snack
- Method: No-Cook
- Cuisine: American
Description
Nutter Butter Ghosts are a playful Halloween treat featuring peanut butter sandwich cookies dipped in smooth white chocolate and decorated with spooky faces using melted dark chocolate. Perfect for parties or festive snacking, these easy-to-make ghosts add a fun twist to classic cookies with simple decorating techniques.
Ingredients
Cookies
- 32 Nutter Butter cookies
Chocolate Coating
- 12 ounces melting white chocolate
- 1 ounce melting chocolate
Instructions
- Prepare Workspace: Line a cookie sheet with wax paper or parchment paper to prevent sticking and allow the cookies to dry properly.
- Melt White Chocolate: In a microwave-safe bowl, melt the white chocolate in 30-second intervals, stirring thoroughly between each interval until completely smooth and creamy.
- Dip Cookies: Dip each Nutter Butter cookie halfway into the melted white chocolate or spoon the coating over the tops to create a ghost shape, then shake gently to remove excess chocolate.
- Decorate Faces: Before the coating sets, use a piping bag filled with melted dark chocolate to pipe small dots for the eyes and a mouth on each cookie, giving each ghost a unique expression.
- Set Cookies: Allow the coated cookies to dry and harden completely on the lined cookie sheet or a cooling rack before handling or storing.
Notes
- Use white almond bark or white candy coating for a smooth finish that hardens quickly.
- Gently tap off any excess chocolate after dipping to avoid thick, uneven coating.
- Customize ghost faces with different expressions for added fun and personality.
- Store finished cookies in an airtight container between layers of wax paper to prevent sticking, up to 5 days.
- Ensure cookies are completely set before stacking or packaging to maintain shape.
Nutrition
- Serving Size: 1 cookie
- Calories: 120 kcal
- Sugar: 10 g
- Sodium: 70 mg
- Fat: 7 g
- Saturated Fat: 3 g
- Unsaturated Fat: 3 g
- Trans Fat: 0 g
- Carbohydrates: 13 g
- Fiber: 1 g
- Protein: 2 g
- Cholesterol: 0 mg

