
No Bake Pumpkin Lush Recipe
If you’re looking for a dessert that’s utterly simple yet irresistibly delicious, you’ve got to try this No Bake Pumpkin Lush Recipe. Trust me, it’s the kind of treat that feels fancy but takes hardly any effort — perfect for those busy days when you want a cozy fall dessert without heating up the oven. Plus, the layers of pumpkin, spice, cream cheese, and crunchy gingersnap crust come together in such a dreamy way, you’re going to want to make it again and again.
Why This Recipe Works
- Easy No-Bake Layers: No oven needed, which means no fuss and less heat in the kitchen — perfect any time of year.
- Balanced Flavors: The pumpkin spice pudding pairs beautifully with the creamy pumpkin cream cheese layer, giving just the right mix of sweet and spiced without being overwhelming.
- Crunchy-Gingersnap Crust: The crispy, buttery gingersnap base adds a satisfying texture contrast to the soft, creamy layers.
- Flexible Ingredients: Easy to tweak based on what you have, like using butterscotch pudding if pumpkin spice isn’t available.

Ingredients & Why They Work
Every ingredient in this No Bake Pumpkin Lush Recipe plays a special role in creating that perfect balance of flavors and textures. Knowing a little about each one helps you shop smart and maybe even improvise when needed.

- Gingersnap cookie crumbs: These give the crust its signature spicy crunch; make sure to crush them finely for an even base.
- Unsalted butter: Butter binds the crumbs into a sturdy crust without overpowering the pumpkin flavors.
- Pumpkin spice pudding mix: The star of the pudding layer, this provides that rich pumpkin flavor with autumn spices all in one.
- Milk: Needed to whisk the pudding into a smooth consistency; whole milk or 2% works best for creaminess.
- Cream cheese: Adds tang and richness to the pumpkin cream cheese layer; letting it soften before mixing helps avoid lumps.
- Confectioners’ sugar: Sweetens the cream cheese layer while keeping it smooth and light.
- Pure pumpkin puree: Use plain canned pumpkin, not pumpkin pie filling, for the best texture and flavor control.
- Vanilla extract: Just a touch lifts the entire dessert, adding sweetness depth and aroma.
- Pumpkin spice: To punch up those warm fall spices beyond what’s in the pudding mix.
- Cool Whip: Incorporates airiness to the cream cheese and pudding layers, making this dessert feel light and fluffy.
- Chopped pecans & extra gingersnap crumbs: Optional toppings that add crunch and a pretty finish — don’t skip if you like a little texture contrast on top.
Tweak to Your Taste
I love how this No Bake Pumpkin Lush Recipe is so versatile. Once you get comfortable with the basic layers, you can easily tweak it to suit your tastes or dietary needs — which I find makes it even more fun to make!
- Use Butterscotch Pudding: If you can’t find pumpkin spice pudding, swapping in butterscotch pudding gives a mellow sweetness that complements pumpkin cream cheese layer beautifully — I’ve done this plenty of times with great results.
- Dairy-Free Version: Try using dairy-free cream cheese and whipped topping alternatives to make this dessert vegan-friendly without sacrificing flavor or texture.
- Spice it Up: Add extra cinnamon, nutmeg, or a pinch of cloves to the cream cheese layer if you like your pumpkin desserts with a punch of warmth.
- Add a Drizzle: I sometimes top mine with a little caramel sauce before serving for that extra indulgence—totally optional but highly recommended.
Step-by-Step: How I Make No Bake Pumpkin Lush Recipe
Step 1: Crafting the Perfect Gingersnap Crust
First things first — I line an 8×8-inch pan with parchment paper to make cleanup and serving a breeze. Then, I melt my butter and mix it right into the crushed gingersnap crumbs. The key here is to get the crumbs nice and evenly coated with butter, so when you press it into the pan, it holds together firmly. I press the mixture down firmly with the back of a spoon to create an even layer, then pop it in the freezer for at least 30 minutes to get nice and solid — this little chill time means your crust won’t crumble when you layer the pudding and cream cheese on top.
Step 2: Whisking Up That Pumpkin Spice Pudding Layer
While the crust chills, I whisk together the pumpkin spice pudding mix and milk in a bowl. It’s important to mix it well so there aren’t any lumps, then pop it in the fridge for about 10 minutes to firm up. This pudding is what makes the whole dessert sing — I find if you’re patient and let it chill well, it holds its shape beautifully between layers.
Step 3: Mixing the Creamy Pumpkin Cheese Layer
Next up is the luscious pumpkin cream cheese layer. I always make sure my cream cheese is softened to room temperature to avoid lumps. After beating it smooth, I add the powdered sugar, pumpkin puree, vanilla, and pumpkin spice. This is where magic happens — the spices really make that pumpkin pop. Then I gently fold in a cup of Cool Whip to keep things light and fluffy. Pro tip: folding instead of mixing vigorously helps keep the texture airy.
Step 4: Assembling Your No Bake Pumpkin Lush
Once your crust is ready, I dollop the pumpkin cream cheese mixture evenly on top and spread it out gently to cover the entire surface. Then I carefully spread the chilled pudding layer over this, followed by covering everything with the remaining Cool Whip. This layering is so satisfying — you want those distinct layers visible when you slice in. Finally, I sprinkle chopped pecans and more crushed gingersnaps on top for that beautiful finish. The whole pan goes into the fridge for at least 4 hours, but overnight is even better if you can wait!
Pro Tips for Making No Bake Pumpkin Lush Recipe
- Room Temperature Cream Cheese: Soft cream cheese blends more smoothly, giving your pumpkin layer that perfect silky texture.
- Chill Your Pudding Well: Letting pudding firm up fully makes it easier to layer and prevents mixing or soggy textures.
- Use Parchment Paper Lining: This saves so much hassle when cutting and serving because the bars come out cleanly with no sticking.
- Don’t Skip the Freezer Time: Freezing the crust first ensures a sturdy base to support those creamy layers without crumbling.
How to Serve No Bake Pumpkin Lush Recipe

Garnishes
When I serve this dessert, I love a sprinkle of toasted chopped pecans on top—adds a nutty crunch that contrasts so nicely with the creamy layers. If I’m feeling fancy, I might add a few whole pecans for presentation or even a light dusting of cinnamon or pumpkin spice to enhance those fall flavors.
Side Dishes
This pumpkin lush pairs beautifully with a hot cup of coffee or a spiced chai latte for a cozy treat. It’s also great alongside a scoop of vanilla ice cream or even a dollop of freshly whipped cream if you want to keep things extra indulgent.
Creative Ways to Present
For a dinner party, I like serving this dessert in clear parfait glasses to show off those gorgeous layers. You can also cut it into smaller squares and serve on a platter with mini spoons for easy sharing. During the holidays, I sometimes top with a drizzle of caramel sauce and a cinnamon stick to make it feel extra festive.
Make Ahead and Storage
Storing Leftovers
I always keep leftovers in an airtight container or cover the pan tightly with plastic wrap. It stays fresh in the fridge for up to 4 days — honestly, it rarely lasts that long in my house! The flavors even seem to deepen after a day or two, which is a nice bonus.
Freezing
This recipe freezes well if you want to make it ahead in bigger batches. I usually freeze the whole pan after it’s fully assembled, wrapped tightly in foil and plastic wrap. When ready to serve, I thaw it overnight in the fridge. Just note that the crust might soften a bit, but the flavors remain wonderful.
Reheating
Since this is a chilled dessert, you don’t really want to heat it up, but letting frozen portions thaw slowly in the fridge helps preserve texture and flavor. If you’re short on time, 30 minutes at room temperature works too, just keep an eye on it so it doesn’t get too soft.
FAQs
-
Can I use homemade pumpkin puree for this recipe?
Absolutely! Homemade pumpkin puree works beautifully and gives you full control over flavor and texture. Just make sure it’s well strained so the layer isn’t too watery.
-
What can I substitute if I can’t find pumpkin spice pudding mix?
If pumpkin spice pudding mix isn’t available, butterscotch pudding is a great substitute — it pairs nicely with the pumpkin cream cheese layer. You can also mix vanilla pudding with extra pumpkin spice for a similar effect.
-
How long should I let this dessert chill before serving?
For best results, refrigerate the dessert for at least 4 hours, but overnight chilling is ideal. This allows all the layers to set and the flavors to meld wonderfully.
-
Can I make this recipe ahead of time for holiday gatherings?
Yes! This No Bake Pumpkin Lush Recipe is perfect for making a day or two ahead. Just keep it covered in the refrigerator and add the toppings right before serving to keep them fresh and crunchy.
Final Thoughts
This No Bake Pumpkin Lush Recipe has been my go-to for autumn gatherings and easy dessert cravings. Its creamy texture layered with just the right spices feels like a warm hug on a plate, and yet it’s so simple to make. I love sharing this recipe because it always impresses guests and brings out that cozy, festive vibe in any season. Give it a try—you might just find yourself reaching for it every pumpkin season, just like I do.
Print
No Bake Pumpkin Lush Recipe
- Prep Time: 45 minutes
- Cook Time: 0 minutes
- Total Time: 4 hours 45 minutes
- Yield: 9 servings
- Category: Dessert
- Method: No-Cook
- Cuisine: American
- Diet: Vegetarian
Description
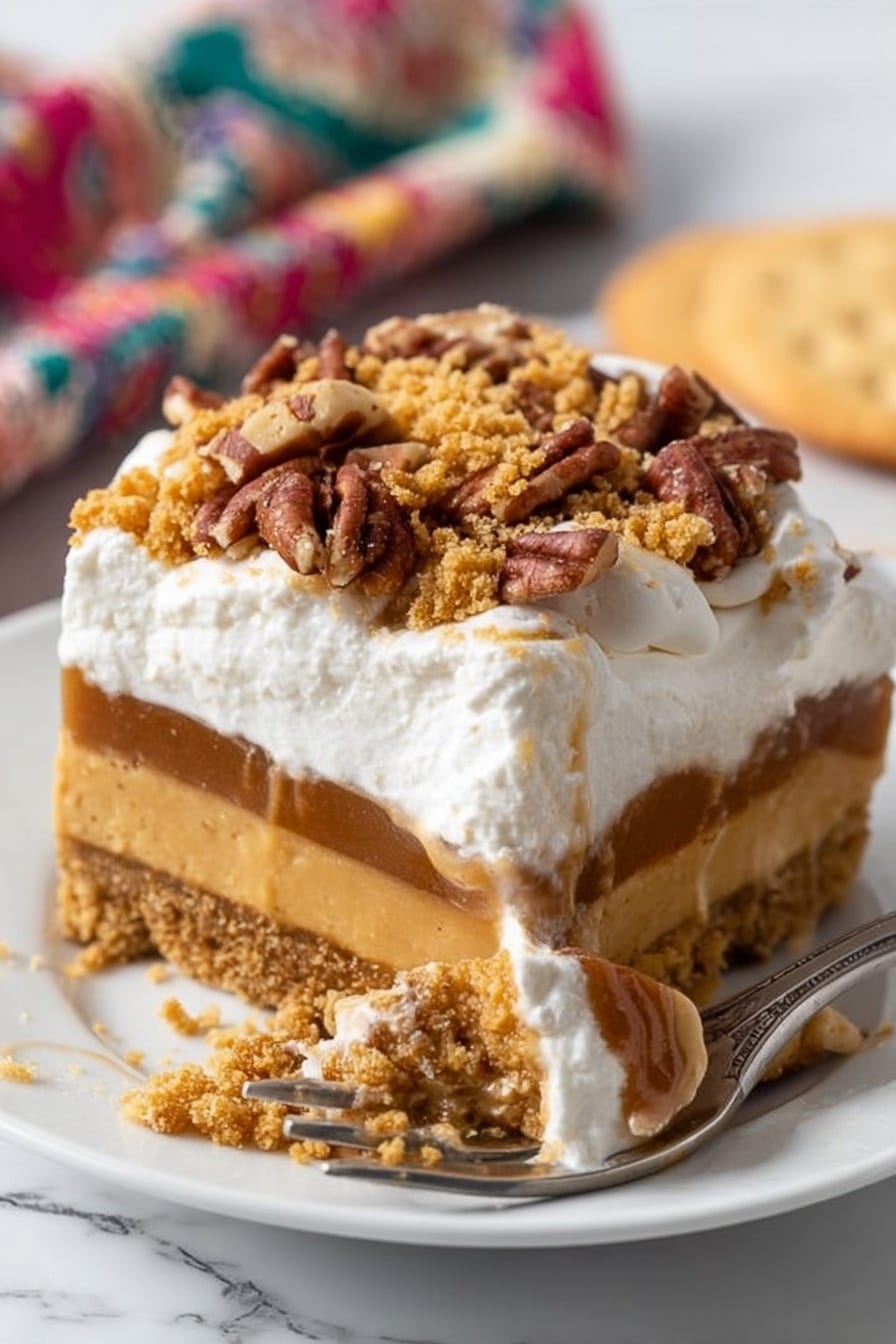
No Bake Pumpkin Lush is a delightful layered dessert featuring a crunchy gingersnap cookie crust, creamy pumpkin spice pudding, and a luscious pumpkin cream cheese layer, topped with fluffy Cool Whip and optional chopped pecans and cookie crumbs. Perfect for fall gatherings or anytime you crave a festive, no-bake treat.
Ingredients
Crust
- 1 ⅓ cups crushed Gingersnap cookie crumbs (about 25 cookies depending on size)
- 5 tablespoons unsalted butter
Pudding Layer
- 3.4 ounce package Pumpkin Spice Pudding Mix (butterscotch pudding can be substituted)
- 1 ½ cups milk
Pumpkin Cream Cheese Layer
- 6 ounces cream cheese, room temperature
- ½ cup confectioners’ sugar
- ¼ cup pure pumpkin puree
- ½ teaspoon pure vanilla extract
- ¾ teaspoon pumpkin spice
- 1 cup Cool Whip from container below
Topping
- 8 ounces Cool Whip, divided
- Chopped pecans (optional)
- Additional crushed Gingersnap cookies (optional)
Instructions
- Prepare the Crust: Line an 8×8-inch baking pan with parchment paper for easy removal and slicing. In a small mixing bowl, melt the butter, then add the crushed gingersnap cookie crumbs and mix until well combined. Press the crumb mixture evenly into the bottom of the prepared pan. Place the crust into the freezer for at least 30 minutes to harden.
- Make the Pudding Layer: In a medium mixing bowl, whisk together the pumpkin spice pudding mix and milk until fully combined. Refrigerate the pudding for a minimum of 10 minutes to set.
- Create the Pumpkin Cream Cheese Layer: In a mixing bowl, beat the cream cheese until smooth and creamy. Add the confectioners’ sugar, pumpkin puree, vanilla extract, and pumpkin spice, mixing until well combined. Gently fold in 1 cup of Cool Whip with a rubber spatula until fully incorporated.
- Assemble the Dessert: Remove the crust from the freezer and dollop the pumpkin cream cheese mixture evenly over it. Spread carefully to cover the crust fully. Next, spread the chilled pudding over the cream cheese layer. Cover the pudding with the remaining Cool Whip, spreading it evenly.
- Chill to Set: Refrigerate the assembled dessert for at least 4 hours or overnight for best results. Alternatively, freeze for 1 hour and 30 minutes if short on time.
- Add Toppings: Before serving, sprinkle chopped pecans and additional crushed gingersnap cookies over the top to add extra texture and flavor, if desired.
Notes
- Use pumpkin spice pudding mix for authentic flavor; butterscotch pudding can be a suitable substitute if unavailable.
- Ensure cream cheese is at room temperature for easier mixing and a smoother texture.
- Line the baking pan with parchment paper to simplify removal and slicing of the dessert bars.
- Chilling time is important; longer refrigeration allows the layers to set properly and flavors to meld.
- Store leftovers covered in the refrigerator for up to 3 days to maintain freshness.
- Can be frozen for longer storage; thaw in refrigerator before serving.
Nutrition
- Serving Size: 1 serving
- Calories: 310 kcal
- Sugar: 22 g
- Sodium: 150 mg
- Fat: 20 g
- Saturated Fat: 9 g
- Unsaturated Fat: 9 g
- Trans Fat: 0 g
- Carbohydrates: 28 g
- Fiber: 1 g
- Protein: 3 g
- Cholesterol: 35 mg


