
No-Bake Cookie Butter Icebox Cake Recipe
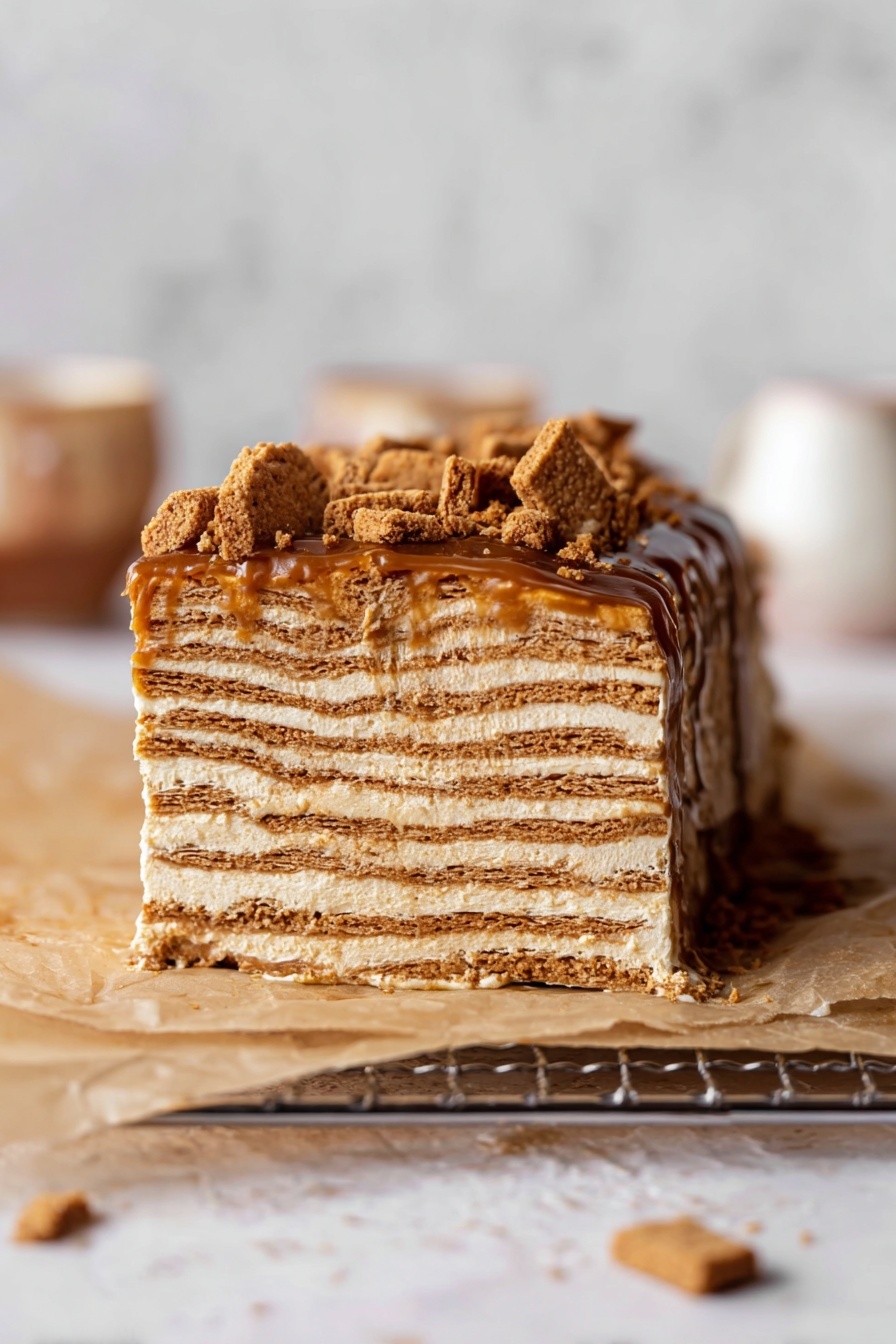
If you love creamy, dreamy desserts that require zero baking, then you’re going to fall head over heels for this No-Bake Cookie Butter Icebox Cake Recipe. It’s unbelievably smooth with that signature spiced caramel flavor only cookie butter can bring, layered with crisp Biscoff cookies that soak up all the deliciousness overnight. Trust me, once you try this, it’s going to be your go-to dessert for gatherings or whenever you need a sweet treat without turning on the oven.
Why This Recipe Works
- No Oven Necessary: You don’t need heat to create layers that meld perfectly, saving time and effort on hot days.
- Layered Texture Contrast: The creamy cookie butter mixture softens the crunchy cookies just enough for a melt-in-your-mouth bite.
- Make-Ahead Friendly: It improves with chilling, making it perfect for prepping in advance for parties or desserts on demand.
- Simple Ingredients: Minimal pantry staples create maximum flavor without any fuss.

Ingredients & Why They Work
Every ingredient in this No-Bake Cookie Butter Icebox Cake Recipe plays a key role in balancing rich creaminess with lightly spiced cookie crunch. Choosing quality ingredients really makes the difference, especially with cookie butter and mascarpone.
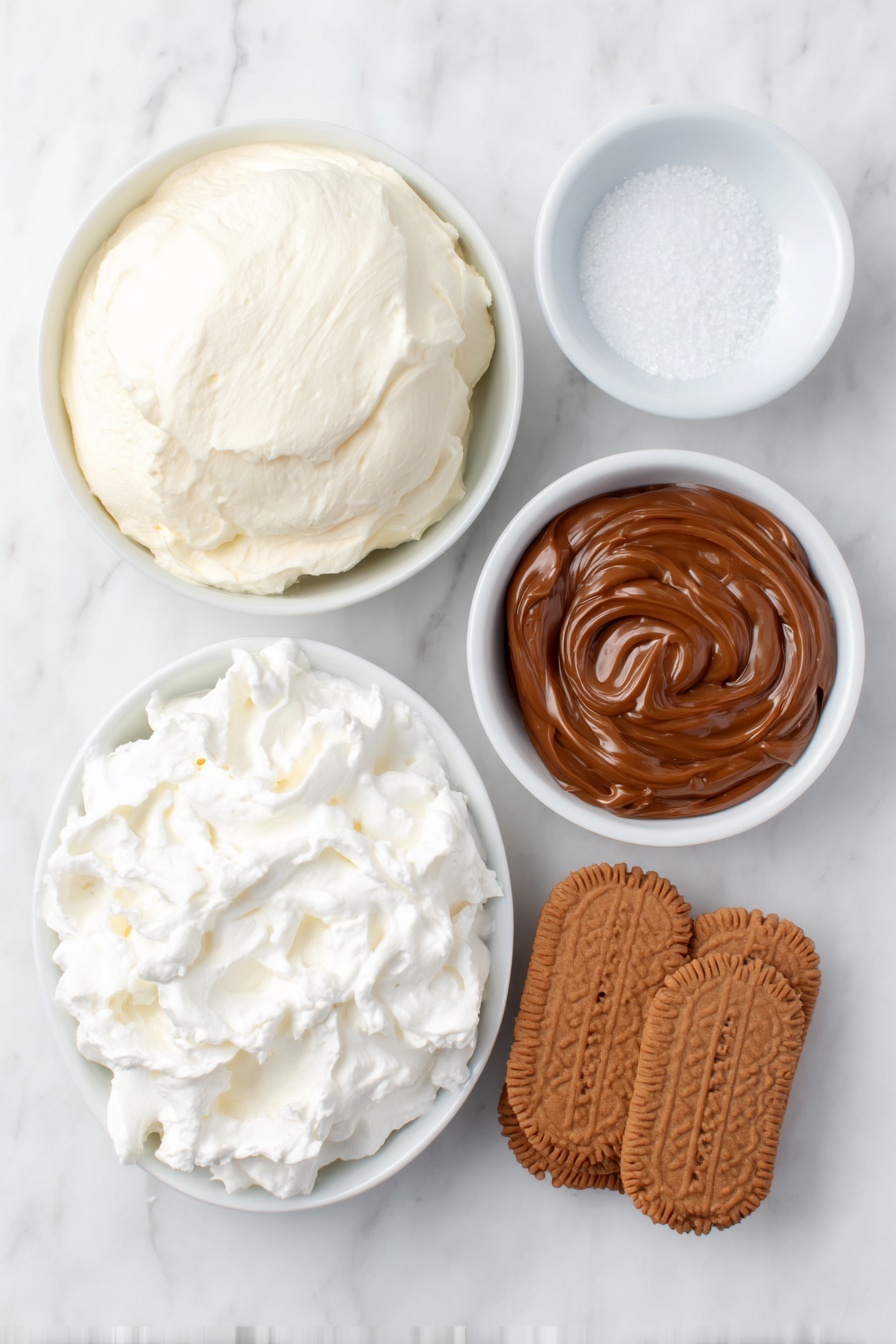
- Heavy cream: Whipped to medium peaks, it gives the cake a light, airy texture that keeps the dessert from feeling heavy.
- Lotus Biscoff spread (cookie butter): The star ingredient that flavors the cream with familiar caramelized spices; warming it up makes it perfect for drizzling.
- Mascarpone cheese: Adds luxuriously smooth richness and helps stabilize the cream mixture while enhancing the flavor depth.
- Pure vanilla extract: Injects a subtle sweetness and aromatic warmth that complements both the cookie butter and cream.
- Kosher salt: Just a pinch to heighten all the sweet flavors and keep the cream balanced.
- Confectioner’s sugar: Sweetens the cream gently without any graininess.
- Lotus Biscoff cookies: Provide that signature crunch and a lovely spiced undertone; layering them so they soak up cream slowly is essential.
Tweak to Your Taste
I like to keep this No-Bake Cookie Butter Icebox Cake Recipe pretty classic for that perfect Biscoff comfort, but sometimes I swap mascarpone for cream cheese to add a tangy note or sprinkle cinnamon between layers for extra warmth. You can really make it your own!
- Chocolate Drizzle: Once, I melted some dark chocolate and drizzled it over the top just before serving—total game changer for chocoholics.
- Dairy-Free Variation: Use coconut cream whipped to stiff peaks and a dairy-free cream cheese alternative; it’s wonderfully indulgent and allergy-friendly.
- Nutty Add-Ins: Toasted pecans or sliced almonds folded into the cream add delightful crunch and depth.
- Fruit Layer: Adding thin slices of banana or pear between the cookie layers can brighten the flavor profile beautifully.
Step-by-Step: How I Make No-Bake Cookie Butter Icebox Cake Recipe
Step 1: Whip Your Cream to Perfection
Start by pouring cold heavy cream into your stand mixer bowl fitted with the whisk attachment. Whip it on medium-high speed until medium peaks form—this means when you lift the whisk, the cream holds soft peaks but still dips gently. Getting this right is key, since over-whipping can turn it grainy, and under-whipping won’t give you that fluffy structure.
Step 2: Fold in the Cookie Butter and Mascarpone
Next, add ½ cup of cookie butter, ⅓ cup of mascarpone cheese, vanilla extract, a pinch of kosher salt, and confectioner’s sugar to your whipped cream. Use the mixer on low speed or a spatula to gently combine until everything is smooth and well incorporated. This creates your luscious cookie butter cream layer. If your mascarpone feels lumpy, give it a quick mix by itself first to prevent clumps.
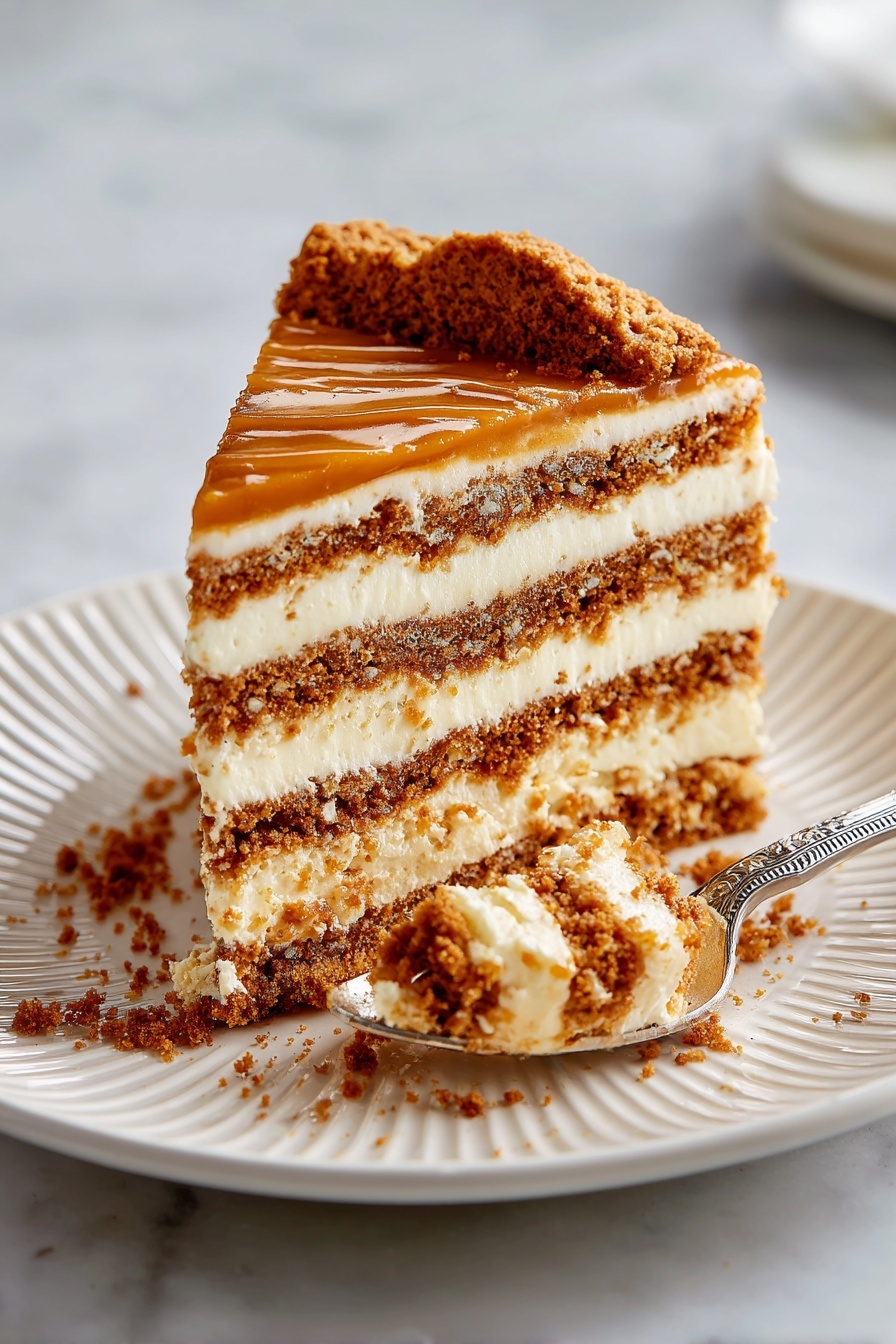
Step 3: Layer Cookies and Cream in a Loaf Pan
Line a loaf pan with plastic wrap to make unmolding easier. Then place a single layer of Biscoff cookies at the bottom—usually about 9 cookies for a straight-sided pan. Spread the cream mixture evenly over the cookies, roughly matching the cookie layer’s thickness. Repeat these layers, alternating cookie then cream, until you fill the pan and finish with a final cookie layer on top. This layering gives you that classic icebox cake look and texture.
Step 4: Chill for 24 Hours—The Magic Happens Here
Cover your loaf pan loosely with plastic wrap and refrigerate for at least 24 hours. This resting time lets the cookies soak up moisture from the cream, softening just enough while maintaining slight bites. It’s why icebox cakes are so tender and satisfying. When ready to serve, gently loosen the plastic wrap and invert the cake onto a plate or tray.
Step 5: Serve with Warmed Cookie Butter and Crushed Cookies
To finish, warm about ⅓ cup of cookie butter in the microwave in 30-second increments, stirring in between, until smooth and drizzly. Pour this over your cake and sprinkle some crushed Biscoff cookies on top for an irresistible finish. This extra drizzle makes the dessert even more decadent and visually inviting.
Pro Tips for Making No-Bake Cookie Butter Icebox Cake Recipe
- Chill Ingredients: Keeping your cream and mascarpone chilled until use helps the cream whip up better and stay stable.
- Don’t Rush the Chill Time: I’ve rushed this step before and the cookies didn’t soften properly—24 hours is really the sweet spot!
- Use a Straight-Sided Pan: It makes layering the cookies easier and gives you perfectly shaped slices.
- Loosen Carefully When Unmolding: Run a thin knife around edges before flipping to avoid cracking or an uneven top.
How to Serve No-Bake Cookie Butter Icebox Cake Recipe
Garnishes
I usually go for a simple but stunning look: a drizzle of warmed cookie butter spread and a generous sprinkle of crushed Lotus Biscoff cookies on top. Sometimes, I add a few toasted pecans or a dusting of cinnamon for a little extra punch. This combo gives both texture and that cozy spice aroma that makes everyone swoon.
Side Dishes
This dessert shines best on its own, but pairing it with fresh berries or a cup of strong coffee balances out the sweetness beautifully. I’ve also enjoyed it alongside a light vanilla bean ice cream for an over-the-top indulgence that impresses guests every time.
Creative Ways to Present
For birthday parties or holidays, I love layering this cake in a clear glass trifle dish so those beautiful cookie and cream stripes pop through. Another fun idea is to pipe extra cookie butter cream on top into decorative rosettes using a star tip, then sprinkle with crushed Biscoff crumbs and edible gold dust for a touch of glam.
Make Ahead and Storage
Storing Leftovers
Keep leftovers tightly wrapped in plastic wrap or in an airtight container in the fridge. Because of the cream and cookie layers, this dessert stays fresh and moist for up to 3 days. I usually slice directly in the loaf pan and keep it covered to minimize drying out.
Freezing
I’ve successfully frozen slices wrapped individually in plastic wrap, then placed inside a freezer-safe container. When you want to enjoy, just thaw overnight in the refrigerator. The texture stays impressively intact, though freshly made is always best.
Reheating
No need to warm this dessert; it’s best served chilled to hold its structure and keep that silky smooth texture. If you prefer, you can take it out of the fridge 15 minutes before serving to soften slightly, but avoid any heat that could cause the cream to separate.
FAQs
-
Can I use a different type of cookie instead of Lotus Biscoff?
While Biscoff cookies are classic in this recipe for their caramelized spice flavor, you can substitute similar crisp cookies like gingersnaps or graham crackers. Just remember that the flavor will slightly change, and the moisture absorption might vary, so adjust chilling time accordingly.
-
How firm should the whipped cream be for this recipe?
You want medium peaks when whipping the cream—soft enough to fold easily but firm enough to hold its shape. This balance ensures a creamy texture that helps the layers set without becoming dense or watery.
-
What’s the best way to melt cookie butter for drizzling?
I recommend placing the cookie butter in a microwave-safe bowl and heating it in 30-second bursts, stirring between each, until smooth and drizzly. This prevents overheating and burning while giving you a perfect sauce consistency.
-
Can I make this icebox cake ahead of time?
Absolutely! This cake actually benefits from chilling overnight or even up to three days. It makes a fantastic make-ahead dessert that will impress without last-minute stress.
Final Thoughts
This No-Bake Cookie Butter Icebox Cake Recipe is truly one of those treats that’s easy to make yet feels indulgently special. I remember the first time I made it for a family gathering and how everyone asked for seconds—or the recipe! It’s creamy, spiced, and refreshingly simple, perfect for cold or warm days when you want something sweet but fuss-free. I can’t wait for you to try it and make it your own favorite dessert too.
Print
No-Bake Cookie Butter Icebox Cake Recipe
- Prep Time: 15 minutes
- Cook Time: 0 minutes
- Total Time: 1 day 15 minutes
- Yield: 8 servings
- Category: Dessert
- Method: No-Cook
- Cuisine: American
Description
A creamy, no-bake icebox cake layered with Lotus Biscoff cookies and a luscious cookie butter mascarpone cream. Perfectly chilled for 24 hours to meld flavors, topped with warmed cookie butter and crushed cookies for extra indulgence.
Ingredients
Cream Mixture
- 2 cups heavy cream
- ½ cup (150g) Lotus Biscoff spread
- ⅓ cup (80g) mascarpone cheese
- 1 tsp pure vanilla extract
- Pinch of Kosher salt
- 2 Tbsp confectioner’s sugar
Cookies
- 2 packages Lotus Biscoff cookies (32 cookies per package)
For Serving
- ⅓ cup Lotus Biscoff spread, warmed
- Crushed Lotus Biscoff cookies
Instructions
- Whip the heavy cream: Pour 2 cups heavy cream into the bowl of a stand mixer fitted with a whisk attachment. Whisk on medium-high speed until medium peaks form, which should take a few minutes.
- Add cookie butter mixture: Add ½ cup (150g) of Lotus Biscoff spread, ⅓ cup (80g) mascarpone cheese, 1 tsp pure vanilla extract, a pinch of Kosher salt, and 2 Tbsp confectioner’s sugar to the whipped cream. Incorporate everything gently but thoroughly until well combined and smooth.
- Assemble the icebox cake: Line a loaf pan with plastic wrap. Place a single layer of Biscoff cookies along the bottom of the pan. Spread a layer of the Biscoff cream mixture evenly over the cookies, ensuring the layer is about the same thickness as the cookie layer. Repeat these layers—cookies followed by cream—until you reach the top of the pan, finishing with a layer of cookies.
- Chill the cake: Loosely wrap the loaf pan with plastic wrap and refrigerate the cake for 24 hours. This allows the cookies to soften and the flavors to meld beautifully.
- Serve the icebox cake: When ready to serve, unmold the cake onto a plate or tray. Drizzle with warmed Lotus Biscoff spread (heat ⅓ cup in microwave in 30-second increments stirring between each) and sprinkle with crushed Biscoff cookies for added texture and flavor.
Notes
- Nutrition facts are estimated based on using 45 cookies total.
- Loaf pan sizes vary; a straight-sided pan uses about 9 cookies per layer, so 1½ packages is usually sufficient. For tapered pans, fewer cookies may be needed at the bottom.
- To melt cookie butter, place ⅓ cup in a microwave-safe bowl and heat in 30-second intervals, stirring between each until smooth and warm.
- This icebox cake can be made ahead and chilled for at least 24 hours or up to 3 days, making it great for meal prep or entertaining.
- Store leftovers tightly wrapped or in an airtight container in the refrigerator for up to 3 days.
- For freezing, wrap tightly in plastic and place in a freezer-safe container. Thaw overnight in the fridge before serving.
Nutrition
- Serving Size: 1 slice
- Calories: 450 kcal
- Sugar: 28 g
- Sodium: 180 mg
- Fat: 30 g
- Saturated Fat: 18 g
- Unsaturated Fat: 10 g
- Trans Fat: 0 g
- Carbohydrates: 38 g
- Fiber: 1 g
- Protein: 5 g
- Cholesterol: 110 mg


