
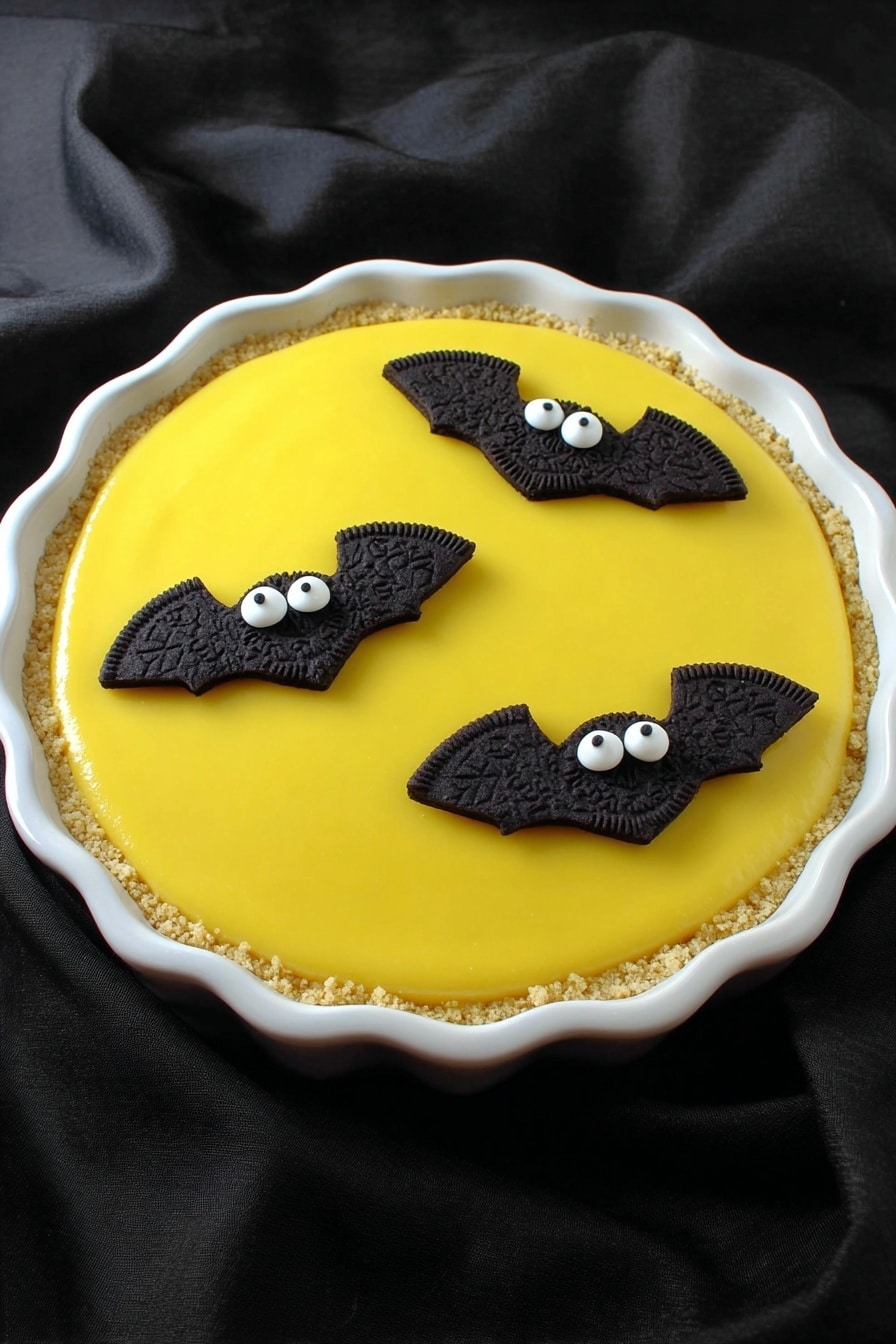
No Bake Boston Cream Halloween Pie Recipe
If you’re looking to wow your friends and family this spooky season with something seriously delicious but shockingly simple, you’re going to love this No Bake Boston Cream Halloween Pie Recipe. Creamy pudding, fluffy whipped cream, crunchy Oreo crust, and those adorable chocolate bats on top make it a perfect festive treat. I’ve made this pie several times now, and each time it feels like Halloween magic—plus, you don’t even have to fire up the oven. So, let me walk you through how to nail this crowd-pleaser effortlessly.
Why This Recipe Works
- No-Bake Ease: You never have to turn on the oven, which means faster prep and less heat in the kitchen during the fall hustle.
- Layered Textures: Crunchy Oreo crust meets smooth chocolate glaze, silky vanilla pudding, and fluffy whipped cream—it’s a texture party in every bite.
- Festive Fun: The chocolate bat decorations aren’t just cute—they add that playful Halloween vibe without any stress.
- Adaptable and Friendly: This recipe scales easily, and you can switch up components to fit your pantry or dietary preferences.

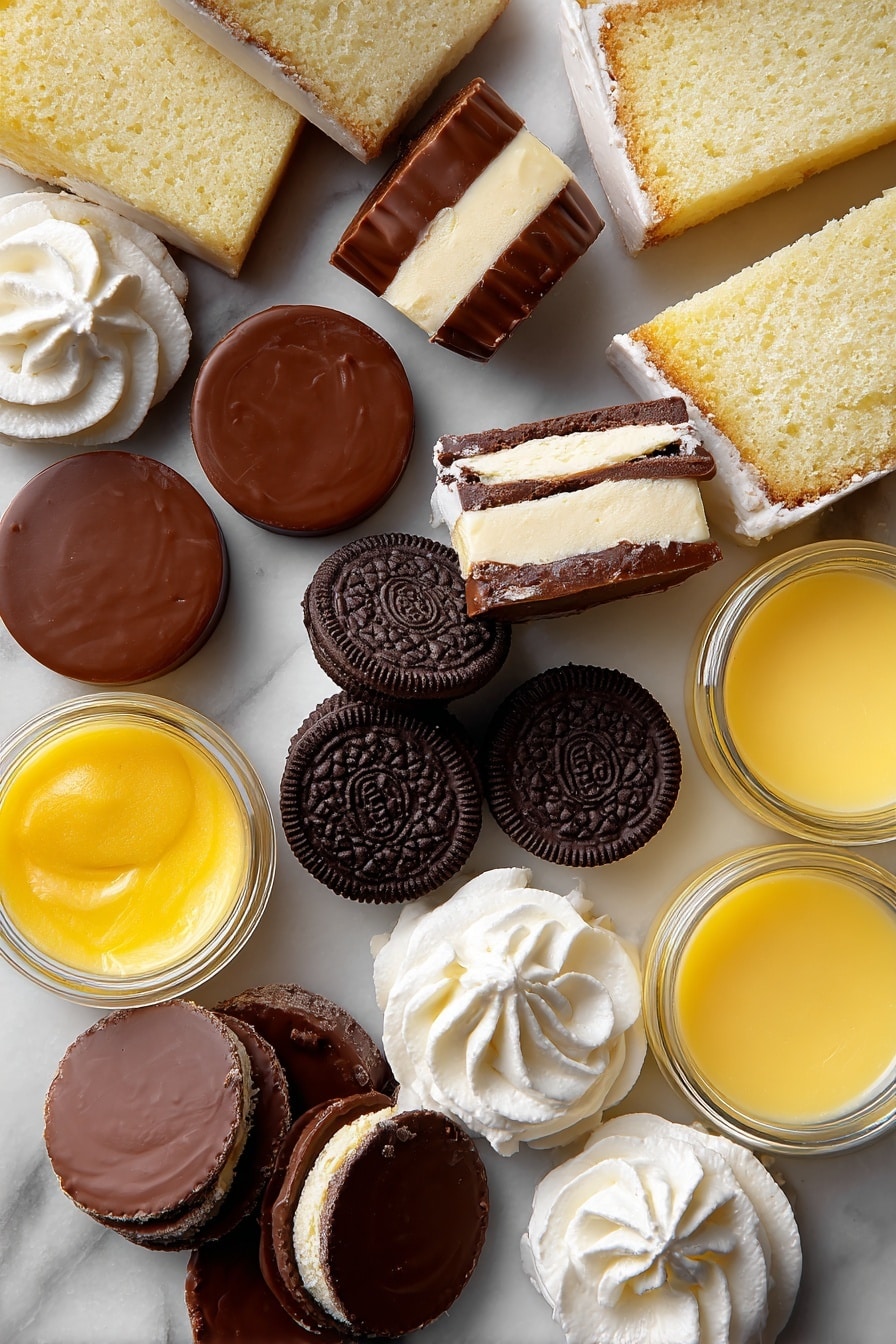
Ingredients & Why They Work
This No Bake Boston Cream Halloween Pie Recipe brings together familiar flavors and textures that just click. From the Oreo crust that forms a sturdy base to the pudding that’s tinted perfectly Halloween yellow with gel coloring, every ingredient has its role in making this pie both festive and indulgent.
- Oreo chocolate baking crumbs: They create that classic chocolatey crust with plenty of texture and rich flavor—buy the baking crumbs or blitz regular Oreos in a food processor.
- Unsalted butter: Melts into the crumbs to bind everything into a perfect crust without overpowering the sweet flavors.
- White granulated sugar: Adds just a touch of extra sweetness and helps balance the chocolatey base.
- Semi-sweet chocolate: This melts into the glaze layer for just the right bittersweet edge against the creamy filling.
- Corn syrup: Gives the chocolate glaze that shiny, glossy finish and prevents it from getting gritty.
- Yellow gel paste food coloring: Unlike liquid grocery store colorings, gel paste is vibrant and won’t water down your pudding’s texture.
- Whipped cream: Use homemade if you can—it makes the pie feel fresh and fluffy. Cool Whip works too in a pinch and keeps it simple.
- Instant vanilla pudding: It sets quickly without fuss and provides the classic Boston cream pie flavor.
- White pound, angel food, or loaf cake: Adds that soft, bouncy layer that contrasts so nicely with the cream—breaking it up rather than slicing makes it easier to spread evenly.
- Mini Reese’s peanut butter cups: The stars of your chocolate bats—they’re small, rich, and perfect for Halloween fun.
- Oreo Thin Sandwich Cookies: Break into bat wings, with frosting scraped off so the wings hold together!
- Royal icing or frosting dabs: Acts as glue to stick the edible eyes on the bats—a tiny touch that transforms them from cute to spooky.
- Edible eyes: Adds personality and adorable creep factor to your Halloween pie’s star decorations.
Tweak to Your Taste
One of my favorite things about this No Bake Boston Cream Halloween Pie Recipe is how easy it is to personalize. Whether you want it a touch sweeter, need a dairy-free version, or fancy a flavor twist, there’s room to make it truly yours.
- Variation: I’ve swapped out the vanilla instant pudding for chocolate pudding in past years for a mocha twist—super rich and delicious paired with the chocolate glaze.
- Dairy-Free Option: Replace dairy whipped cream with coconut whipped cream and use dairy-free chocolate, and you have a vegan-friendly Halloween treat.
- Nut Allergies: Instead of Reese’s cups, use chocolate candies or Oreo halves for the bats if peanut butter is off-limits.
- Seasonal Flavors: Try adding a dash of cinnamon or pumpkin pie spice in the whipped cream for a warm autumn vibe.
Step-by-Step: How I Make No Bake Boston Cream Halloween Pie Recipe
Step 1: Prepare Your Dessert Dish and Crust
First things first, grab a 10.5-inch round dessert dish or two 9-inch shallow pie plates and spray them with some non-stick cooking spray—trust me, this makes releasing the pie a breeze later. Then, mix the Oreo crumbs, melted butter, and sugar until they cling together like wet sand. Press this evenly into your dish’s bottom—don’t be shy about packing it firmly. Pop it in the fridge to chill while we move on.
Step 2: Make That Gorgeous Chocolate Glaze
While the crust chills, melt the semi-sweet chocolate gently—my go-to is 50% power in the microwave, stirring every 30 seconds until smooth. Stir in the melted butter and corn syrup carefully. This glaze is the secret to adding a silky, glossy layer over your crust that sets firm and looks stunning. Pour it evenly over the cookie crust and refrigerate again until it firms up—about 15 minutes or so.
Step 3: Assemble the Creamy Layers
Spread whipped cream evenly over your shiny, chocolate-covered crust—this adds that cloud-like softness to the pie’s base. Next, scatter chunks or slices of your white cake over that fluffy layer—think of it like a cozy blanket for the pudding coming next. Tint the instant vanilla pudding bright yellow with gel paste food coloring (not liquid) and spread it on top. Use a butter knife to smooth it out, filling the pie edges just right—the colors should pop and make you smile already!
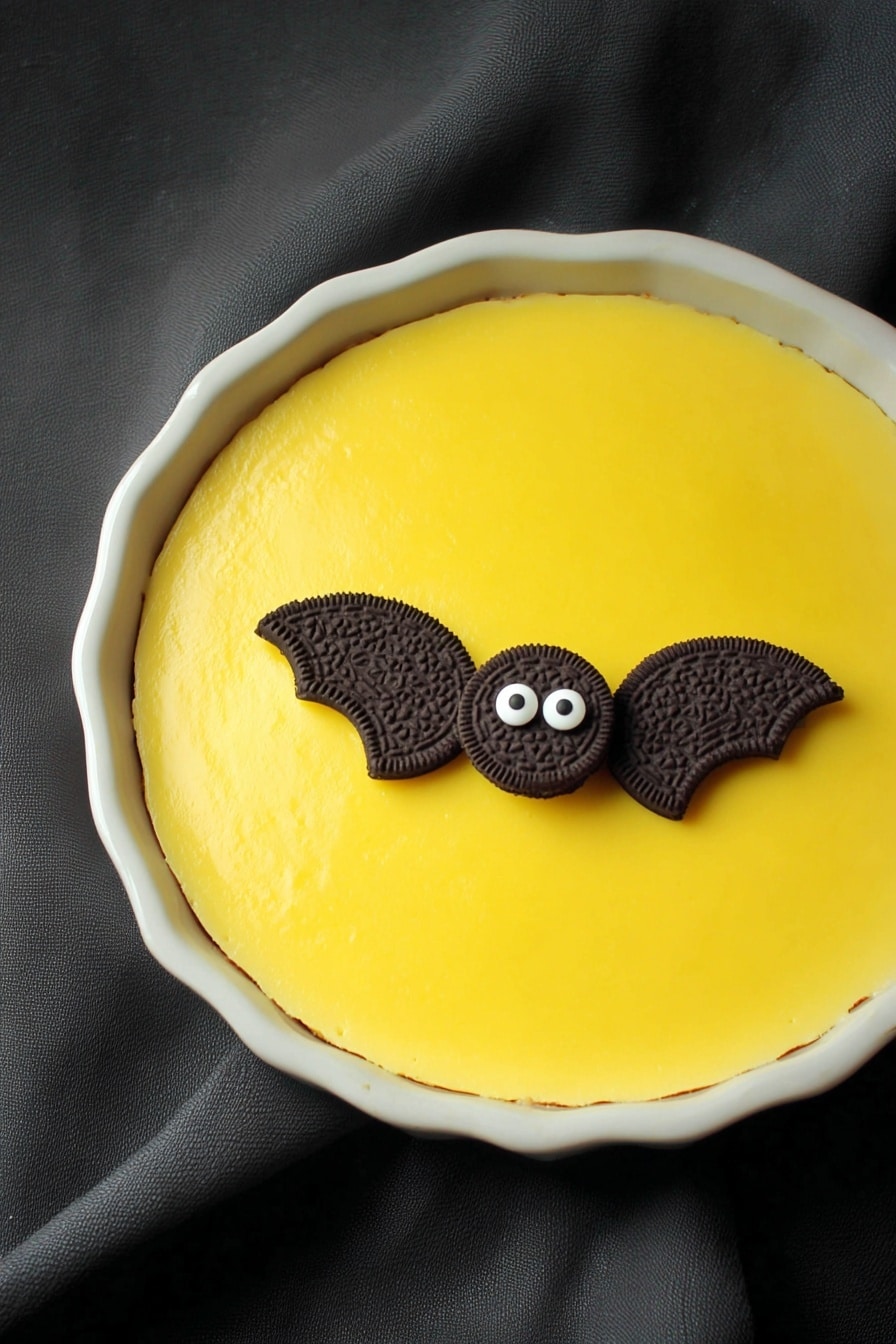
Step 4: Create Your Chocolate Bats
Now for the fun and whimsical part: the bats! Unwrap the Reese’s peanut butter cups and break Oreo Thin Sandwich Cookies in half, peeling the halves into single cookie layers to form “bat wings.” Scrape off the white frosting carefully so the cookies stick better. Affix one cookie piece to each side of the Reese’s cups using a dab of frosting as glue. Pipe little dots of icing on the back of the edible eyes and place them on each bat’s center “head.”
Place the bats gently on top of the pie right before serving. Pro tip: If you’re not serving immediately, keep the bats aside and add them last minute—otherwise, they can turn soggy and eyes start to run, which is a little gross (been there, learned that!).
Pro Tips for Making No Bake Boston Cream Halloween Pie Recipe
- Gently Press Your Crust: Don’t crush the Oreo crumbs too hard; the goal is firm but crumbly to maintain that lovely texture contrast.
- Chocolate Melting Patience: Melt chocolate slowly to avoid seizing—microwave in short bursts or use a double boiler if you have time.
- Color Your Pudding Wisely: Use gel paste coloring for a vibrant yellow that won’t water down your pudding.
- Decorate Last Minute: Add those chocolate bats just before serving to keep them crisp and looking their spooky best.
How to Serve No Bake Boston Cream Halloween Pie Recipe
Garnishes
I love adding a few sprinkles of crushed Oreos around the bats for extra texture and a bit of edible glitter on the yellow pudding for a festive shimmer. Sometimes a dollop of homemade whipped cream with a dash of cinnamon makes it even cozier.
Side Dishes
Pair this pie with hot apple cider or a pumpkin spice latte to complement those autumnal flavors. If you’re hosting, a small charcuterie board with some spiced nuts and sharp cheeses balances the sweetness perfectly.
Creative Ways to Present
For a Halloween party, I’ve served this pie in clear glass trifle bowls so everyone can admire those layers, then topped each serving with a little bat on a toothpick. It’s a fun way to personalize portions and keeps the bat decorations intact until the last second!
Make Ahead and Storage
Storing Leftovers
I store leftover pie covered tightly with plastic wrap in the refrigerator. It stays fresh for up to 3 days, though honestly, it rarely lasts that long in my house. Keep the bats separate if you made extra to prevent sogginess.
Freezing
Since this pie is heavy on whipped cream and pudding, I don’t recommend freezing—it affects texture and can make the cream watery when thawed. If you want to prepare ahead, make all layers but hold off adding whipped cream and bats, then add fresh when thawing.
Reheating
No need to reheat this dessert—it’s best served chilled. Just let it sit at room temperature for about 10 minutes before serving to bring out the flavors and soften the pudding a bit.
FAQs
-
Can I use a different type of cookie for the crust?
Absolutely! While Oreo crumbs provide that signature chocolate flavor, crushed chocolate graham crackers or even chocolate wafer cookies can work well if you want a slightly different taste or texture. Just make sure they’re crushed finely and bind well with melted butter.
-
What if I can’t find yellow gel paste food coloring?
Gel paste coloring is best for vibrant colors without altering texture, but if unavailable, you can use a small amount of liquid food coloring—start with just a drop or two to avoid watering down the pudding. Alternatively, natural colorants like turmeric can add a gentle yellow hue.
-
Can I make this pie in advance for a party?
Yes, you can prep most of it a day ahead. Just keep the chocolate bats separate and add them right before serving to ensure they stay crisp and the eyes don’t smudge. Store the pie covered in the fridge until ready.
-
What kind of whipped cream is best for this pie?
Homemade whipped cream gives the best fresh flavor and fluffiness, but store-bought frozen dessert toppings like Cool Whip are a great shortcut and hold up well for layering.
Final Thoughts
This No Bake Boston Cream Halloween Pie Recipe has quickly become my go-to for festive comfort food that doesn’t rob me of time or sanity. It’s fun, flavorful, and honestly, it just puts a smile on everyone’s face—even the picky eaters. Give it a try and I bet it’ll become one of your Halloween traditions too. Plus, those chocolate bats? So much fun to make and even better to eat!
Print
No Bake Boston Cream Halloween Pie Recipe
- Prep Time: 45 minutes
- Cook Time: 0 minutes
- Total Time: 1 hour
- Yield: 12 servings
- Category: Dessert
- Method: No-Cook
- Cuisine: American
- Diet: Vegetarian
Description
This No Bake Boston Cream Halloween Pie is a fun and festive dessert featuring a rich Oreo crust, smooth chocolate glaze, creamy whipped filling, and decorated with adorable chocolate bats perfect for Halloween celebrations. It’s easy to assemble without baking, making it ideal for quick holiday treats.
Ingredients
Pie Crust
- ½ 400g box Oreo chocolate baking crumbs
- ½ cup unsalted butter melted
- 2 tablespoons white granulated sugar
Pie Glaze
- 6 oz melted semi-sweet chocolate
- 1 tablespoon corn syrup
- ¼ cup melted butter
- ½ teaspoon yellow gel paste food/icing colouring
Pie Filling
- 2 cups whipped cream homemade or frozen dessert topping (e.g. Cool Whip)
- 12 99g containers snack size instant vanilla pudding (3 packages of 4 pudding)
- 1 270g – 370g white pound, angel food or loaf cake sliced or broken up
Chocolate Bats
- 4 miniature Reese’s peanut butter cups
- 4 Oreo Chocolate (thins) sandwich cookies
- Dabs frosting/icing (royal icing recommended)
- 8 edible eyes
Instructions
- Prepare the Pie Dish: Spray the inside of a 10.5 inch round (2.5 inches deep) dessert dish or two shallow (1.5 inch deep) 9-inch pie plates with non-stick cooking spray to prevent sticking.
- Make the Crust: In a large bowl, mix the Oreo cookie crumbs, melted butter, and white granulated sugar until the mixture clings together. Press the mixture evenly into the bottom of the pie plate. Chill in the refrigerator for 10 minutes to set.
- Make the Glaze: Melt the semi-sweet chocolate in the microwave at 50% power for 2.5 to 3 minutes or until fully melted, stirring occasionally. Stir in the melted butter and corn syrup until smooth. Pour the glaze evenly over the chilled Oreo crust and spread gently with a spatula to avoid mixing crumbs into the glaze. Refrigerate until the glaze is firm, about 15 minutes.
- Prepare the Filling: Spread the whipped cream evenly over the chocolate-coated crust. Add sliced or broken pieces of white pound, angel food, or loaf cake on top of the whipped cream. Mix yellow gel food coloring into the vanilla pudding until the desired yellow hue is achieved. Spoon the colored vanilla pudding over the cake layer. Use a butter knife to smooth the pudding to be flush with the edge of the pie plate, adjusting the amount as needed.
- Assemble Chocolate Bats: Remove wrappers from Reese’s peanut butter cups. Break Oreo thin sandwich cookies in half, separate the halves, and scrape off the frosting to create 8 bat wings. Attach one cookie piece to the left side and another to the right side of each Reese’s cup to form bat wings. Pipe frosting on the back of each edible eye and place them on top center of each Reese’s cup bat. Repeat for all four bats.
- Final Assembly: Place the chocolate bats gently on top of the pudding layer of the pie. Serve immediately for best results. If not serving right away, refrigerate the pie without the bats, adding them just before serving to avoid mushiness.
Notes
- Use yellow gel paste food coloring for the pudding for vibrant color; grocery store liquid food coloring may not produce the right hue.
- When melting chocolate, avoid high heat or contact with water to prevent seizing.
- If halving the recipe for a 9 inch pie plate, adjust servings to 8 for accurate ingredient amounts.
- Do not add chocolate bats until right before serving to keep them crisp and appealing.
- Homemade or store-bought whipped cream works well; Cool Whip is an acceptable alternative.
- For melting chocolate, a double boiler can be used as a gentle alternative to the microwave.
Nutrition
- Serving Size: 1 slice (based on 12 servings)
- Calories: 320 kcal
- Sugar: 24 g
- Sodium: 150 mg
- Fat: 20 g
- Saturated Fat: 10 g
- Unsaturated Fat: 8 g
- Trans Fat: 0 g
- Carbohydrates: 30 g
- Fiber: 2 g
- Protein: 4 g
- Cholesterol: 30 mg


