

Mummy Pretzels with Creepy Pudding Cups Recipe
If you’re looking to wow the kids (and let’s be honest, the adults too) this Halloween, you’ve absolutely got to try this Mummy Pretzels with Creepy Pudding Cups Recipe. It’s not just fun and festive—it’s a delightful mix of sweet, salty, and a little bit spooky, making your party or spooky night at home so much more memorable. These treats are surprisingly simple to whip up, and I’m excited to walk you through each step so your kitchen smells amazing and your guests get a tasty treat they won’t forget. Ready to make some mummy magic?
Why This Recipe Works
- Perfect Flavor Balance: The salty pretzels paired with sweet candy melts and creamy pudding create a deliciously addictive combo.
- Simple but Impressive: Minimal ingredients and easy steps result in treats that look complicated and festive.
- Kid-Friendly Fun: Decorating with candy eyes and adding spooky stickers makes this perfect for little helpers.
- Versatile Presentation: Pudding cups with pretzel toppers offer both a tasty snack and a fun Halloween centerpiece.

Ingredients & Why They Work
These ingredients are easy to find and play really well together. The pretzels give a nice crunch and saltiness, while the candy melts add festive color and a fun coating. The pudding cups bring a creamy, sweet base, and the little extra touches—like diced apple and peanut butter—add texture and flavor that keep each bite exciting.

- Pretzels: Choose small or medium-sized twisted pretzels for perfect “mummy bandages” that are easy to dip and decorate.
- Candy Melts (white, orange, green, chocolate): These melt smoothly and harden quickly, giving you bright colors to make your pretzels pop.
- Candy Eyeballs: The ultimate spooky accessory; look for high-quality eyes that stick well or use melted chocolate like glue.
- Snack Pack Puddings (vanilla and chocolate): Easy-to-use individual portions that keep your pudding cups neat and fun.
- Apple (diced): Adds a crisp freshness that contrasts beautifully with creamy pudding.
- Crushed Pretzels: A sprinkle for crunch and saltiness inside the pudding cups and on top.
- Peanut Butter: Adds a little richness and nutty flavor to the chocolate pudding cups—don’t skip this step, it’s a game changer!
- Halloween Stickers: Fun to decorate the pudding cups and amp up the festive mood, especially with kids helping out.
Tweak to Your Taste
I love how this Mummy Pretzels with Creepy Pudding Cups Recipe can easily be tweaked to fit your preferences or dietary needs. Over the years, I’ve found that little changes make it even more fun to tailor these treats for any Halloween gathering.
- Variation: Swap peanut butter for almond or sunflower seed butter if you have allergies—or omit it altogether if you want to keep it kid-friendly and simple.
- Flavor Twist: Try swapping vanilla pudding for banana or caramel flavors—adds an unexpected but yummy flair.
- Presentation: Use colored pretzels if you can find them, or drizzle a mix of pink and purple candy melts to give a more personalized look.
- Dietary adjustments: Skip the candy melts and use yogurt coatings or melted white chocolate made with dairy-free ingredients for vegan or lactose-sensitive guests.
Step-by-Step: How I Make Mummy Pretzels with Creepy Pudding Cups Recipe
Step 1: Melt your candy melts like a pro
Start by melting your candy melts in separate bowls according to the package instructions. I like using the microwave in short bursts, stirring frequently—this prevents the chocolate from burning. Having white, orange, and green ready to go sets such a fun tone. Keep a close eye because candy melts can stiffen quickly once off the heat, so only melt what you think you will use and reheat gently if needed.
Step 2: Dipping and decorating the pretzels
Line a baking sheet with parchment or wax paper, that way your pretzels won’t stick and cleanup will be a breeze. Dip your pretzels in the melted candy colors one at a time, then place them neatly on the paper. This is when the fun begins! Let the chocolate set for about 15 minutes, and if your candy melts harden before you’re done, just pop them back in the microwave for a few seconds to re-melt. Once set, use a fork to drizzle contrasting colors atop the pretzels for that iconic mummy bandage look — I find alternating thin and thick lines looks best.
Before the final chocolate drizzle hardens, press candy eyeballs onto the pretzels using a tiny dab of melted chocolate like glue if needed—it’s amazing how those eyes bring your mummies to life!
Step 3: Assemble the pudding cups
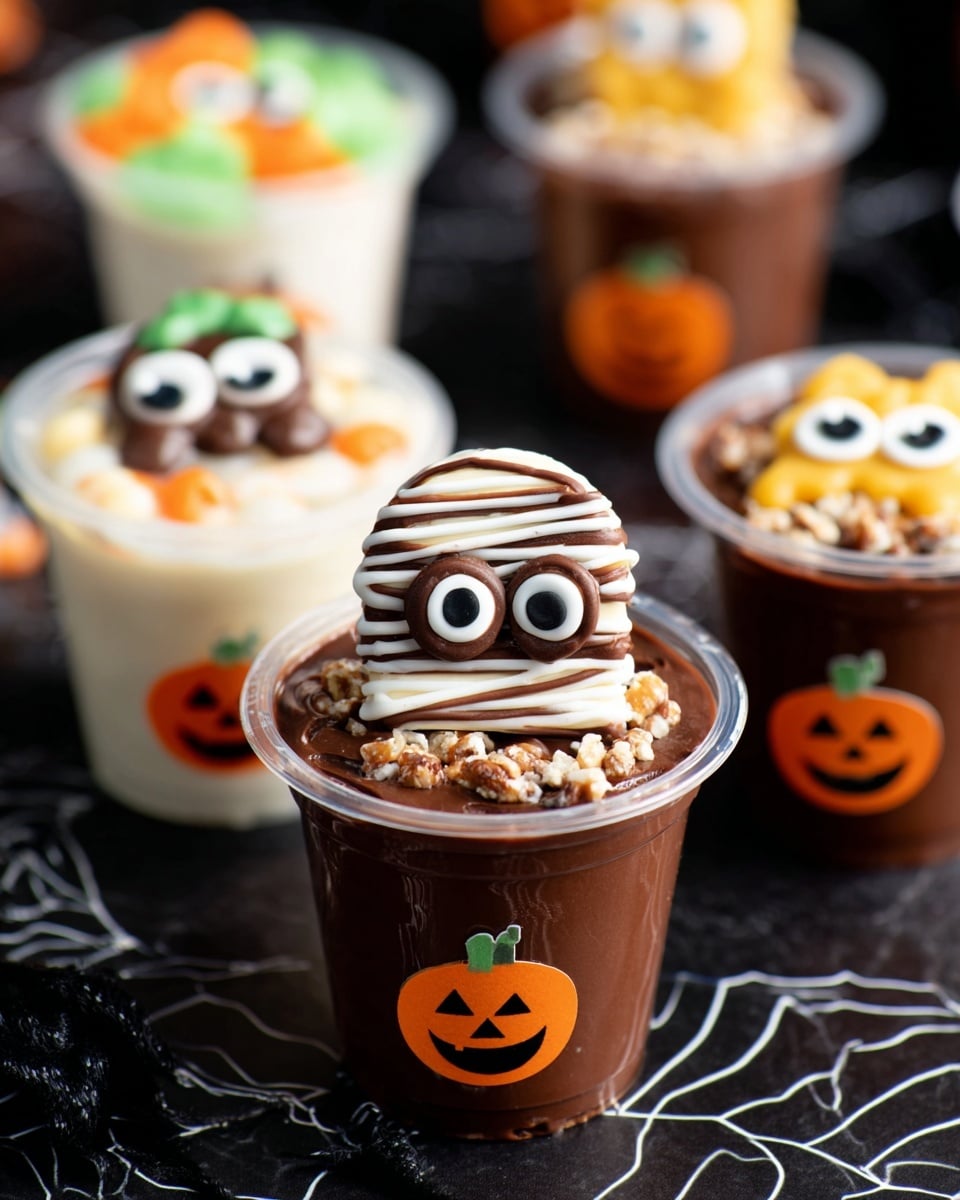
While the pretzels are setting, grab your pudding cups and decorate the outside with Halloween stickers—that step always gets my kids excited to join in. Then, stir 1 teaspoon of peanut butter and some crushed pretzels into each chocolate pudding cup, giving them a delightful crunch and flavor boost. For vanilla pudding cups, add in chopped apple and crush a bit of pretzels for topping to add freshness and texture. Top each cup with a mummy pretzel and scatter a few crushed pretzels and diced apple on top for a little extra flair.
Pro Tips for Making Mummy Pretzels with Creepy Pudding Cups Recipe
- Keep Candy Melts Smooth: Stir frequently and melt in short bursts to avoid baking the melts or making them lumpy.
- Use Parchment Paper: This saves your pretzels from sticking and makes cleanup super easy.
- Work Quickly with Eyeballs: Attach candy eyes while chocolate is still tacky so they stick well without waiting forever.
- Prep Ahead: Melt your candy melts and prep pudding cups before guests arrive to keep the fun stress-free.
How to Serve Mummy Pretzels with Creepy Pudding Cups Recipe
Garnishes
I like to dust the pudding cups with a little extra crushed pretzels and diced apple for color and texture. Sometimes, I add tiny candy spiders or edible glitter on the chocolate puddings for an extra creepy effect. For the pretzels, a light sprinkle of edible colored sugar adds a glimmer that catches the light perfectly.
Side Dishes
These mummy pretzels and pudding cups go great with simple, spooky drinks like a fizzy berry punch or even just apple cider. I’ve also paired them with popcorn tossed in cinnamon and sugar to keep the sweet-salty theme going. It’s a great snack table starter that blends well with all sorts of other Halloween finger foods.
Creative Ways to Present
Try serving the pudding cups nestled in a shallow bowl filled with dry ice for that foggy spooky effect—kids absolutely love this! You can also arrange the mummy pretzels standing in a tall vase or jar, like little candy soldiers guarding your dessert table. For a party, I set each pudding cup on a mini Halloween-themed plate with a striped straw and napkin, making it all super Instagram-worthy.
Make Ahead and Storage
Storing Leftovers
I store leftover mummy pretzels in an airtight container at room temperature to keep their crispness. The pudding cups go straight into the fridge, covered with plastic wrap to prevent a skin from forming. They keep well for 2-3 days, perfect for enjoying over a few evenings of spooky movie marathons.
Freezing
I don’t recommend freezing the pudding cups since the texture can change when thawed, but the pretzels can be frozen if you want to save them for another time. Just be sure to wrap them tightly to keep their crunch intact. When you thaw frozen pretzels, give them a few minutes at room temperature and they’ll be nearly as good as fresh!
Reheating
Since these are no-bake treats, reheating isn’t necessary. If your candy melts get a little dull or chalky, a quick gentle re-melt in the microwave will revive them. For the pudding cups, just stir gently before serving to freshen up the texture.
FAQs
-
Can I make the mummy pretzels ahead of time?
Yes! You can prepare the mummy pretzels a day or two ahead. Just store them in an airtight container at room temperature to keep their crispiness. This makes party prep super easy and stress-free.
-
What if I don’t have candy eyeballs?
No worries! You can use tiny chocolate chips, edible googly eyes from a baking store, or even small dots of black icing piped on with a toothpick. If you want to get creative, mini M&M’s or jelly beans can work too!
-
Can I replace peanut butter in the pudding cups?
Absolutely! You can swap peanut butter for any other nut or seed butter, or leave it out entirely if allergies are a concern. The pudding will still be delicious, just maybe a little less rich.
-
How do I prevent the candy melts from seizing?
Make sure your bowls and utensils are completely dry—any water can cause the candy melts to seize up. Also, melt them slowly in short bursts and stir well between each interval to keep the texture silky smooth.
-
Can this recipe be made gluten-free?
Yes! Just use gluten-free pretzels and double-check that all your candy melts and puddings don’t contain gluten. Many brands offer gluten-free options, making this recipe perfect for sensitive diets.
Final Thoughts
This Mummy Pretzels with Creepy Pudding Cups Recipe has become such a Halloween favorite in my house because it’s not only charming and festive but also super simple to put together. I love how it invites creativity and gets everyone involved—from dipping pretzels in candy melts to decorating pudding cups. Plus, the delicious balance of salty, sweet, creamy, and crunchy hits all the right notes. I can’t wait for you to try it and see just how many smiles these spooky treats bring to your table!
Print
Mummy Pretzels with Creepy Pudding Cups Recipe
- Prep Time: 15 minutes
- Cook Time: 15 minutes
- Total Time: 30 minutes
- Yield: 8 servings
- Category: Snack
- Method: No-Cook
- Cuisine: American
Description
These fun and festive Mummy Pretzels are perfect for Halloween parties, featuring pretzels dipped and drizzled in colorful candy melts, decorated with candy eyeballs, and paired with delicious vanilla and chocolate pudding cups topped with peanut butter, crushed pretzels, and juicy diced apples.
Ingredients
For the Mummy Pretzels:
- 3-4 cups pretzels
- 1 cup white candy melts
- 1 cup orange candy melts
- 1 cup green candy melts
- 1/2 cup chocolate candy melts
- candy eyeballs
- bowls for melting candy
For the Pudding Cups:
- 4 Snack Pack vanilla puddings
- 4 Snack Pack chocolate puddings
- 1 apple, diced
- crushed pretzels (amount as needed)
- 4 tsp Peter Pan peanut butter
Other:
- Halloween stickers of your choice
Instructions
- Melt Candy Melts: Melt the white, orange, green, and chocolate candy melts in separate bowls according to package instructions to prepare for dipping and drizzling.
- Dip Pretzels: Line a baking sheet with parchment or wax paper. Dip the pretzels in the different colors of melted candy and place them on the lined baking sheet. Allow the candy coating to set for 15 minutes.
- Drizzle and Decorate: If the melted chocolate hardens, gently re-melt it. Use a fork to drizzle different colors of melted candy over the pretzels. Add candy eyeballs, using melted chocolate as glue if necessary. Let the decorated pretzels set for an additional 15 minutes.
- Prepare Pudding Cups: Place Halloween stickers on the outside of each pudding cup to decorate.
- Mix Chocolate Pudding Cups: Add 1 teaspoon of peanut butter and some crushed pretzels to each chocolate pudding cup and mix well to combine.
- Mix Vanilla Pudding Cups: Add 1/4 cup of diced apple to each vanilla pudding cup and mix until evenly incorporated.
- Assemble Cups: Top each pudding cup with a mummy pretzel. Sprinkle extra crushed pretzels over the chocolate pudding cups and diced apple over the vanilla cups for garnish.
Notes
- Use parchment or wax paper to prevent sticking when the pretzels are drying.
- If candy melts harden too much during the process, re-melt gently to maintain a smooth coating consistency.
- Candy eyeballs can be glued on securely using a small dab of melted chocolate.
- Substitute peanut butter with almond or sunflower seed butter for allergy-friendly options.
- For a stronger apple flavor, use a tart apple variety such as Granny Smith.
- Store assembled pretzels in an airtight container to keep them fresh and crisp.
Nutrition
- Serving Size: 1 serving
- Calories: 250 kcal
- Sugar: 18 g
- Sodium: 350 mg
- Fat: 12 g
- Saturated Fat: 6 g
- Unsaturated Fat: 5 g
- Trans Fat: 0 g
- Carbohydrates: 30 g
- Fiber: 2 g
- Protein: 4 g
- Cholesterol: 5 mg
