
Melted Witch Halloween Bark Recipe
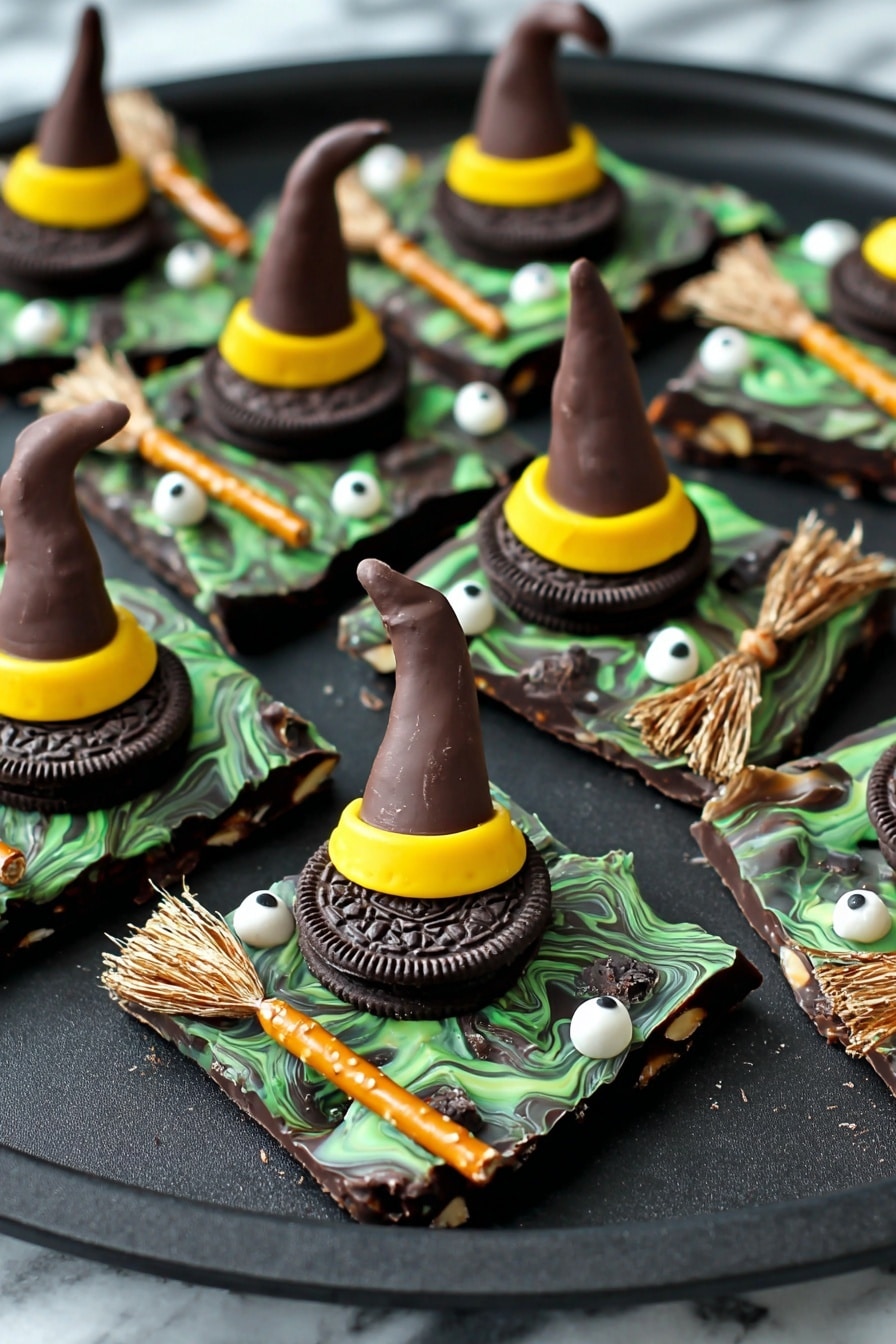
If you’re gearing up for Halloween and want a treat that’s as fun to make as it is to eat, you’re going to adore this Melted Witch Halloween Bark Recipe. It combines all the spooky vibes with sweet, crunchy textures — think witch hats, brooms, candy eyeballs, and that beautiful, swirled bark that feels like a Halloween party on your kitchen counter. Stick with me, and I’ll show you exactly how to pull this off — trust me, your friends and family will be begging for the secret (which you can totally keep to yourself!).
Why This Recipe Works
- Layered Fun: Combining different elements like witch hats, brooms, and bark creates multiple textures and flavors that keep this treat exciting.
- Easy Chocolate Melting: Melting chocolates at half power in intervals prevents burning and gives you smooth, shiny coating every time.
- Eye-Catching Presentation: Swirling different colored melts with candy eyeballs and shaped toppers makes this bark a showstopper at any Halloween party.
- Customizable and Kid-Friendly: The recipe invites creativity and is simple enough that kids can help with some assembly – making it fantastic for family fun.

Ingredients & Why They Work
Every ingredient in this Melted Witch Halloween Bark Recipe has a role in balancing taste, texture, and that spooky, whimsical look we all want at Halloween. Plus, I’ll share what brands and substitutes work best if you’re short on time or can’t find something.
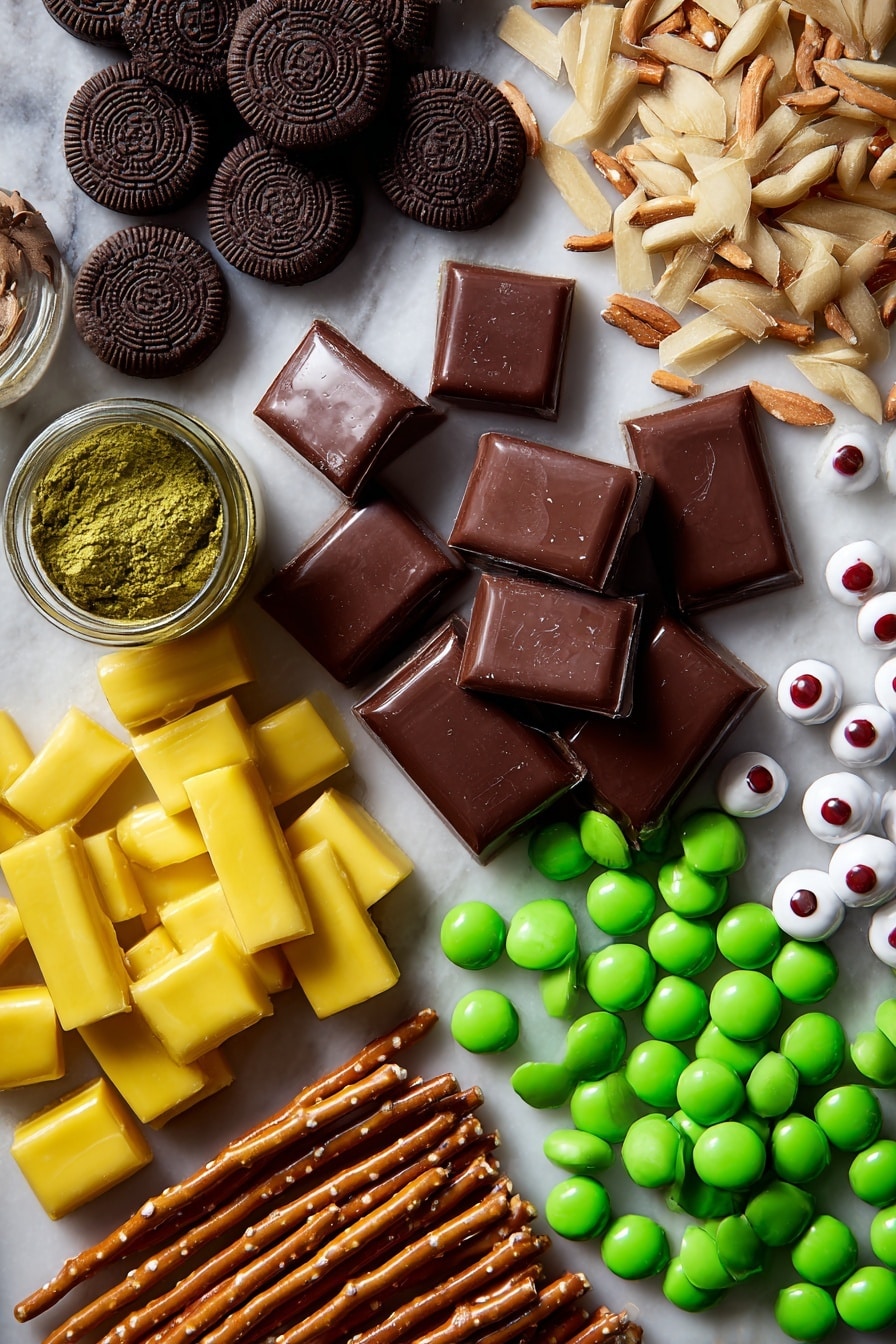
- Milk chocolate candy melts: These melt smoothly and set with a nice shine, perfect for dipping and swirling, no tempering needed.
- Chocolate cookies: I adore using Girl Guide cookies here because their crunch and size are ideal, but any chocolate sandwich cookie like Oreos works great.
- Bugles: They add that perfect cone shape for witch hats and provide a crunchy base.
- Fondant, yellow: Easy to shape and great for small decorative details like the hat bands.
- Semi sweet dark chocolate: Offers a rich contrast and depth in the bark swirls.
- Milk chocolate melting chocolate or chips: Easy to melt and thick enough to create the bark’s base layer.
- Almond slivers: These mimic broom bristles in a fun and tasty way.
- Pretzel sticks: The perfect sturdy handle for witch brooms, salty and savory contrast.
- Green candy melts: Adds seasonal color and that magical, witchy vibe throughout the bark.
- White or red candy eyeballs: Essential for that creepy-cute highlight — total show stoppers.
Tweak to Your Taste
This Melted Witch Halloween Bark Recipe is one I always feel comfortable tweaking. Sometimes I swap the green candy melts for purple to match a party theme, or sprinkle some edible glitter on top for that extra magic. You’ll find that small changes can really make it your own.
- Variation: I once made a pumpkin spice version by adding a dash of pumpkin pie spice to my melted chocolate before pouring it out — it was a total hit with the spice lovers in my crew.
- Dietary swaps: I’ve replaced standard pretzels with gluten-free sticks and used dairy-free chocolate melts when friends had allergies — both worked beautifully.
- Color play: Feel free to mix up the candy melts colors — orange and black are classic Halloween vibes, but you can definitely get creative.
Step-by-Step: How I Make Melted Witch Halloween Bark Recipe
Step 1: Crafting Witch Hats with Candy Melt Magic
Start by gently melting half the milk chocolate candy melts — I always go at 50% power in 30-second bursts and stir between to avoid burning. Once silky smooth, dip each Bugle into the chocolate and shake off any excess. Immediately place it atop each chocolate cookie to form the classic witch hat shape, then let them harden completely. While you wait, roll out that yellow fondant to create a tiny snake to wrap around the cookie rim like a hatband — trim it so it fits snugly. These little touches are what make the bark whimsical and fun.
Step 2: Assembling Witch Brooms
Reheat the remaining milk chocolate melts if they’ve begun to set. Dip one end of each pretzel stick into the chocolate — this acts like glue when you add about four almond slivers per broomstick, mimicking the broom bristles. Spoon a little melted chocolate over the almonds to secure them, then let everything harden on parchment paper. After they’re firm, trim any uneven edges carefully with a paring knife to give a tidy, realistic broom look. These little brooms make the bark playful and surprisingly easy to assemble.
Step 3: Creating the Swirly Chocolate Bark Base
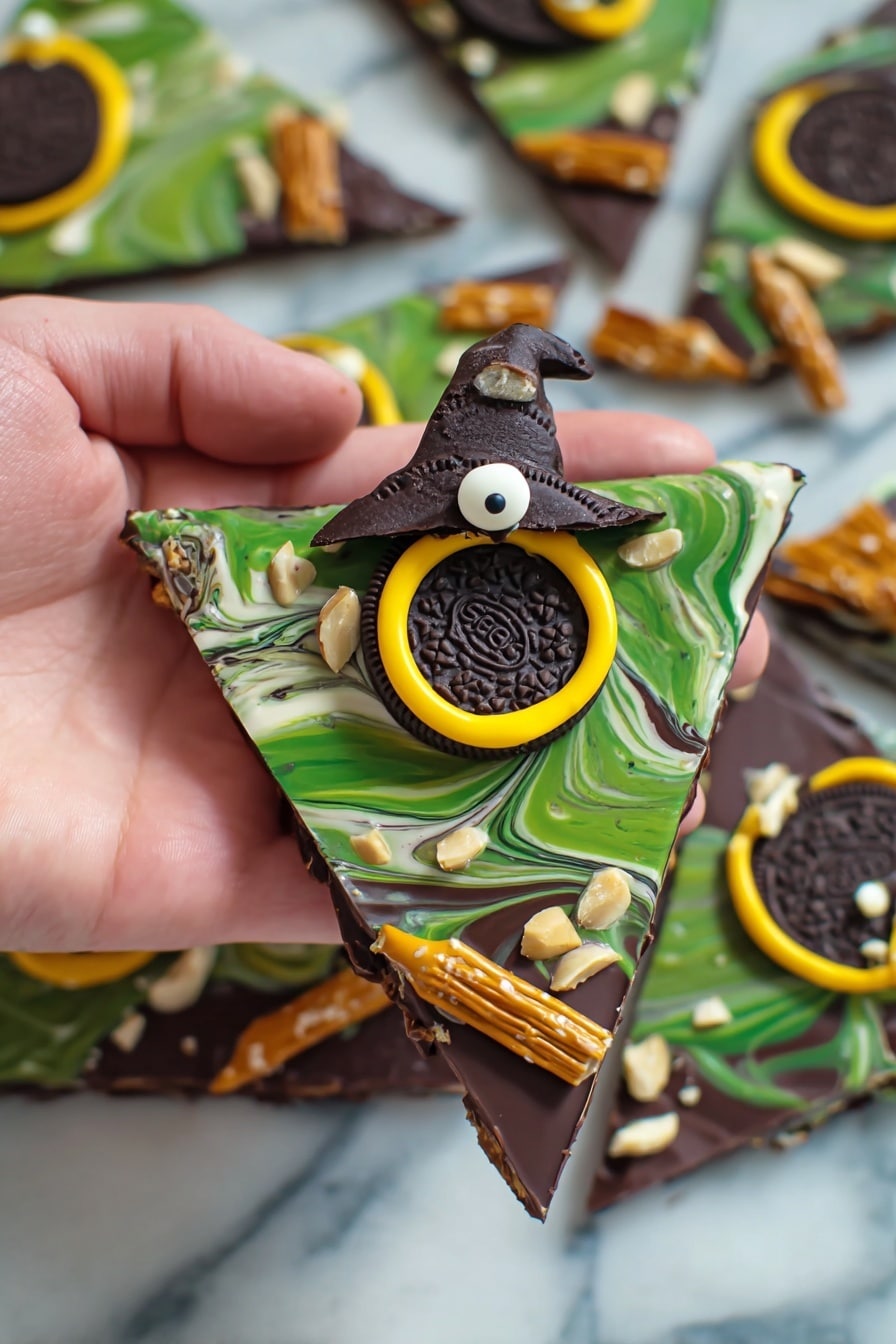
Line a baking sheet with parchment paper. Melt your milk chocolate chips or melting chocolate at 50% power in 30-second increments until smooth. Pour it onto your prepared baking sheet and spread evenly as the bark’s base. Next, melt the semi sweet dark chocolate using the same gentle method — add spoonfuls randomly over the milk chocolate and swirl gently with a knife to create this creepy-cool marbled effect. Follow that with melting the green candy melts, then drop spoonfuls to create “puddles” of color. Use the knife lightly on some edges for a spooky blending effect. This swirling technique creates that signature Halloween ambiance without needing complicated tools.
Step 4: Decorating and Setting Your Halloween Masterpiece
Evenly space your beautifully crafted witch hats and brooms on top of the bark, tucking them gently into the chocolate. Then scatter your candy eyeballs for that extra eerie touch. To make sure no air bubbles spoil your glossy finish, give the baking sheet a firm bang on the counter 3-4 times — it really helps to smooth things out. Set your bark aside in a cool place for 1-2 hours to fully harden, then break or cut it into pieces and prepare to impress!
Pro Tips for Making Melted Witch Halloween Bark Recipe
- Gentle Melting: Using half power in the microwave and stirring regularly prevents burning and ensures smooth chocolate every time.
- Fondant Trick: Slightly warming fondant by kneading makes it easier to shape those tiny witch hat bands without cracking.
- Air Bubble Fix: Tapping the pan firmly helps release bubbles and smooths the bark surface for a professional look.
- Storage Success: Store in a cool, dry place, and avoid refrigeration—moisture can dull the shiny finish and attract condensation.
How to Serve Melted Witch Halloween Bark Recipe
Garnishes
For serving, I like to sprinkle a few extra candy eyeballs on the platter for those last-minute snackers. Sometimes I add edible glitter or a dusting of cocoa powder for a mystical touch. Fresh mint leaves might sound odd but can freshen the palate when you’re surrounded by so much sweetness.
Side Dishes
This bark pairs wonderfully with a warm cup of spiced apple cider or a creamy pumpkin latte. If you’re planning a full Halloween spread, try it alongside caramel popcorn or a small cheese board to balance sweet and savory.
Creative Ways to Present
I’ve had fun layering the bark in clear jars for gift-giving, tying them with orange and black ribbons. For parties, I arrange pieces on a black slate board with gothic-style serving utensils — the dark background makes the colors POP. You can also place the bark on a tiered stand with mini Halloween props like tiny pumpkins or fake spiders for an eye-catching centerpiece.
Make Ahead and Storage
Storing Leftovers
When you have leftover bark (which I hope you do—lucky you!), store it in an airtight container at room temperature. Avoid the fridge because moisture will dull the shine and could make the chocolate sweat. It keeps its crunch for about 5 to 7 days if sealed well.
Freezing
If you want to freeze some for later, wrap the bark tightly in parchment and then foil or a sealed freezer bag. Thaw at room temperature before serving to keep texture intact. From my experience, freezing doesn’t affect the flavor, but the candy decorations might lose a bit of their snap.
Reheating
You really don’t want to reheat bark, so if it’s a little firm after freezing, just let it come to room temperature naturally. If you need to soften fondant decorations on the witch hats, leave them in a slightly warm (not hot) spot for a little while — never microwave, as it can melt your hard work!
FAQs
-
Can I use regular chocolate instead of candy melts for this recipe?
Absolutely! You can substitute regular milk or dark chocolate chips for candy melts. Just be mindful that candy melts are formulated to harden glossy and smooth without tempering — regular chocolate might need to be tempered or you risk a dull finish or bloom (white streaks). If you don’t have tempering experience, candy melts are the easiest and most foolproof choice.
-
How long will this Melted Witch Halloween Bark last?
Stored properly in an airtight container at room temperature, it will last about a week. Beyond that, the texture might start to suffer, and the candy decorations could soften or lose their crispness.
-
Can kids help make this recipe?
Definitely! Kids can help dip bugles, place candies on the bark, and even assist with rolling fondant for decorating. Just supervise around hot melted chocolate to keep things safe.
-
What if I can’t find candy eyeballs?
No worries! You can substitute mini chocolate chips or even draw eyes on white chocolate dots using edible food markers. Alternatively, small round sprinkles add a fun pop that’s just as playful.
Final Thoughts
This Melted Witch Halloween Bark Recipe is one of those joyful projects I come back to year after year. It’s visually delightful, impressively tasty, and surprisingly simple — a magical trifecta when you want to treat yourself or wow your party guests. Once you nail the chocolate melting and layering aspects, you’re free to have so much fun customizing it. I’m excited for you to try this recipe and create your own Halloween masterpiece — fair warning, once your friends taste it, they might be queuing up for seconds!
Print
Melted Witch Halloween Bark Recipe
- Prep Time: 30 minutes
- Cook Time: 0 minutes
- Total Time: 2 hours 30 minutes
- Yield: 24 servings
- Category: Dessert
- Method: No-Cook
- Cuisine: American
Description
This Melted Witch Halloween Bark Recipe combines festive witch hats, brooms, and candy eyeballs on a swirled chocolate bark base. Perfect for a spooky Halloween treat, it features milk chocolate, semi-sweet chocolate, green candy melts, and fun candy decorations like bugles, pretzel sticks, and almond slivers. This easy no-bake treat is fun to make and visually impressive for Halloween parties.
Ingredients
Witch Hats
- ½ 340 g package milk chocolate candy melts
- 12 chocolate cookies (e.g., Girl Guide or Oreo)
- 12 bugles
- Yellow fondant for decoration
Witch Brooms
- 4 oz semi sweet dark chocolate
- 2 lbs milk chocolate (melting chocolate or chips)
- 48 almond slivers (approximately 4 per broom)
- 12 pretzel sticks
Chocolate Bark
- ½ 340 g package green candy melts
- 18 white or small red candy eyeballs
Instructions
- Melt Chocolate for Hats: Melt the milk chocolate candy melts on ½ power in 30 second intervals using a microwave. Stir and check after each interval to avoid burning.
- Assemble Witch Hats: Dip each bugle into the melted chocolate, gently shaking off excess chocolate. Immediately place each bugle on top of a chocolate cookie and allow to harden.
- Add Fondant Decoration: Once the hats have hardened, roll yellow fondant into thin snakes and fit them around the rim of each cookie hat, trimming to size for a neat fit.
- Melt Chocolate for Brooms: Reheat any remaining milk chocolate candy melts if needed. Then melt semi sweet dark chocolate separately in the microwave at 50% power in 30 second intervals, stirring well between intervals.
- Assemble Witch Brooms: Dip one end of each pretzel stick into the melted milk chocolate and place on parchment paper. Attach 4 almond slivers per pretzel stick to resemble broom bristles. Spoon a little melted chocolate over the almond slivers to secure them. Let harden.
- Trim Brooms: Once hardened, carefully trim the edges of the almond sliver broom bristles with a paring knife for a tidy look.
- Prepare Chocolate Bark Base: Line a baking sheet with parchment paper. Melt the milk chocolate (melting chocolate or chips) in the microwave at 50% power in 30 second intervals until fully melted. Pour melted milk chocolate onto the lined baking sheet and spread evenly.
- Add Swirls: Drop spoonfuls of melted semi sweet dark chocolate on top of the milk chocolate base and swirl gently with a knife.
- Swirl Green Candy Melts: Melt the green candy melts in the microwave as before. Drop spoonfuls to form puddles on the chocolate bark. Swirl the edges lightly with a knife for a marbled effect.
- Assemble Bark Decorations: Place the prepared witch hats evenly over the chocolate bark. Also place the witch brooms evenly throughout. Add candy eyeballs spaced evenly across the bark.
- Remove Air Bubbles: Gently bang the bottom of the cookie sheet on the counter 3-4 times to release any trapped air bubbles.
- Set and Harden: Set the bark aside at room temperature to harden for 1-2 hours until completely firm.
- Serve: Once hardened, cut the bark into pieces and serve for a festive Halloween treat.
Notes
- Use good quality chocolate candy melts and chocolates to ensure smooth melting and taste.
- Keep stirring chocolate frequently while melting in the microwave to prevent burning.
- If fondant is sticky, dust with a little powdered sugar before rolling and shaping.
- You can substitute pretzel sticks with other thin, sturdy sticks if preferred.
- For extra color, you can add different colored candy melts swirled into the bark.
- Store the finished bark in an airtight container at room temperature or in a cool place to prevent melting.
- Be gentle when banging the baking sheet to avoid breaking the bark pieces prematurely.
Nutrition
- Serving Size: 1 piece (approx. 50 g)
- Calories: 220 kcal
- Sugar: 18 g
- Sodium: 85 mg
- Fat: 15 g
- Saturated Fat: 9 g
- Unsaturated Fat: 5 g
- Trans Fat: 0 g
- Carbohydrates: 20 g
- Fiber: 1 g
- Protein: 3 g
- Cholesterol: 10 mg

