

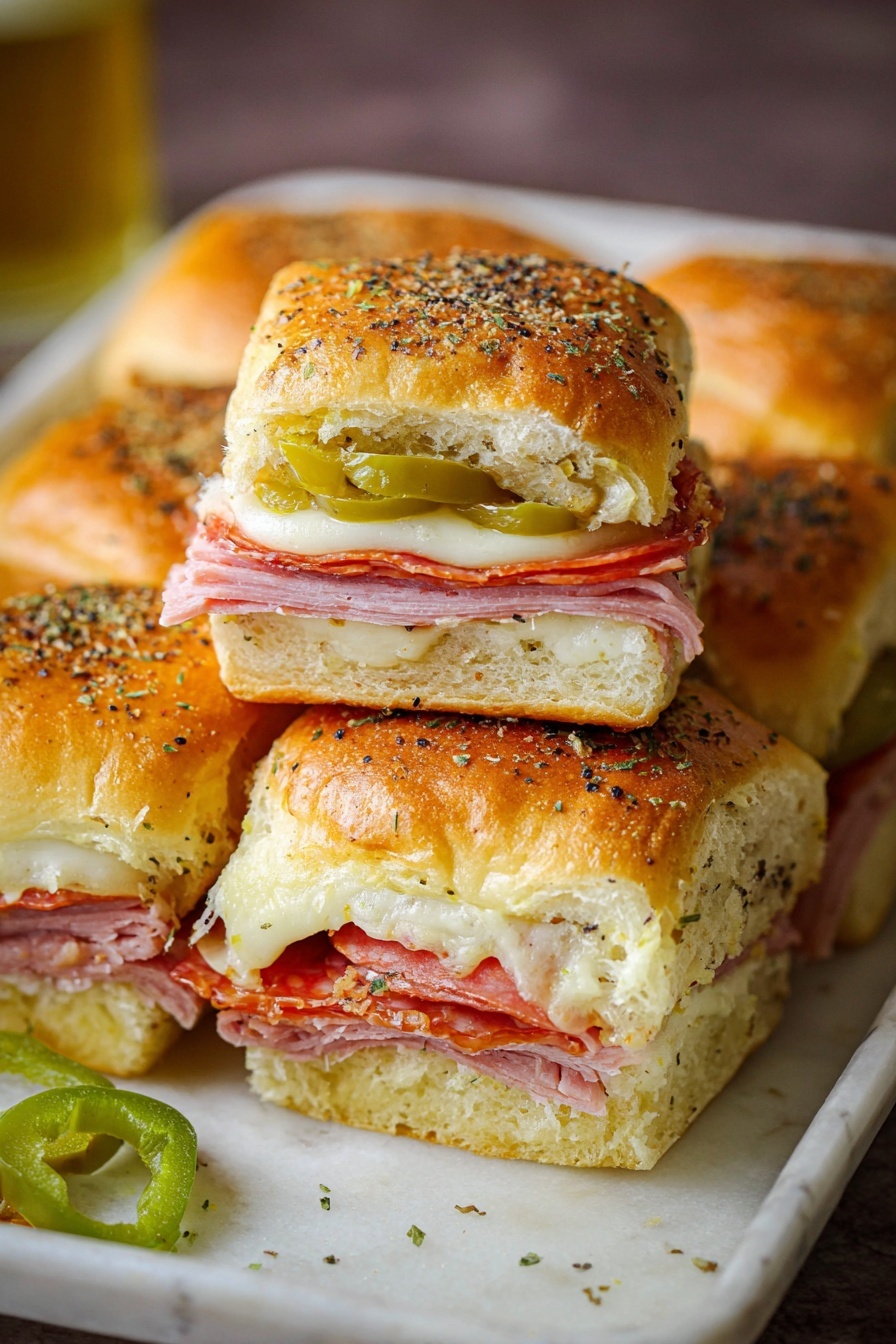
Hot Italian Sub Slider Sandwiches Recipe
If you’re craving something packed with bold flavors but easy enough for a weeknight or party, you’ve got to try this Hot Italian Sub Slider Sandwiches Recipe. These little goodies are the perfect bite-sized way to enjoy that classic Italian sub taste—with melty provolone, layers of pepperoni, salami, and ham, and a punch of heat from hot cherry peppers and pepperoncini. Trust me, once you try these, you’ll be making them again and again.
Why This Recipe Works
- Perfect Slider Size: The use of small Hawaiian rolls keeps these sandwiches bite-sized and perfect for gatherings—easy to eat and share.
- Layered Italian Meats: Combining ham, salami, and pepperoni gives it a wonderful depth of flavor that’s unmistakably Italian.
- Garlic-Butter Glaze: Brushing the top with seasoned melted butter infused with garlic makes each bite buttery, juicy, and extra flavorful.
- Melty Provolone Cheese: Provolone balances the spice and meatiness, plus it melts beautifully to hold everything together.

Ingredients & Why They Work
Each ingredient in the Hot Italian Sub Slider Sandwiches Recipe serves a distinct role, making sure the sandwich hits all the right notes: savory, spicy, buttery, and cheesy. I always try to grab good-quality deli meats and fresh garlic, which really elevates the overall flavor.

- 12 pack rolls (Hawaiian rolls): These rolls are slightly sweet and soft, making them the perfect vessel for the spicy and savory fillings.
- Ham (thinly sliced): Adds a mild, smoky flavor that balances the stronger meats.
- Salami (thinly sliced): Provides that classic Italian cured meat taste with just the right amount of fat.
- Pepperoni (thinly sliced): Brings a bit of spice and a chewy texture that contrasts nicely with the soft roll.
- Provolone cheese: Melts gorgeously and adds a slightly tangy, buttery flavor.
- Pepperoncini (sliced): Offers a mild heat and tang, which perks up each bite.
- Pickled hot cherry peppers (sliced): These add a punch of heat and briny zip that’s just irresistible.
- Salted butter (melted): Used as a base for the garlic butter glaze that crisps and flavors the top.
- Italian seasoning: A fragrant mix that layers in herbs like oregano and basil for an authentic Italian vibe.
- Fresh garlic (crushed): Always go fresh if you can—it makes a huge difference in that butter glaze.
- Marinara sauce (optional): For dipping, because, let’s be honest, who doesn’t love a little sauce with their sandwich?
Tweak to Your Taste
What I love about this Hot Italian Sub Slider Sandwiches Recipe is how adaptable it is. Depending on who I’m feeding or what I have on hand, I make subtle changes to keep it fun and fresh—feel free to do the same!
- Variation: Sometimes I add a layer of provolone or mozzarella inside for extra cheesiness—cheese lovers, rejoice! I’ve also swapped pepperoni for spicy soppressata for a bit of a kick.
- Mild Version: If you’re not into spicy, just skip the hot cherry peppers and go easy on the pepperoncini; the flavor still holds strong without the heat.
- Vegetarian Twist: Though this is a meat-lover’s dream, you can replace the Italian meats with grilled veggies like zucchini and eggplant, then add provolone and keep the pickled peppers for tang.
- Make it Gluten-Free: Use gluten-free slider rolls or mini buns to make this recipe safe for wheat-sensitive friends without sacrificing flavor.
Step-by-Step: How I Make Hot Italian Sub Slider Sandwiches Recipe
Step 1: Prep and Layer Your Sliders
First things first—preheat your oven to 350 degrees F. Slice your Hawaiian rolls in half lengthwise and lay the bottom halves on a baking sheet or pan. Then comes the fun part: layering! I usually start with the ham, followed by the salami, then pepperoni, and top it all off with slices of provolone cheese. Don’t rush this part—make sure every slider is packed evenly so each bite has a good meat-to-cheese ratio. Then scatter your sliced pepperoncini and hot cherry peppers over the cheese for that perfect spicy zing.
Step 2: Brush on the Garlic-Butter Glaze
In a small bowl, melt your salted butter and stir in Italian seasoning and freshly crushed garlic. If you buy pre-minced garlic, it just doesn’t deliver the same flavor punch—fresh garlic is worth the extra effort here. Once the garlic-butter mix is ready, brush it generously over the top halves of the rolls. Make sure every nook and cranny gets some coverage so the sliders get that beautiful golden crust and extra savoriness during baking.
Step 3: Assemble and Bake
Place the top halves of the rolls over your loaded bottoms and press down lightly. Cover the entire pan tightly with foil—this keeps the sliders steamy and melty inside while the tops get delectably crisp. Slide your pan into the preheated oven and bake for about 30 minutes. You’ll know they’re done when the tops turn golden brown and the cheese inside is perfectly melted. If you want a little extra crisp, uncover for the last 5 minutes, but be sure to watch closely so they don’t burn!
Step 4: Slice, Serve, and Enjoy!
Once baked, remove the foil and let the sliders sit for a couple of minutes—this helps everything set, so the sandwiches don’t fall apart when you slice them. Use a sharp knife to cut between each roll and serve warm. I like to offer a bowl of marinara sauce on the side for dipping, which adds a lovely tomato tang that balances the rich flavors perfectly.
Pro Tips for Making Hot Italian Sub Slider Sandwiches Recipe
- Choose Sweet Rolls: I swear by King’s Hawaiian rolls for this recipe — their softness and subtle sweetness balance the spicy peppers wonderfully.
- Layering Meat Evenly: Taking the time to layer evenly ensures every slider bites into all the meats and cheese, so no slider feels skimpy.
- Garlic Butter Magic: Don’t skimp on fresh garlic in the butter — it infuses the whole sandwich with that irresistible aroma.
- Cover While Baking: Always cover with foil while baking to keep the sliders moist and melty inside—you can uncover at the end if you want extra crispiness on top.
How to Serve Hot Italian Sub Slider Sandwiches Recipe
Garnishes
When I serve these sliders, I love adding a sprinkle of fresh parsley on top for color and a spritz of good-quality olive oil to take it up a notch. If you want a bit more tang, extra sliced pepperoncini on the side is always welcomed by guests who like a little kick.
Side Dishes
Pair these Hot Italian Sub Slider Sandwiches with a crisp Caesar salad or even some baked fries seasoned with rosemary and garlic—it creates a well-rounded meal that’s easy to throw together but tastes like you spent hours in the kitchen.
Creative Ways to Present
For parties, I’ve arranged sliders on a large wooden board with small cups of marinara sauce and pickles around the edges—guests enjoy picking and choosing their combos. You can also wrap individual sliders in parchment paper tied with twine to make them portable, perfect for potlucks or picnic lunches.
Make Ahead and Storage
Storing Leftovers
After enjoying the first round, I store any leftovers in an airtight container in the fridge—these sliders hold together really well and taste delicious even the next day. Just be sure to cover them tightly so the bread doesn’t dry out.
Freezing
If you want to prep in advance, wrap individual sliders tightly in plastic wrap and then foil before freezing. When I’ve tried this, freezing works great and sliders thaw in the fridge overnight without losing flavor, making them perfect for quick lunches or snacks later.
Reheating
To reheat, I pop the sliders in a 350°F oven for about 10-12 minutes, covered with foil to trap moisture and keep the cheese melty. If you’re in a hurry, a quick microwave zap works too, but I prefer the oven to keep the bread from getting soggy.
FAQs
-
Can I make the Hot Italian Sub Slider Sandwiches Recipe ahead of time?
Absolutely! You can prepare the sliders fully assembled and wrapped in foil, then store them in the fridge for up to a day before baking. This makes it easy to pop them in the oven when guests arrive.
-
What if I don’t like spicy foods—can I omit the hot peppers?
Yes! You can simply leave out the pickled hot cherry peppers and reduce or skip the pepperoncini. The sliders will still be delicious with the classic Italian meats and cheese.
-
Can I use different cheese instead of provolone?
Definitely. Mozzarella or fontina are good substitutes, though provolone has that signature nutty, slightly sharp flavor that pairs best with Italian meats.
-
How do I keep the sliders from getting soggy?
To avoid sogginess, don’t overload the sandwiches with wet ingredients, and make sure to cover tightly with foil during baking to keep them moist without letting steam make the rolls soggy. Also, letting sliders rest a few minutes before slicing helps.
-
Can these sliders be doubled or scaled up for a crowd?
Yes! The recipe scales well. Just bake sliders in multiple pans if needed, and pay attention to baking time—they may vary slightly with volume.
Final Thoughts
Honestly, this Hot Italian Sub Slider Sandwiches Recipe has become my go-to whenever I want something both impressive and comforting without much fuss. The perfect balance of spicy, savory, and cheesy bites always gets rave reviews from family and friends. I can’t wait for you to try these sliders yourself—they’re sure to become a favorite in your rotation, just like they are in mine!
Print
Hot Italian Sub Slider Sandwiches Recipe
- Prep Time: 5 minutes
- Cook Time: 30 minutes
- Total Time: 35 minutes
- Yield: 12 sliders
- Category: Appetizer
- Method: Baking
- Cuisine: Italian-American
Description
These Hot Italian Sub Sliders feature a delicious combination of ham, salami, pepperoni, provolone cheese, and spicy peppers on soft Hawaiian rolls, brushed with garlic Italian butter and baked to golden perfection. Perfect for a party appetizer or a flavorful snack served with marinara sauce.
Ingredients
Sliders
- 12 pack rolls, halved lengthwise (I recommend Kings Hawaiian rolls)
- 6 oz package of ham, thinly sliced
- 5 oz package of salami, thinly sliced
- 5 oz package of pepperoni, thinly sliced
- 9 slices provolone cheese
- ⅓ cup pepperoncini, sliced
- ⅓ cup pickled hot cherry peppers, sliced
- ¼ cup salted butter, melted
- 1 teaspoon Italian seasoning
- 2 cloves garlic, crushed (fresh preferred)
To Serve (optional)
- 1 cup marinara sauce
Instructions
- Preheat Oven: Preheat the oven to 350 degrees F to prepare for baking the sliders.
- Assemble Sliders: Lay the bottom halves of the rolls on a baking sheet or pan. Layer slices of ham, salami, pepperoni, and provolone cheese on top. Then add sliced hot cherry peppers and pepperoncini. Place the top halves of the rolls over the fillings.
- Prepare Butter Mixture: In a small bowl, combine the melted salted butter with Italian seasoning and crushed garlic. Mix well to infuse the flavors.
- Brush Sliders: Brush the seasoned butter mixture generously over the tops of the sliders, making sure to coat all surfaces including the edges.
- Bake Covered: Cover the sliders tightly with foil and bake in the preheated oven for 30 minutes until the tops are golden brown and the cheese is melted.
- Serve: Remove from the oven, slice the sliders apart, and serve hot. Optionally, offer marinara sauce on the side for dipping for extra flavor.
Notes
- Use fresh garlic for a more pronounced flavor instead of jarred garlic.
- Hawaiian rolls add a sweet contrast complementing the savory meats and spicy peppers.
- For a milder version, omit the hot cherry peppers and pepperoncini.
- Sliders can be assembled a few hours ahead and refrigerated until ready to bake.
- Marinara sauce is optional but highly recommended for dipping and added moisture.
Nutrition
- Serving Size: 1 slider
- Calories: 320 kcal
- Sugar: 4 g
- Sodium: 720 mg
- Fat: 18 g
- Saturated Fat: 8 g
- Unsaturated Fat: 8 g
- Trans Fat: 0 g
- Carbohydrates: 26 g
- Fiber: 2 g
- Protein: 14 g
- Cholesterol: 50 mg


