
Halloween Rice Krispie Treats Recipe
Hey there! If you’re looking for a fun, festive, and downright delicious treat to whip up this spooky season, you’ve landed in the right spot. This Halloween Rice Krispie Treats Recipe is one of my all-time favorites for Halloween parties or just a cozy night in with the family. They’re crispy, gooey, and decked out with festive chocolate drizzles and sprinkles that scream Halloween in the best way. Trust me, these treats are fan-freaking-tastic, and I can’t wait to share all my tips so you nail them perfectly every time.
Why This Recipe Works
- Browned Butter Magic: Browning the butter adds a rich, nutty depth that takes these treats from ordinary to extraordinary.
- Marshmallow Layers: Using both jumbo and small marshmallows gives an irresistible gooey texture with little pockets of sweetness.
- Crunch and Festivity: Classic Rice Krispies bring that perfect crunch, balanced by the melty marshmallows and festive toppings.
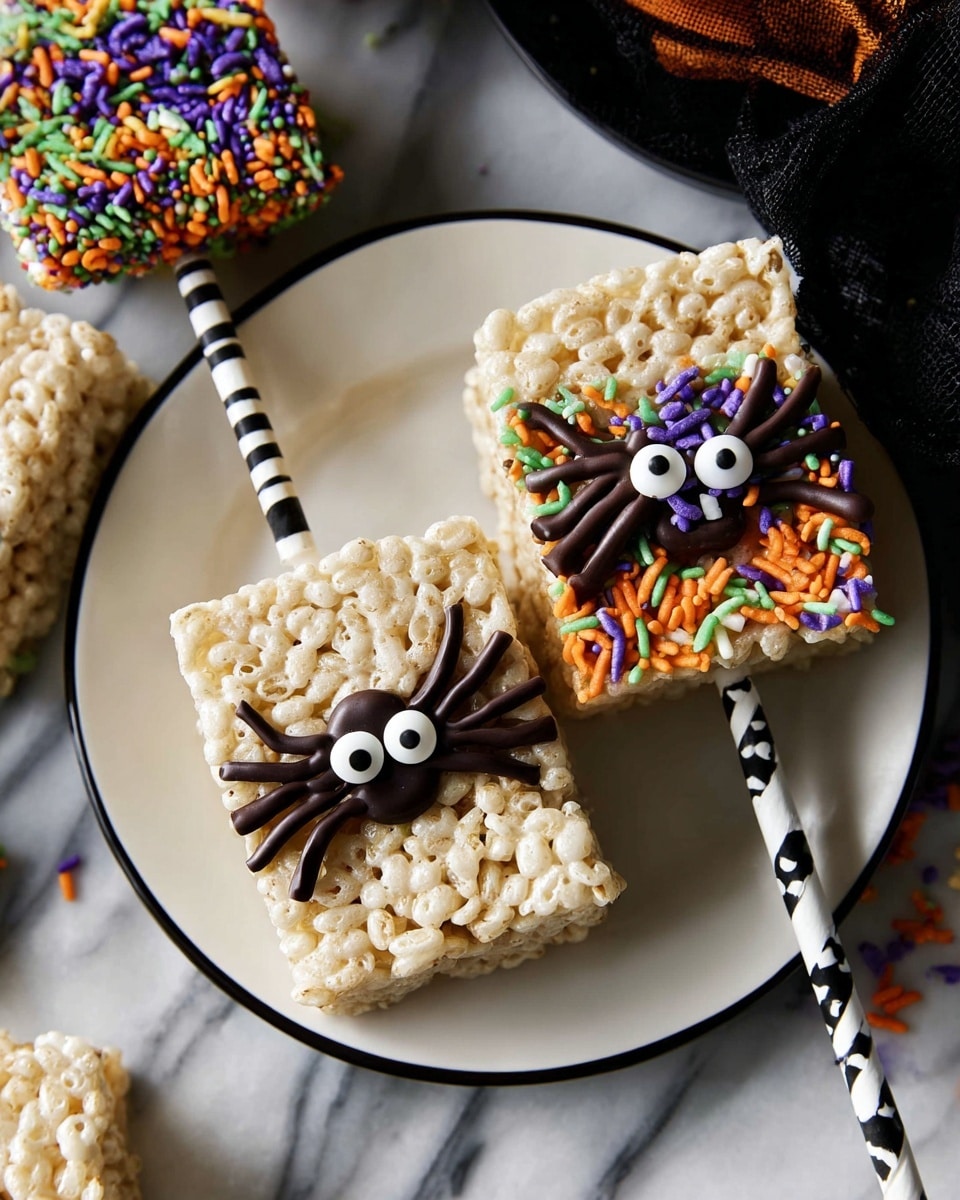
- Fun Presentation: The addition of paper straws as handles makes these treats perfect for parties and easy for kids to enjoy.

Ingredients & Why They Work
Every single ingredient here is thoughtfully chosen to create textures and flavors that complement each other perfectly. When you’re shopping, pick quality marshmallows and fresh Rice Krispies for the best results—you’ll notice the difference right away.

- Unsalted Butter: Using unsalted allows you to control the flavor and browning it adds a rich, toasty note.
- Jumbo Marshmallows: These melt down smoothly, creating that classic sticky base we all love.
- Rice Krispies Cereal: The crispy texture is essential for the perfect crunch and bite.
- Small Marshmallows: These are folded in to add chewy pockets — a little surprise in every bite.
- Paper Straws: Great for making handheld treats, plus they add a cute Halloween vibe.
- Semisweet Chocolate Chips: Melted and drizzled on top for that lovely chocolate contrast.
- Halloween-Themed Sprinkles: Sprinkles are all about aesthetics and fun — go wild here!
Tweak to Your Taste
One of my favorite things about this Halloween Rice Krispie Treats Recipe is how easy it is to customize it to your own creepy cravings or dietary needs. I encourage you to experiment a bit — you might discover a new favorite twist!
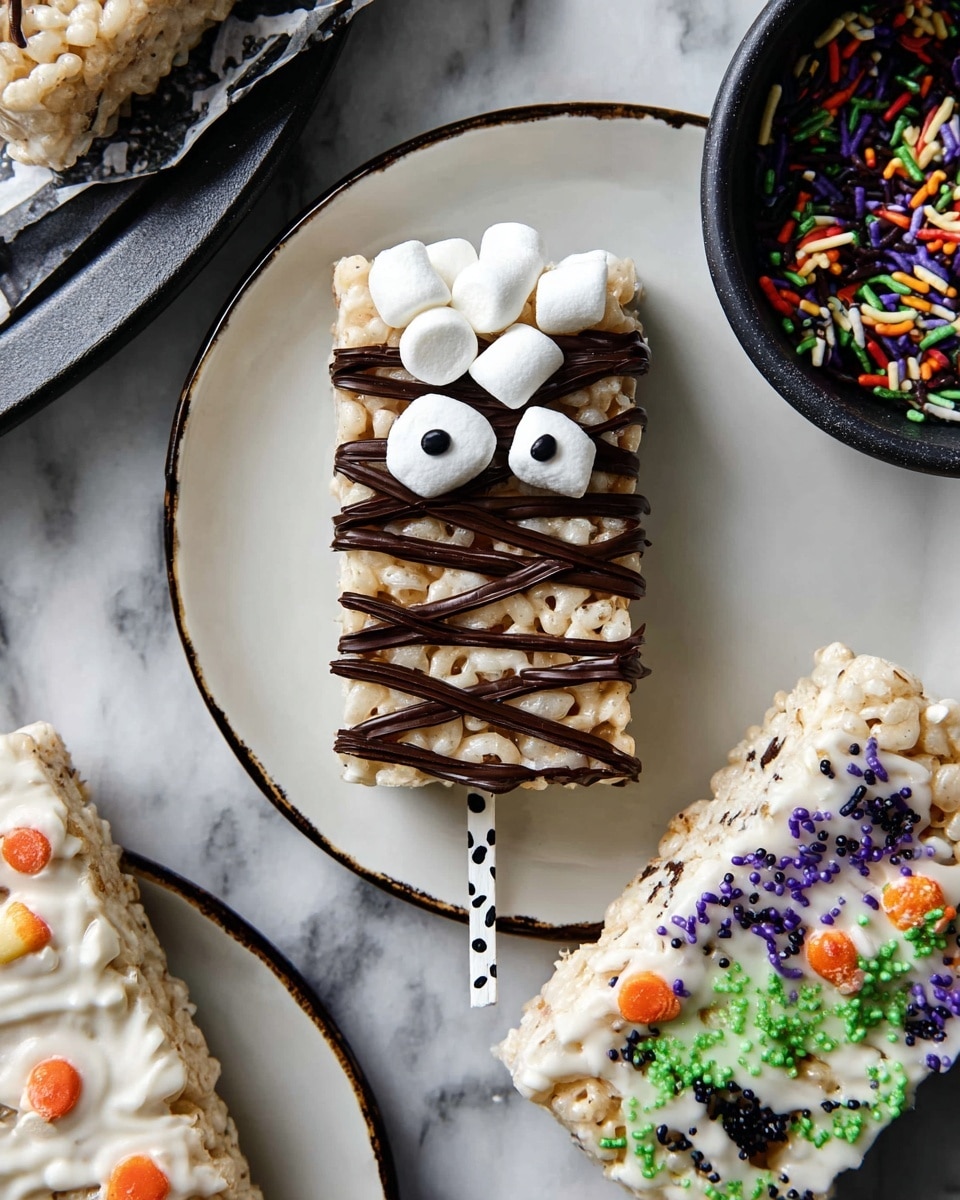
- Variation: I sometimes swap semisweet chocolate drizzle for white chocolate tinted orange or green with food coloring—it really makes them pop!
- Dietary Twist: For a gluten-free version, just double-check your cereal brand, and use vegan marshmallows to make it fully plant-based.
- Seasonal Inspiration: Add crushed candy corn or Halloween M&Ms inside for extra fun and colors.
Step-by-Step: How I Make Halloween Rice Krispie Treats Recipe
Step 1: Line Your Pan and Get Ready
First things first—grab a 9×13-inch baking dish and line it generously with parchment paper. Don’t forget to leave some overhang on the sides; trust me, this makes lifting the treats out an absolute breeze later on.
Step 2: Brown That Butter
This is the secret step that elevates the whole recipe. Melt the butter over medium-low heat and keep stirring—it will foam a bit before turning a gorgeous golden brown with that nutty aroma that fills the kitchen. Just keep a close eye to avoid burning. Once browned, pull it off the heat immediately.
Step 3: Melt the Jumbo Marshmallows
Throw the jumbo marshmallows into the browned butter and return the pan to low heat. Stir gently but consistently until they’re melted down into a smooth, sticky mixture. This step is crucial to avoid burning the marshmallows—low and slow wins here!
Step 4: Combine with Rice Krispies and Fold In Small Marshmallows
Remove the pan from the heat and quickly stir in the Rice Krispies cereal. Mix thoroughly so every crispy bit is coated with that luscious melted marshmallow. Then, fold in the cup of small marshmallows for little surprises of chewy sweetness throughout.
Step 5: Press Into the Pan
Time to transfer your mixture to the lined baking dish. Use a spatula lightly greased with butter or cooking spray, or (my favorite) clean your hands and butter them up a bit to press the treats evenly but not too compacted—keeping some lightness makes for a better texture!
Step 6: Cool, Cut & Insert Paper Straws
Let the treats cool and set for at least 30 minutes, though up to an hour is ideal. Once firm, cut into squares and push a paper straw gently into the bottom of each one—these straws act as handles and are so fun, especially for kids!
Step 7: Drizzle Chocolate & Sprinkles
Melt your semisweet chocolate chips slowly in the microwave (20-second bursts, stirring in between). Drizzle the chocolate over your treats and immediately sprinkle with Halloween-themed confetti while the chocolate is still gooey. This little detail makes all the difference for festive charm.
Step 8: Let Chocolate Set and Enjoy!
Allow the chocolate to firm up—about 15 to 20 minutes should do it. Then, get ready to enjoy these crowd-pleasing Halloween Rice Krispie Treats that are as fun to make as they are to eat!
Pro Tips for Making Halloween Rice Krispie Treats Recipe
- Don’t Rush the Browning: Take your time browning the butter; it’s the secret flavor that makes these treats unforgettable.
- Work Quickly After Melting Marshmallows: The mixture sets fast once off heat, so having your pan lined and spatula ready saves you from frantic stirring!
- Lightly Grease Your Tools: Butter your spatula and hands lightly to prevent sticking — it’s a game-changer for clean, smooth pressing.
- Choose Paper Straws Carefully: Use sturdy paper straws to avoid bending or breakage when serving—plastic might ruin the aesthetic and isn’t as eco-friendly!
How to Serve Halloween Rice Krispie Treats Recipe
Garnishes
I love topping these treats with a rainbow of Halloween sprinkles—bats, pumpkins, ghosts, or just the classic orange and black mix. It adds color and texture, not to mention instant Instagram-worthy vibes. Sometimes, I swirl in colored white chocolate drizzle too, just for an extra treat.
Side Dishes
Pair these Rice Krispie treats with a chilled glass of spooky punch, hot cocoa, or even a simple cup of coffee to balance the sweetness. I’ve found they’re perfect next to a bowl of caramel popcorn or cinnamon apple slices—keeps the palate interested and the party going.
Creative Ways to Present
For Halloween parties, I like to arrange the treats on a platter draped with faux spider webs and little plastic spiders for a spooky effect. You can also wrap each treat individually in clear cellophane tied with orange and black ribbons—makes it perfect for handing out or as cute party favors.
Make Ahead and Storage
Storing Leftovers
Once cooled completely, I store leftovers in an airtight container at room temperature. This keeps the treats chewy and crispy for up to 3-4 days. A neat trick is to layer parchment between treats to keep them from sticking together.
Freezing
You can definitely freeze these! I wrap individual treats tightly in plastic wrap and place them inside a freezer-safe container. They maintain their texture wonderfully and freeze well for about a month. Just thaw at room temp before serving.
Reheating
If you want to enjoy them warm (and who doesn’t?), pop a treat in the microwave for about 10 seconds to soften the marshmallow goo. Be cautious not to overheat or you’ll end up with melted chocolate drizzle runny everywhere.
FAQs
-
Can I use regular marshmallows instead of jumbo marshmallows for this Halloween Rice Krispie Treats Recipe?
Absolutely! Regular-sized marshmallows will work just fine—you might just need a bit more since jumbo marshmallows are larger. The texture and gooeyness will still be on point.
-
Why do you brown the butter in this recipe?
Browning the butter adds a deep, nutty flavor that really elevates the whole treat. It’s a simple step that makes the taste richer and more complex compared to just melting it.
-
Can I make these treats vegan or gluten-free?
Yes! Use gluten-free Rice Krispies (or similar cereal) and vegan marshmallows. Substitute vegan butter or margarine for the unsalted butter, and you’re good to go for a vegan-friendly treat.
-
How long do these Halloween Rice Krispie Treats last?
Stored properly in an airtight container at room temp, they stay fresh for 3-4 days. Past that, they might start to get a bit stale or chewy, but freezing is a great option to extend their shelf life.
-
What’s the best way to cut these treats without them sticking?
I recommend using a buttered or lightly oiled sharp knife and cutting gently in one smooth motion. Letting the treats set properly before cutting helps a lot too, so patience really pays off here.
Final Thoughts
Honestly, this Halloween Rice Krispie Treats Recipe is one of those feel-good, nostalgia-packed goodies that’s also incredibly easy to make and customize. Every year I find myself coming back to it not just because it’s tasty, but because it brings such joy to the kitchen and the party table. I hope you’ll love making (and eating!) these as much as I do—grab those marshmallows and get ready for some seriously fun Halloween magic.
Print
Halloween Rice Krispie Treats Recipe
- Prep Time: 10 minutes
- Cook Time: 12 minutes
- Total Time: 1 hour 12 minutes
- Yield: 24 servings
- Category: Dessert
- Method: Stovetop
- Cuisine: American
Description
Delight in these festive Halloween Rice Krispie Treats made with browned butter, jumbo and small marshmallows, and a fun chocolate drizzle topped with spooky sprinkles. Perfect for holiday parties, these treats come with straw handles for easy snacking.
Ingredients
Main Ingredients
- 1 stick (1/2 cup) unsalted butter
- 1 bag (10 ounces) jumbo marshmallows
- 8 cups Rice Krispies cereal
- 1 cup small marshmallows
Decorations
- 12 paper straws
- 1/2 cup semisweet chocolate chips, melted (for drizzling)
- Halloween-themed sprinkles
Instructions
- Prepare a Workspace: Line a 9×13-inch baking dish with parchment paper, leaving some overhang on the sides to easily remove the treats later.
- Brown the Butter: Melt the unsalted butter in a large saucepan over medium-low heat. Stir frequently until the butter turns a golden brown color and emits a nutty aroma, taking care not to burn it. Remove from heat once browned.
- Melt the Jumbo Marshmallows: Add the jumbo marshmallows to the browned butter in the saucepan. Return to low heat and stir continuously until the marshmallows are completely melted and smooth.
- Combine with Rice Krispies: Remove the saucepan from heat and quickly stir in the Rice Krispies cereal until all pieces are evenly coated with the marshmallow mixture.
- Add Small Marshmallows: Gently fold in the small marshmallows to create pockets of gooey marshmallow throughout the mixture.
- Press into Baking Dish: Transfer the mixture into the prepared pan. Use a greased spatula or lightly buttered hands to press the mixture evenly into the dish, pressing firmly but not compacting too much.
- Set and Cut: Allow the mixture to cool and set for about 50 minutes to 1 hour so it becomes firm and easier to cut into squares.
- Insert Straws: Once set, cut the Rice Krispie mixture into 24 squares. Insert a paper straw into the bottom of each square to serve as a handle for easy eating.
- Chocolate Drizzle: Melt semisweet chocolate chips in a microwave-safe bowl at 20-second intervals, stirring between each until smooth. Drizzle the melted chocolate over each treat.
- Add Sprinkles: While the chocolate drizzle is still wet, sprinkle Halloween-themed sprinkles over the treats for a festive look.
- Final Set and Enjoy: Let the chocolate drizzle set for 15-20 minutes before serving. Enjoy your Halloween Rice Krispie Treats!
Notes
- For a richer flavor, carefully brown the butter without burning to enhance the nutty taste of the treats.
- You can substitute Halloween-themed sprinkles with any seasonal decorations if desired.
- If you prefer a sturdier handle, use paper straws as recommended instead of popsicle sticks.
- To avoid sticking, grease your hands or spatula before pressing the mixture into the pan.
- Store leftovers in an airtight container at room temperature for up to 3 days.
Nutrition
- Serving Size: 1 treat
- Calories: 150 kcal
- Sugar: 15 g
- Sodium: 70 mg
- Fat: 6 g
- Saturated Fat: 3.5 g
- Unsaturated Fat: 2 g
- Trans Fat: 0 g
- Carbohydrates: 22 g
- Fiber: 0.5 g
- Protein: 1 g
- Cholesterol: 15 mg


