
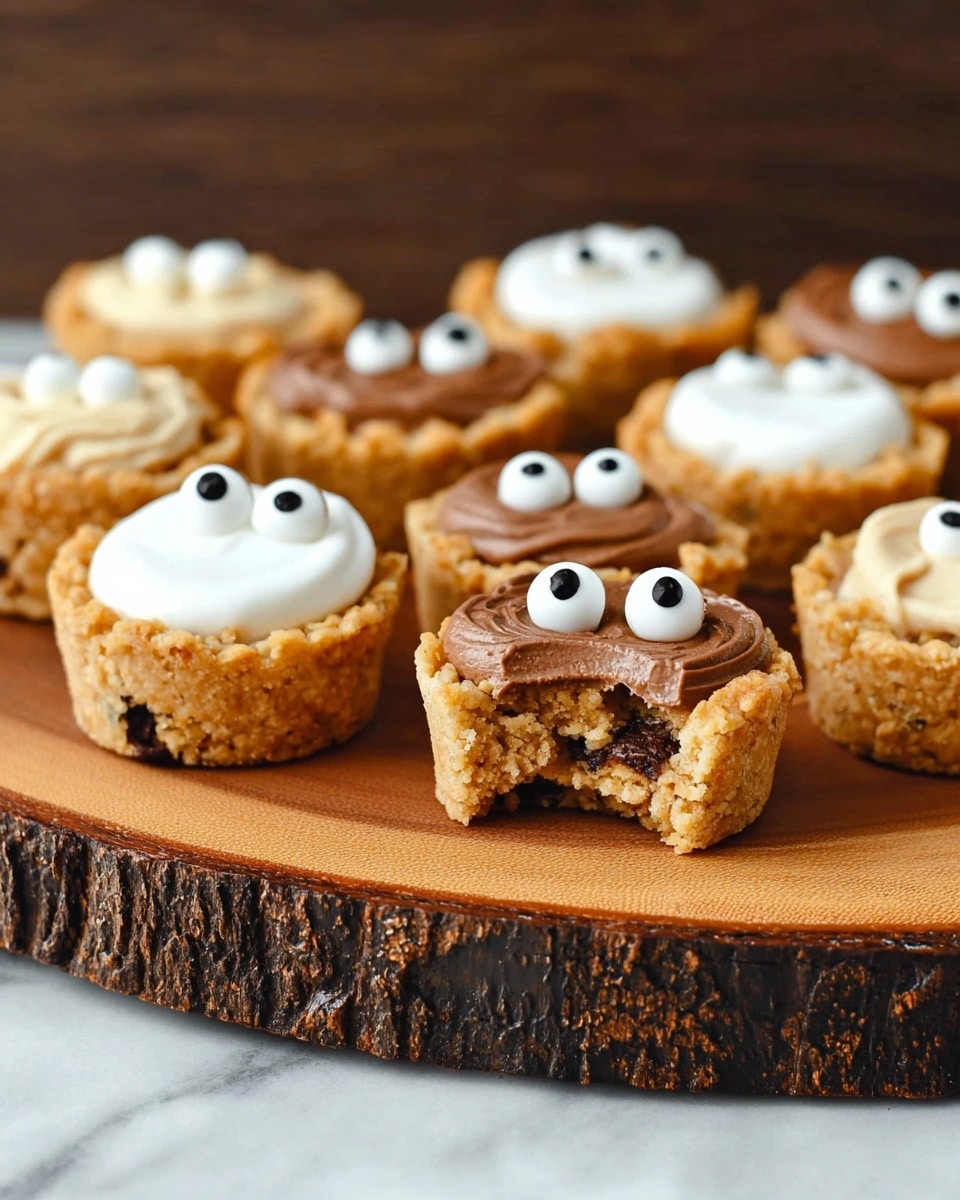
Halloween Peanut Butter Cookie Cups Recipe
If you’re after a fun, festive, and totally irresistible treat this fall, you’re going to flip for this Halloween Peanut Butter Cookie Cups Recipe. It’s one of those crowd-pleasers that’s easy to whip up but looks super impressive on your party table. Plus, decorating them is just plain fun—like a mini Halloween craft project that ends with oh-so-delicious cookie cups bursting with peanut butter goodness. Stick with me, and I’ll walk you through every step so you nail these tasty little bites on your first try!
Why This Recipe Works
- Simple, Minimal Ingredients: Just peanut butter, sugar, and an egg form a cookie base that’s quick and foolproof, perfect when you’re juggling Halloween prep.
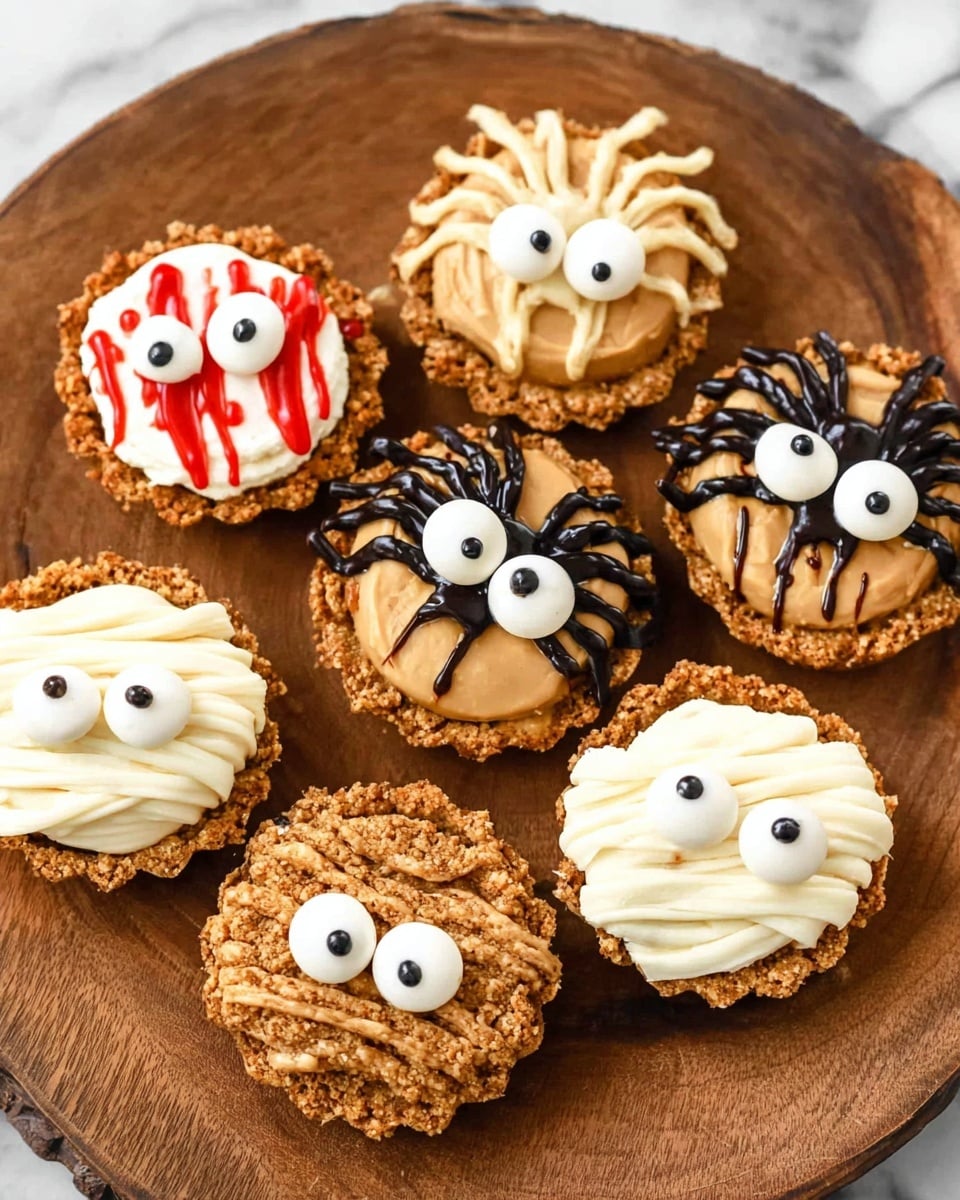
- Versatile Decoration Options: You can turn these cookie cups into mummies, spiders, or spooky eyeballs with just a few candies and some melted chocolate—whichever vibe you want!
- Fast and Fun: They bake in under 15 minutes and decorating is half the fun, making it a great activity to do with kids or friends.
- Delicious Peanut Butter Flavor: Using peanut butter as the base gives these cookies a rich, nutty taste that pairs perfectly with sweet chocolate and marshmallow accents.

Ingredients & Why They Work
Each ingredient in this Halloween Peanut Butter Cookie Cups Recipe is chosen for a reason. The peanut butter provides that classic nutty base, sugar adds just the right touch of sweetness, and the egg binds everything together perfectly. Then, the candy toppings bring the cookie cups to life with festive charm and extra flavor.

- Creamy Peanut Butter: Choose smooth peanut butter for a tender, melt-in-your-mouth cookie cup texture.
- Granulated Sugar: Helps create a slightly crisp exterior while keeping the inside soft and chewy.
- Large Egg: Acts as a natural binder, holding your cookie cups together without adding complexity.
- White Chocolate Reese’s Cups / Marshmallows: Essential for the mummy design—marshmallows bring fluffiness, while white chocolate Reese’s add richness.
- Candy Eyes: No Halloween cookie is complete without goofy, spooky eyes to bring character and fun.
- White & Dark Chocolate Melting Wafers: Perfect for drizzling and “drawing” details like mummy wraps or spider legs.
- Mini Reese’s Peanut Butter Cups: Small but mighty, these form the base of your spider and eyeball designs, packing peanut butter flavor in every bite.
- Sparkly Red Gel: Adds that creepy, bloodshot effect on your eyeball cookies—super simple but highly effective.
Tweak to Your Taste
One of my favorite things about this Halloween Peanut Butter Cookie Cups Recipe is how easy it is to make it your own. Play with the decorations, swap peanut butter types, or even try adding a pinch of cinnamon or vanilla to the dough. It’s all about having fun and making a treat that feels totally you.
- Mummy Variation: I love swapping the white chocolate Reese’s for marshmallow halves here—it makes the cookies fluffier and adds a whole other texture that kids adore.
- Spider Variation: If you want a richer chocolate punch, try using Rolos instead of peanut butter cups. The caramel surprise inside is a delightful twist!
- Eyeball Customization: Instead of red gel, you can try colored gel pens for different “eye” colors—it’s a fun way to make each cookie unique, especially for parties.
- Nut-Free Adaptation: Use sunflower seed butter in place of peanut butter, and replace Reese’s with chocolate-free candies to accommodate allergies.
Step-by-Step: How I Make Halloween Peanut Butter Cookie Cups Recipe
Step 1: Prep Your Pan and Ingredients
Start by preheating your oven to 350°F and spray your mini muffin tin thoroughly with baking spray. Trust me, you don’t want your cookie cups sticking when they’re perfectly baked. Next, unwrap all your candy and prep your chocolate melting wafers—when the cookies come out hot, you’ll want to decorate right away without scrambling for supplies!
Step 2: Mix the Simple Cookie Dough
In a medium bowl, combine creamy peanut butter, granulated sugar, and one large egg. Stir everything together until you get a smooth, uniform dough. It’s quick, sticky, and smells incredible already. No fancy tools needed, just a spoon or spatula works perfectly here!
Step 3: Bake Your Cookie Cups
Using a 1-tablespoon cookie scoop, drop spoonfuls of dough into each well of your mini muffin tin. Aim to fill almost to the top but leave a little room for pressing the candies later. Bake for 12 to 14 minutes until they’re set but still soft in the center. You’ll notice the edges turn slightly golden—that’s your cue!
Step 4: Press and Decorate Immediately
The cookies are hot from the oven, so it’s the perfect time to gently press one Reese’s cup or marshmallow half into each cookie cup. This makes the candy sink perfectly into the warm dough. Then get creative with your decorating—drizzle melted white chocolate for mummy wraps, use dark chocolate to sketch spider legs, or add that spooky red gel for eyeball veins. Add candy eyes last so they stick just right!
Step 5: Cool and Pop Out
Let the cookie cups sit in the muffin tin for about 10 minutes to firm up; this also helps the candy set. When ready, use a butter knife to gently loosen each cookie cup’s edge, and they should pop out smoothly without falling apart. If you have leftover melted chocolate, drizzle some on top for an extra festive touch!
Pro Tips for Making Halloween Peanut Butter Cookie Cups Recipe
- Prep Your Candy First: Don’t wait until the cookies are out of the oven to start unwrapping—decorating in hot cookies is time-sensitive.
- Don’t Overbake: The cookie cups should be set at 12 minutes but still soft in the center; this guarantees they’ll be tender and not dry.
- Use a Small Spoon or Piping Bag for Chocolate: This helps you create clean, precise details when decorating your spooky cookie cups.
- Cooling Time Is Key: Let the cookie cups cool for at least 10 minutes in the pan before trying to remove them to keep the shape intact.
How to Serve Halloween Peanut Butter Cookie Cups Recipe
Garnishes
I usually top the mummy cookie cups with extra drizzles of white chocolate because it looks like real mummy wrappings. For the spooky eyeballs, a little red gel gives the perfect eerie bloodshot effect, making them almost too fun to eat! And of course, candy eyes set the tone instantly—never skip those for maximum creep factor.
Side Dishes
These cookie cups pair wonderfully with a simple glass of cold milk or even a warm cup of hot cocoa sprinkled with cinnamon. If you’re throwing a Halloween party, some fresh fruit skewers or a pumpkin spice dip also complement the peanut butter and chocolate flavors beautifully.
Creative Ways to Present
I like to arrange the different decorated cookie cups on a spooky serving tray lined with fake spiderwebs and miniature plastic spiders. For a party, placing them on a tiered cake stand surrounded by carved mini pumpkins adds a festive touch. You can even place each cookie cup in individual cupcake liners colored black or orange for an extra pop!
Make Ahead and Storage
Storing Leftovers
If you happen to have leftovers (which is rare in my house!), store the cookie cups in an airtight container at room temperature for up to 3 days. Avoid refrigerating unless it’s very warm, as this can affect the texture of the peanut butter and candy toppings.
Freezing
To freeze, place the cookie cups on a tray lined with parchment paper, freeze until solid, then transfer to a freezer-safe container or bag. They freeze well for up to 2 months. When you’re ready, thaw them at room temperature to preserve that soft cookie texture.
Reheating
If you want to warm them up a bit, pop the cookie cups in a microwave for about 10 seconds—it brings back the gooey softness without melting the candy decorations too much. Just keep a close eye so you don’t overdo it!
FAQs
-
Can I use crunchy peanut butter instead of creamy?
While you can swap in crunchy peanut butter, keep in mind that the texture will be a little chunkier, and the cookie cups may not be as smooth or delicate. I prefer creamy for the best melt-in-your-mouth effect, but if you like a bit of crunch, go for it!
-
What if I don’t have mini muffin tins?
Mini muffin tins help keep the cookie cups uniform, but if you don’t have one, you can shape the dough into small balls, bake on a regular cookie sheet, and press the candies into the top while warm. The shape won’t be as cup-like, but the flavor is just as incredible.
-
How do I avoid candy melting too much during baking?
This recipe has you press the candy into cookies immediately after baking, so the candies soften but don’t fully melt. For best results, unwrap and prepare your candy before baking, and press gently but firmly into warm cookies right after they come out of the oven.
-
Can I make these vegan or dairy-free?
You can make some substitutions! Use a flax egg or a commercial egg replacer, choose dairy-free peanut butter and candies, and replace chocolate melting wafers with vegan alternatives. Just note that texture and flavor might vary a bit from the original.
Final Thoughts
This Halloween Peanut Butter Cookie Cups Recipe is one of those gems that feels like both a treat and an activity rolled into one. I’ve made these for years, and every time, kids and adults alike light up when they see the little mummies, spiders, and eyeballs sitting on the tray. They’re simple to make, super fun to decorate, and downright delicious—you really can’t go wrong. So go ahead, grab your ingredients, get cozy, and make some spooky cookie magic in your kitchen. I promise you’ll be so glad you did!
Print
Halloween Peanut Butter Cookie Cups Recipe
- Prep Time: 15 minutes
- Cook Time: 14 minutes
- Total Time: 49 minutes
- Yield: 24 cookie cups
- Category: Dessert
- Method: Baking
- Cuisine: American
- Diet: Vegetarian
Description
Delight in these spooky Halloween Peanut Butter Cookie Cups, perfect for a festive treat. Soft peanut butter cookies serve as the base for creative toppings like mummy marshmallows, spider peanut butter cups, and bloody eyeball decorations using candy eyes, white and dark chocolate melts, and festive gels.
Ingredients
For the Cookies
- 1 cup creamy peanut butter
- 1 cup granulated sugar
- 1 large egg
For the Mummy Cookies
- 24 white chocolate Reese’s cups or 12 regular sized marshmallows, cut in half
- 48 candy eyes
- ½ cup Ghiradelli White Chocolate Melting Wafers, melted
For the Spider Cookies
- 24 Reese’s Peanut Butter Cup miniatures, unwrapped
- 48 candy eyes
- ½ cup Ghiradelli Dark Chocolate Melting Wafers, melted
For the Spooky Eyeballs
- 24 Reese’s White Chocolate Peanut Butter Cup miniatures, unwrapped (or 12 regular marshmallows, cut in half)
- Sparkly red gel
- 24 spooky eyeballs
Instructions
- Prepare the Oven and Tin: Preheat your oven to 350°F. Spray a mini muffin tin thoroughly with baking spray and set it aside.
- Mix Ingredients: In a mixing bowl, combine 1 cup of creamy peanut butter, 1 cup of granulated sugar, and 1 large egg. Stir until all ingredients are well blended into a smooth dough.
- Form and Bake Cookies: Using a 1 tablespoon cookie scoop, drop spoonfuls of the dough into the prepared mini muffin tin. Bake in the oven for 14 minutes until cookies are set.
- Choose Your Decoration Style: Decide whether you want to make mummy cookies, spider cookies, or spooky eyeballs. Adjust the amount of toppings you have prepared accordingly.
- Add Candy Toppings: Remove the pan from the oven immediately. While the cookies are hot, press a Reese’s cup or marshmallow half into the center of each cookie. Begin decorating with corresponding candy eyes and drizzled melted chocolate as per your chosen design.
- Cool and Serve: Allow the cookie cups to cool in the pan for about 10 minutes before carefully removing them with a butter knife to prevent breaking. Enjoy your festive Halloween treats!
Notes
- Ensure all candy is unwrapped beforehand to quickly press into warm cookies right out of the oven.
- For mummy cookies: Use white chocolate peanut butter cups or marshmallows and drizzle melted white chocolate to mimic cloth strips; don’t forget to add candy eyes.
- For spider cookies: Use peanut butter cups or rolos, press candy eyes on top, and use melted dark chocolate to pipe spider legs.
- For bloody eyeball cookies: Use white chocolate peanut butter cups or marshmallows, decorate with candy eyes and create bloodshot effects using sparkly red gel.
- Let cookies cool sufficiently in the pan before removing to maintain shape and avoid crumbling.
Nutrition
- Serving Size: 1 cookie cup
- Calories: 180 kcal
- Sugar: 15 g
- Sodium: 75 mg
- Fat: 12 g
- Saturated Fat: 5 g
- Unsaturated Fat: 6 g
- Trans Fat: 0 g
- Carbohydrates: 15 g
- Fiber: 1 g
- Protein: 5 g
- Cholesterol: 20 mg


