
Halloween Mummy Oreo Cookies Recipe
If you’re looking for a fun and spooky treat to wow your friends—and maybe even your kids—this Halloween Mummy Oreo Cookies Recipe is absolute magic. These adorable, creepy-cute mummy cookies are super easy to make, require minimal ingredients, and deliver big on the Halloween vibes. I’ve made them countless times for parties and last-minute get-togethers, and they never fail to impress (and disappear fast!). Let me walk you through how to make these mummy wonders that are as tasty as they are fun to create.
Why This Recipe Works
- Simplicity with Wow Factor: You don’t have to be a pro baker to pull off these charming mummies—they’re quick, easy, and look professionally spooky.
- Perfect Candy-Coating Technique: Using white chocolate melting wafers combined with paramount crystals gives a smooth, glossy finish that hardens just right for decorating.
- Customizable and Kid-Friendly: The recipe invites creativity—you can switch up Oreo flavors or icing eyes, making it a fantastic project to share with your little ones.
- Festive and Crowd-Pleasing: These cookies bring a festive touch to any Halloween party, trick-or-treat bag, or just an everyday spooky snack.

Ingredients & Why They Work
Each ingredient in this Halloween Mummy Oreo Cookies Recipe plays a role in building flavor and that iconic mummy look. I always recommend picking your favorite Oreo flavor to personalize these treats—cookies and cream or classic chocolate are fantastic choices. Let’s peek at why everything works so well together.
- Oreo Sandwich Cookies: These provide the perfect crunchy base and are readily available. Their cream filling makes for a nice contrast with the chocolate coating.
- White Chocolate Melting Wafers: These melt easily and cool to a satisfying, sturdy shell that holds your mummy design perfectly.
- Paramount Crystals: Optional but game-changing; they help keep your chocolate smooth, shiny, and prevent any bloom that could dull your finished cookies.
- Royal Icing Eyes: The secret finishing touch that instantly brings your mummies to life—plus it’s fun to add those creepy little gazes!
Tweak to Your Taste
One of the best parts about making this Halloween Mummy Oreo Cookies Recipe is how easy it is to customize. Whether you want to jazz it up with a different chocolate color or add some sparkly edible glitter, the decorating stage is your playground. I personally love swapping the white chocolate for orange or purple candy melts to match other Halloween themes.
- Flavor Variation: I once tried mint-flavored Oreos dipped in dark chocolate for a more sophisticated bite – it was a hit with the adults at the party!
- Dietary Modifications: You can find vegan white chocolate melts and dairy-free Oreos if you want a plant-based spin.
- Difficulty Levels: For beginners, just focus on the dipping and eyes, and skip the tricky piped bandages—still super cute and delicious.
Step-by-Step: How I Make Halloween Mummy Oreo Cookies Recipe
Step 1: Prepare Your Workspace
Line a baking sheet with parchment paper or a Silpat mat. This step might seem basic, but trust me, it makes cleanup a breeze and keeps your cookies from sticking once dipped in white chocolate. Set it aside so everything is ready to roll when the chocolate is melted.
Step 2: Melt the White Chocolate Perfectly
Into a microwave-safe bowl, add your white chocolate melting wafers and paramount crystals (if using). Microwave on medium heat for 30 seconds, then stir patiently—this helps distribute heat evenly and avoid burning. Repeat microwaving in 15-second bursts, stirring gently between each, until your chocolate is silky smooth and glossy. This slow approach is key to luscious coating and that satisfying snap when hardened.
Step 3: Dip Those Oreos Like a Pro
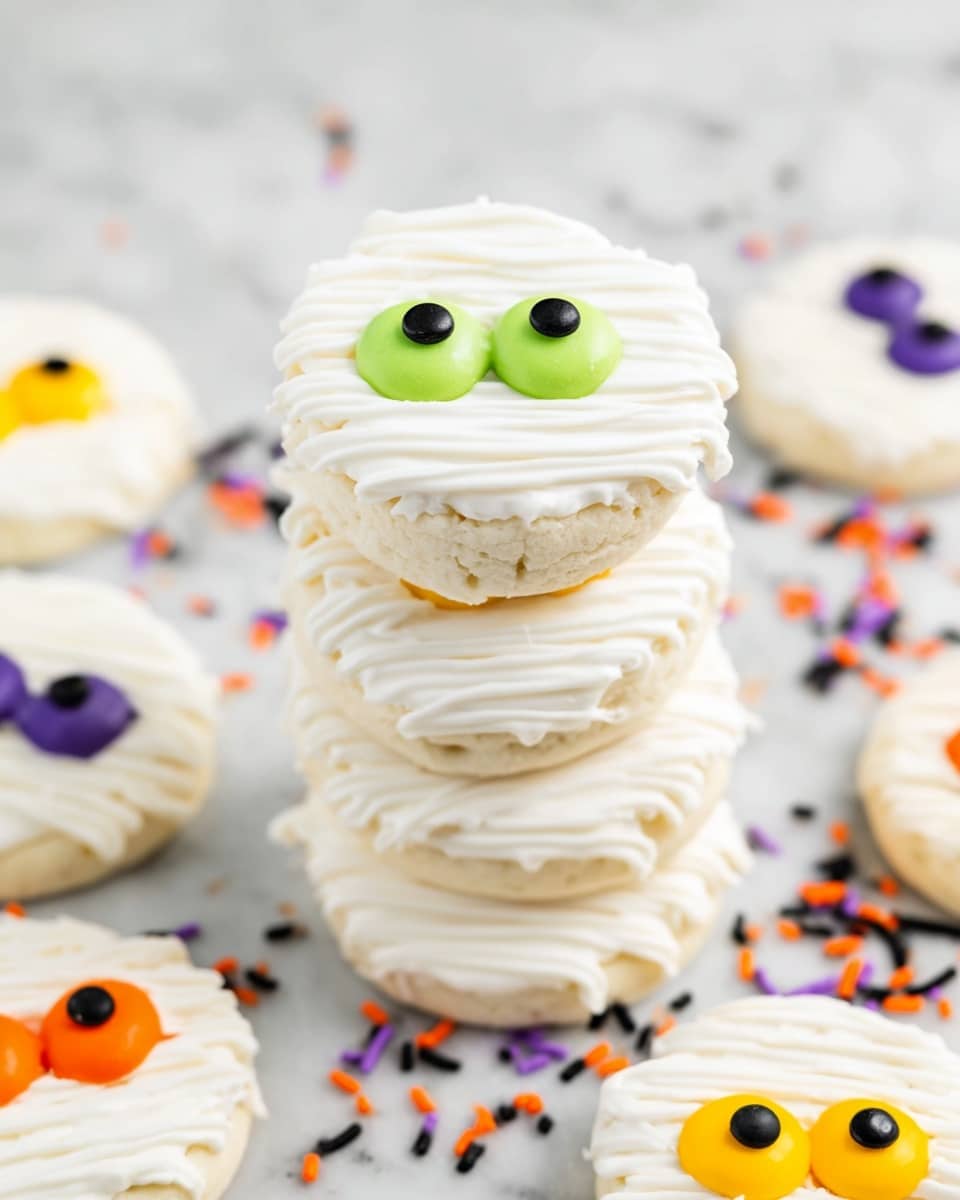
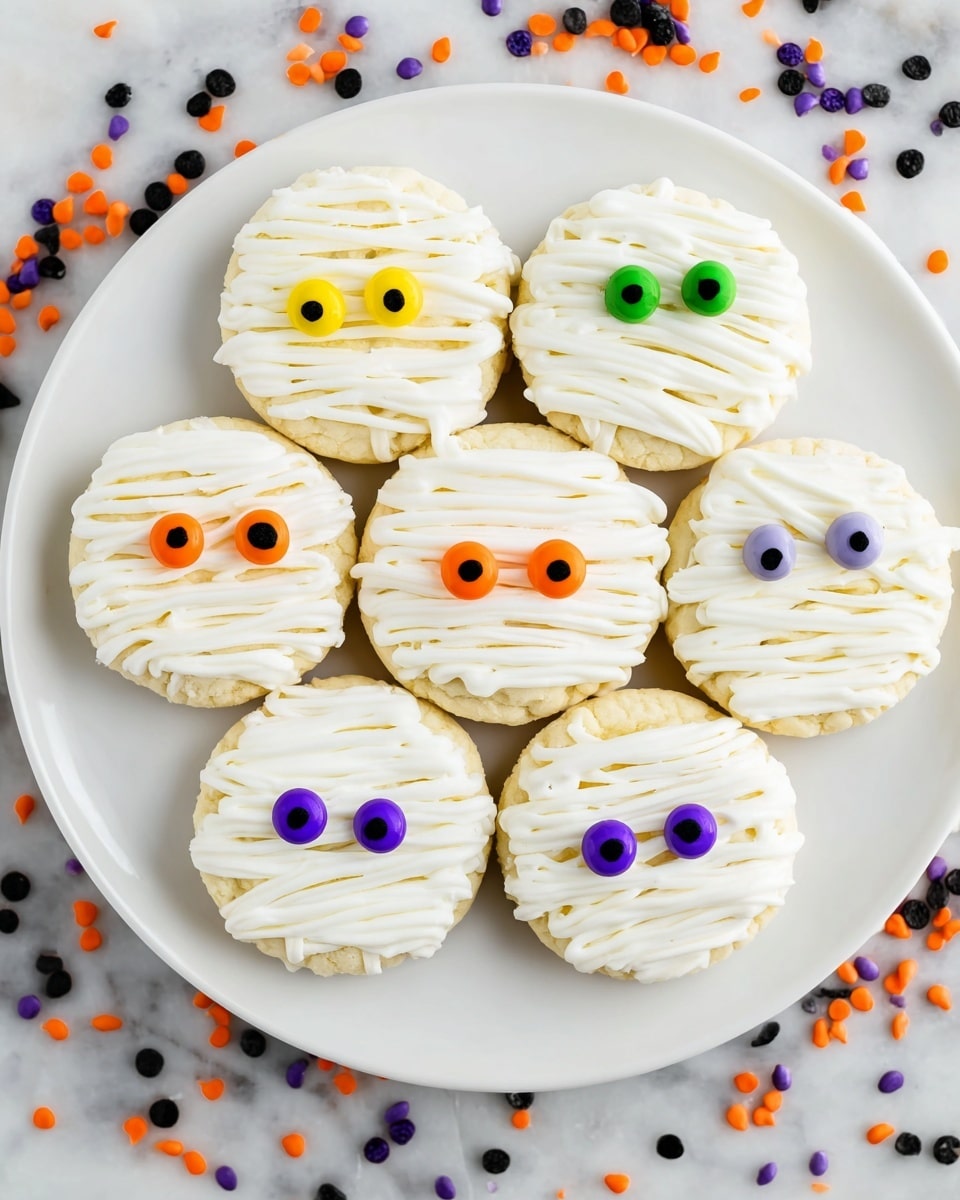
Now comes the fun—and a bit messy—part. Using a fork or dipping tool, carefully dunk each Oreo into the melted white chocolate. Hold the cookie above the bowl and lightly tap the fork on the edge to shake off excess chocolate, so it doesn’t drip or pool. Transfer dipped Oreos to your baking sheet and immediately pop royal icing eyes onto each—this will give that instantly creepy mummy stare!
Step 4: Pipe Your Mummy Bandages
Pour the remaining melted chocolate into a decorating bag or a sandwich bag. Snip off a tiny corner, then pipe zigzag lines back and forth over the Oreos to mimic mummy wrappings. Don’t cover up the eyes—you want to keep those peering through! Set your cookies aside until the chocolate hardens completely, which usually takes about 20-30 minutes.
Pro Tips for Making Halloween Mummy Oreo Cookies Recipe
- Don’t Rush the Melting: Stirring the chocolate frequently between microwave bursts prevents scorching and keeps it silky smooth—a trick I’ve learned after some ruined batches.
- Use Paramount Crystals if You Can: They really help your chocolate set shiny and smooth; I keep a small jar handy every Halloween season.
- Perfect Your Piping Technique: Practice piping on parchment paper first to get comfy with control and pressure before decorating the cookies.
- Avoid Overloading the Chocolate: Too much white chocolate on the cookie leads to drips and mess—tap off the excess for a clean finish.
How to Serve Halloween Mummy Oreo Cookies Recipe
Garnishes
I like to keep it simple and let the mummies do the talking, so I just add those classic royal icing eyes. Sometimes, though, I sprinkle a tiny bit of edible glitter or add some mini candy bats around the tray for a fun Halloween display. It’s amazing how small touches amp up the festive feel!
Side Dishes
These cookies pair perfectly with a cold glass of milk or a warm cup of spiced pumpkin latte. For Halloween parties, you could serve alongside caramel popcorn or a hearty pumpkin soup to balance sweet and savory.
Creative Ways to Present
I’ve had a blast turning these mummies into spooky cookie bouquets using wooden skewers, or nestled them in mini “graveyards” made of crushed chocolate cookies and little tombstone toppers. Setting them in a Halloween-themed tin also makes a charming gift. Play around and see what your inner crafty chef dreams up!
Make Ahead and Storage
Storing Leftovers
After these Halloween Mummy Oreo Cookies have set fully, I store them in an airtight container at room temperature. They stay fresh and crispy for at least a week—perfect for enjoying throughout the spooky season. Just be sure to keep them away from humidity to avoid any sogginess.
Freezing
If you need to make them ahead well before Halloween, I’ve frozen these cookies successfully. Wrap individual cookies in plastic wrap first and then store them in a freezer-safe container. When you’re ready to serve, thaw them at room temperature—this keeps that delightful crunch intact without condensation messing up the chocolate.
Reheating
Reheating isn’t really necessary for these cookies since they’re served cold and the chocolate sets firm. But if your kitchen is chilly and the chocolate feels too hard, just leave them out for 15 minutes before serving for a perfect bite.
FAQs
-
Can I use regular white chocolate instead of melting wafers for this Halloween Mummy Oreo Cookies Recipe?
Yes, you can, but ordinary white chocolate can be trickier to melt and may seize or burn more easily. Melting wafers are specially formulated to melt smoothly without burning, making them ideal for dipping and piping.
-
What if I don’t have royal icing eyes—can I make my own?
Absolutely! You can pip tiny dots with black gel icing or use edible marker pens for eyes. Alternatively, small candy pearls or sprinkles can work well—just give your creativity free rein!
-
How long do these mummy Oreo cookies last?
Stored properly in an airtight container at room temperature, the cookies will stay fresh and tasty for about 7 days. Just keep them away from heat and moisture to maintain the crisp texture and shiny coating.
-
Can kids help make the Halloween Mummy Oreo Cookies Recipe?
Definitely! Kids love dipping the Oreos and placing the eyes, which makes this recipe a fantastic hands-on Halloween activity. For piping, adults may want to take the lead or supervise younger kids to prevent any chocolate messes.
Final Thoughts
This Halloween Mummy Oreo Cookies Recipe is one of my favorite quick festive projects that never fails to bring smiles (and a few squeals) to the table. It’s approachable, playful, and that perfect mix of spooky and sweet. Whether you’re baking with friends, entertaining kids, or just craving a fun seasonal treat, these mummies will deliver the goods. So grab your Oreos, melt some chocolate, and let’s get dipping—your Halloween party just found its cutest star.
Print
Halloween Mummy Oreo Cookies Recipe
- Prep Time: 5 minutes
- Cook Time: 25 minutes
- Total Time: 30 minutes
- Yield: 25 cookies
- Category: Dessert
- Method: No-Cook
- Cuisine: American
Description
These Halloween Mummy Oreo Cookies are a fun and spooky treat perfect for Halloween parties and celebrations. Oreo cookies are dipped in smooth white chocolate, decorated with royal icing eyes, and piped with white chocolate to create an adorable mummy effect that’s sure to delight kids and adults alike.
Ingredients
Main Ingredients
- 25 Oreo sandwich cookies, your favorite flavor
- 2 cups white chocolate melting wafers
- 2 tablespoons paramount crystals
- Royal icing eyes
Instructions
- Prepare Baking Sheet: Line a baking sheet with parchment paper or a Silpat mat and set it aside for easy cleanup and cookie cooling.
- Melt Chocolate: Place white chocolate melting wafers and paramount crystals in a microwave-safe bowl. Microwave on medium heat for 30 seconds, stir slowly, then continue microwaving in 15-second increments until the chocolate is fully melted and smooth.
- Dip Oreos: Using a fork or dipping tool, dip each Oreo cookie into the melted white chocolate. Lightly tap to remove excess chocolate, then transfer cookies onto the lined baking sheet. Immediately add royal icing eyes on each cookie before the chocolate hardens.
- Pipe Mummy Lines: Pour some melted white chocolate into a decorating bag or a sandwich bag and cut a small piece off a corner. Pipe lines back and forth over the cookies to mimic mummy bandages, taking care not to cover the eyes.
- Set and Serve: Allow the cookies to sit at room temperature until the chocolate hardens completely. Once set, enjoy your spooky and delicious Halloween Mummy Oreo Cookies!
Notes
- Store cookies in an airtight container to maintain freshness for up to 7 days or longer.
- Paramount crystals are optional but recommended as they keep the chocolate shiny and smooth and reduce sugar and fat bloom.
- If royal icing eyes are not available, you can use small candy eyes or make your own eyes with colored icing or edible markers.
- Ensure the white chocolate is completely smooth and well-melted for easier dipping and piping.
- Use a toothpick to help place and adjust the royal icing eyes accurately.
Nutrition
- Serving Size: 1 cookie
- Calories: 150 kcal
- Sugar: 15 g
- Sodium: 80 mg
- Fat: 9 g
- Saturated Fat: 6 g
- Unsaturated Fat: 3 g
- Trans Fat: 0 g
- Carbohydrates: 18 g
- Fiber: 1 g
- Protein: 1 g
- Cholesterol: 0 mg

