

Halloween Mummy Cupcakes Recipe
If you’re on the hunt for a show-stopping yet surprisingly easy Halloween treat, I’ve got just the thing for you. These Halloween Mummy Cupcakes Recipe are the perfect blend of spooky and sweet, and honestly, they’re a total crowd-pleaser every time I bring them out. Whether you’re baking for a party or just want to add a fun twist to your Halloween celebrations, this recipe nails it — with simple steps and a result that’s too cute to resist!
Why This Recipe Works
- Simple Ingredients: Uses everyday ingredients you likely already have on hand, making it easy to pull together last minute.
- Fun Decoration: The basketweave piping technique gives cupcakes a mummy-wrapped look that’s both charming and spooky.
- Customizable: You can swap cupcakes or frosting flavors while still keeping the adorable mummy theme intact.
- Perfect for All Skill Levels: Don’t worry if you’re new to decorating—you’ll find step-by-step guidance that makes it doable and delightful.

Ingredients & Why They Work
Getting your hands on the right ingredients is half the fun—plus, it ensures your Halloween mummy cupcakes come together perfectly with rich flavor and that styled look. Each ingredient plays its role in balancing taste and ease, whether you’re baking from scratch or using a mix.
- Your favorite cupcake recipe: Choose a classic vanilla, chocolate, or even pumpkin spice base—whatever you love. Homemade or box mix works great, just make sure they’re fully cooled before decorating.
- Vanilla buttercream: This creamy frosting acts as the “bandages” on the mummies and tastes rich without overpowering the cupcake.
- Royal icing eyes: These tiny edible eyes bring your mummy cupcakes to life, adding that playful “peek-a-boo” effect. You can buy them pre-made or pipe them yourself with royal icing.
Tweak to Your Taste
One of the things I adore about this Halloween Mummy Cupcakes Recipe is how easy it is to make it your own. I love swapping out the cupcake flavors depending on the season or crowd, and even the frosting can get a little twist to match your vibe.
- Variation: I recently tried a chocolate cupcake base with orange buttercream, and it was a hit at my daughter’s school party—adding a pop of fall color to those spooky mummies.
- Dietary Options: Gluten-free cupcake mixes and dairy-free frostings work perfectly here, so no one has to miss out on the fun.
- Extra Spooky: For a creepier edge, use red gel or edible glitter lightly on the “bandages,” giving these mummies an eerie glow.
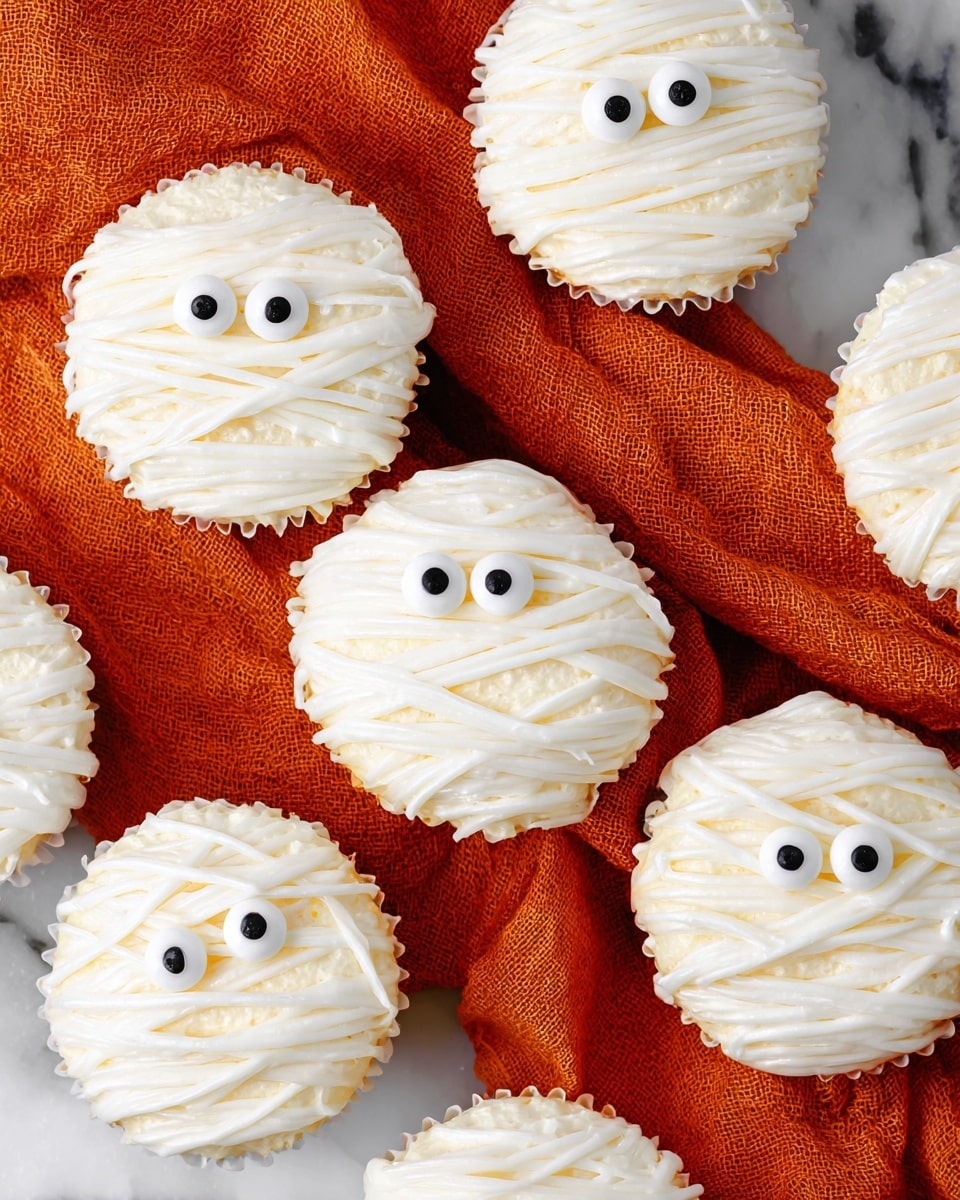
Step-by-Step: How I Make Halloween Mummy Cupcakes Recipe
Step 1: Frost Your Cupcakes Smoothly
Once your cupcakes have completely cooled (this is key!), grab a butter knife or a straight spatula and spread a thin, even layer of vanilla buttercream over the top of each cupcake. Think of it as a smooth base layer that will let your mummy ribbons stick perfectly.
Step 2: Add Those Spooky Eyes
Place two royal icing eyes onto each cupcake. I like to put them slightly off-center for a whimsical, quirky look—like these mummies are peeking out from under their wrappings!
Step 3: Pipe the Mummy Bandages
Fit a piping bag with a #44 basketweave decorating tip and fill it with your vanilla buttercream. Pipe thin, flat ribbons of frosting across the cupcake in a crisscross pattern. The trick is to keep the ribbons flat and overlapping just enough to mimic mummy wrappings without covering those eyes you just added. I find a gentle, steady hand works best—no need to rush!
Step 4: Admire and Enjoy!
Once you’re happy with your mummy look, stand back and admire these spooky cuties before digging in. I promise they’re just as tasty as they look!
Pro Tips for Making Halloween Mummy Cupcakes Recipe
- Cool Completely First: Try to frost completely cooled cupcakes so the frosting stays smooth and piping doesn’t melt.
- Practice Your Basketweave: If piping ribbon-style frosting is new to you, practice on parchment paper first to get a feel for the pressure and motion.
- Use Consistent Frosting Texture: Make sure your buttercream isn’t too stiff or too runny—it should hold shape but still be easy to pipe.
- Place Eyes Last: Adding the eyes before piping keeps them in place and prevents frosting from smudging them.
How to Serve Halloween Mummy Cupcakes Recipe
Garnishes
I like keeping my garnishes simple since the mummies themselves are the star, but sometimes I sprinkle a touch of edible glitter or pop a tiny fondant spider on a few cupcakes for some extra creep factor. It’s those little extras that add charm and fun conversation starters!
Side Dishes
Pair these cupcakes with some freshly brewed apple cider or a Halloween-themed punch. For a party spread, popcorn balls or candied apples make fun, seasonal sides that keep the festive spirit going.
Creative Ways to Present
I once displayed these cupcakes on a tiered stand surrounded by fake cobwebs and little plastic bats. Adding mini LED tealights underneath gave the whole setup an eerie glow that kids loved. You could also wrap your cupcake liners in black or orange paper for an instant Halloween vibe.
Make Ahead and Storage
Storing Leftovers
Any leftover Halloween mummy cupcakes store best in an airtight container, kept in the fridge to maintain the buttercream’s freshness. I usually layer them with parchment between cupcakes to avoid smudging the decorations.
Freezing
I’ve frozen these cupcakes successfully by wrapping each tightly in plastic wrap, then placing them in an airtight container. When you’re ready, thaw them overnight in the fridge—the frosting holds up surprisingly well to freezing when wrapped carefully.
Reheating
Since these are frosted cupcakes, reheating isn’t typically needed or recommended. If you want frostings a bit softer, let the cupcake sit at room temperature for 15–20 minutes before serving—it brings out the best texture.
FAQs
-
Can I use store-bought cupcakes to make this Halloween Mummy Cupcakes Recipe?
Absolutely! Store-bought cupcakes work wonderfully here, especially if you’re short on time. Just make sure they’re plain or lightly flavored so your buttercream and decorations can really stand out.
-
What piping tip is best for the mummy bandages?
The #44 basketweave tip is ideal because it creates those perfect flat frosting ribbons resembling mummy wrappings. If you don’t have one, a small flat tip or ribbon tip can work too—with a little creative piping!
-
Can I make the royal icing eyes myself?
Yes! You can pipe tiny dots of white royal icing to create eyes and then add smaller black dots for pupils. It takes a bit of patience but it’s a fun DIY touch if you want to skip store-bought decorations.
-
How long do these cupcakes stay fresh?
When stored properly in an airtight container in the fridge, they stay fresh for 3-4 days. For best eating, take them out 15-20 minutes before serving for that perfect buttercream softness.
Final Thoughts
This Halloween Mummy Cupcakes Recipe has become my go-to for last-minute baking that still wows the crowd. It strikes the perfect balance between festive fun and ease, so whether you’re a baking beginner or a Halloween party pro, this recipe has your back. Give it a try—you’ll find yourself smiling every time you see those adorable frosting bandages and silly eyes staring back at you. Happy baking and spooky snacking!
Print
Halloween Mummy Cupcakes Recipe
- Prep Time: 15 minutes
- Cook Time: 0 minutes
- Total Time: 15 minutes
- Yield: 12 cupcakes
- Category: Dessert
- Method: No-Cook
- Cuisine: American
- Diet: Vegetarian
Description
These Halloween Mummy Cupcakes are a fun and spooky treat perfect for Halloween parties. Featuring your favorite cupcakes topped with vanilla buttercream and decorated with piping techniques to resemble mummies, they are sure to delight kids and adults alike.
Ingredients
Cupcakes
- 1 batch your favorite cupcake recipe (about 12 cupcakes)
Frosting and Decoration
- 1 cup vanilla buttercream
- Royal icing eyes (enough for 12 cupcakes)
Instructions
- Frost the Cupcakes: Using a knife or straight spatula, frost each cupcake evenly, covering all visible cupcake tops with a smooth layer of vanilla buttercream.
- Add the Eyes: Place the royal icing eyes onto the frosted cupcakes, spacing them appropriately to create the mummy’s eyes.
- Pipe the Mummy Wrappings: Fit a piping bag with a no. 44 basketweave decorating tip, fill it with vanilla buttercream, and pipe flat ribbons crisscrossing over the cupcake to simulate mummy wrappings. Continue layering the ribbons until the desired mummy look is achieved.
- Serve: Allow the frosting to set slightly before serving. Enjoy your spooky Halloween Mummy Cupcakes!
Notes
- You can use store-bought cupcakes and frosting to save time.
- If royal icing eyes are not available, use small candy eyes or create eyes with white and black icing.
- The no. 44 basketweave tip creates flat ribbons ideal for mummy wrappings; if you don’t have this tip, a small petal tip can be a good substitute.
- For extra effect, use black food coloring to outline eyes or add cracks on the mummy wrappings.
- Store cupcakes in an airtight container at room temperature for up to 2 days.
Nutrition
- Serving Size: 1 cupcake
- Calories: 250 kcal
- Sugar: 25 g
- Sodium: 150 mg
- Fat: 12 g
- Saturated Fat: 7 g
- Unsaturated Fat: 4 g
- Trans Fat: 0 g
- Carbohydrates: 33 g
- Fiber: 1 g
- Protein: 2 g
- Cholesterol: 40 mg
