

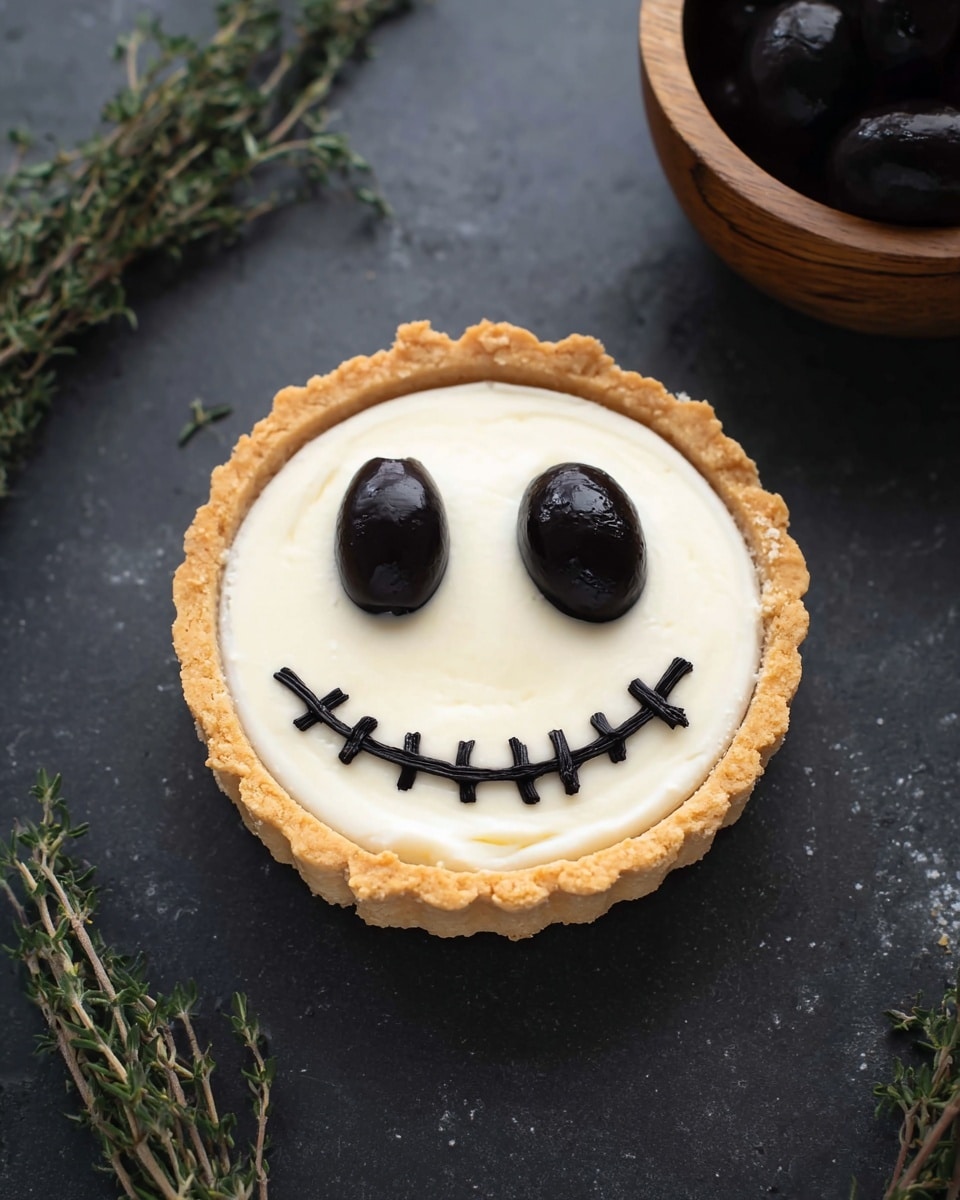
Halloween Jack Skellington Ricotta Olive Tarts Recipe
If you’re looking for a Halloween treat that’s both adorable and delicious, you absolutely have to try my Halloween Jack Skellington Ricotta Olive Tarts Recipe. These little tartlets capture that spooky vibe with Jack Skellington’s iconic face, all while delivering creamy ricotta, salty olives, and tangy sun-dried tomatoes in every bite. Trust me, they’re fan-freaking-tastic, and I can’t wait to show you how easy (and fun) they are to make!
Why This Recipe Works
- Perfectly Balanced Flavors: The creamy ricotta pairs beautifully with the briny olives and sun-dried tomatoes for a savory taste that’s just right for Halloween.
- Gluten-Free Friendly Crust: Using a combination of sweet rice, millet, and oat flours creates a tender crust that holds up well without gluten.
- Visual Delight: The Jack Skellington design is simple to create but makes these tarts stand out at any party or family gathering.
- User-Friendly Steps: You don’t need complicated kitchen skills or fancy tools—just basic ingredients and a little patience.

Ingredients & Why They Work
Before you start, let’s talk about the ingredients that make this Halloween Jack Skellington Ricotta Olive Tarts Recipe so special. Each component plays a role—from building a flaky, gluten-free crust to layering flavors in the filling. Here are the why’s behind the what’s.

- Sweet Rice Flour: Adds tenderness and a slightly sticky texture, which is important for holding a gluten-free crust together.
- Millet Flour: Brings a gentle nuttiness and helps the crust keep its structure without gluten.
- Gluten-Free Oat Flour: I love grinding whole oats myself for the freshest flavor and a bit more texture.
- Tapioca Flour (or Corn Starch): Introduces chewiness and crispness to balance the flours.
- Unsalted Butter: Cold and cubed, it’s the secret to a flaky, melt-in-your-mouth crust.
- Ice Water: Hydrates the dough gently, making it easier to work with without developing too much gluten.
- Black Olives: For the classic Jack face details and salty depth in the filling.
- Sun-Dried Tomatoes: Oil-packed ones pack intense flavor and a chewy texture contrast.
- Fresh Thyme: Adds a subtle herbaceous note that complements the ricotta beautifully.
- Parmesan Cheese: Brings savory umami and a hint of saltiness.
- Ricotta Cheese: Creates a luscious, creamy filling that’s rich but light.
- Greek Yogurt: Gives tang and helps keep the filling silky.
- Egg Whites: Help the filling set and stay firm when baked.
- Garlic: Minced fresh for that warm, savory kick without overpowering.
- Kosher Salt: Enhances all the flavors just right.
Tweak to Your Taste
The best part about this Halloween Jack Skellington Ricotta Olive Tarts Recipe is how flexible it is to your own flavor preferences. I often switch up the herbs and olives to match what I have on hand or to suit guest tastes, and you can too!
- Herb Swap: When fresh thyme isn’t available, I substitute with fresh rosemary or even a sprinkle of dried Italian seasoning—either works great.
- Cheese Variation: Try mixing in a bit of crumbled feta or goat cheese if you want a tangier, saltier twist on the ricotta filling.
- Olive Options: If black olives aren’t your thing, green olives stuffed with pimentos can add a fun color contrast and a slightly different flavor.
- Make It Vegan: Use a plant-based butter for the crust and swap ricotta for a tofu-based ricotta alternative with some nutritional yeast for cheesy flavor.
Step-by-Step: How I Make Halloween Jack Skellington Ricotta Olive Tarts Recipe
Step 1: Crafting the Gluten-Free Tart Crust
Start by whisking together all the dry flours—sweet rice, millet, oat, tapioca starch, and salt—in a large bowl. The secret here is cold butter—cut it into tablespoon-sized pieces and use your hands to work it into the flour mix until the chunks are pea-size. Don’t rush this step; those little bits are what make the crust flaky.
Next, slowly add ice water, a tablespoon at a time. I like to keep the dough cold and handle it quickly so it holds together but doesn’t get sticky. Once the dough clumps when pinched between your fingers, you’re good! Divide it into 6-8 portions, roll into discs, wrap tightly with plastic, and pop them in the fridge for at least 30 minutes.
Step 2: Rolling Out and Shaping the Tarts
Preheat your oven to 400ºF now so it’s ready. Each dough disc gets rolled between two sheets of parchment paper dusted with millet flour—this keeps the dough from sticking without adding too much extra flour. Roll each disc to about an inch wider than your mini tart pan.
To transfer, peel off one parchment side, flip the disc into the pan (parchment side up), then peel off the remaining paper and press the dough gently into place with your fingers. If your tart pan shelves only 4 tarts like mine, take your time and bake in batches. This part feels fiddly at first, but patience makes perfect!
Step 3: Prepping the Filling and Faces
While the crusts get their first bake, it’s time to slice and dice those black olives. Thinly slice 6 olives lengthwise to make the iconic Jack Skellington mouth. I use a very sharp paring knife and work slowly to get paper-thin strips—that’s key to the recognizable grin.
Cut 12-14 small olive ovals for the nose, then go ahead and chop about 3-4 tablespoons of olives to mix into each tart base. Top with a few strips of julienned sun-dried tomatoes and sprinkle fresh thyme and parmesan over each one before giving them a 12-minute bake to lightly cook the crust and warm the flavors.
Step 4: Mixing and Adding the Ricotta Filling
While the crust bakes, whisk together ricotta cheese, Greek yogurt, egg whites, minced garlic, and salt. This mixture will create the lovely creamy filling that sets firm but stays delicate.
Once your crusts are out of the oven, carefully fill each tart shell right up to the top with the ricotta mixture. Now the fun part—place two whole olives as eyes, arrange two olive ovals for the nose, and gently place the thin olive slices in a criss-cross pattern for the mouth. I find using chopsticks here makes it easier to position the tiny olive bits without messing up the filling.
Step 5: The Final Bake and Serving
Bake the tarts at 400ºF for 20-25 minutes until the ricotta is set. Smaller tart pans might take less time, so start checking after 15 minutes to avoid overbaking. When they come out, the crust is golden and the filling is firm yet creamy—perfect for serving warm.
Pro Tips for Making Halloween Jack Skellington Ricotta Olive Tarts Recipe
- Keep Ingredients Cold: For the flakiest crust, keep your butter and water ice cold and limit handling the dough to prevent warming.
- Use Parchment Paper: Rolling dough between parchment helps avoid adding too much extra flour, which can dry out the crust.
- Sharp Knives for Olive Details: Thin, clean cuts are essential for that spooky Jack Skellington mouth—don’t rush this step.
- Watch the Bake Time: Overbaking can dry out the filling, so keep an eye starting at 15 minutes during the second bake.
How to Serve Halloween Jack Skellington Ricotta Olive Tarts Recipe
Garnishes
I love adding a fresh thyme sprig on each tart right before serving—it adds a pop of green and a boost of aroma that surprises people. Sometimes, a light drizzle of good-quality olive oil adds a silky finish that takes these from tasty to next-level.
Side Dishes
Since these tarts are rich and savory, I usually pair them with a crisp green salad with a tangy vinaigrette or a roasted butternut squash soup for a cozy fall combo. They’re also wonderful alongside spiced apple cider or a pumpkin ale to keep the Halloween vibes flowing.
Creative Ways to Present
If I’m serving these at a party, I place them on a dark slate platter with some mini pumpkins and faux cobwebs around the edges for Halloween flair. Using mini tart pans means each one is perfectly bite-sized—people always comment on how fun it is to eat these little spooky faces!
Make Ahead and Storage
Storing Leftovers
I store any leftover tarts in an airtight container in the fridge. They keep well for about 2-3 days. When you’re ready to enjoy again, just reheat briefly and they taste almost as fresh as the first time.
Freezing
Freezing works well too! I like to freeze the baked tarts individually on a baking sheet, then transfer to a ziplock bag so I can pull out just what I need. When defrosted and reheated, they maintain their texture nicely.
Reheating
To reheat, pop the tarts back in a 400°F oven for about 7 minutes. This warms them evenly and crisps up the crust, bringing back that just-baked magic.
FAQs
-
Can I make these tarts ahead of time for a party?
Absolutely! You can prepare both the crust and filling in advance. Keep the dough refrigerated until you’re ready to roll and bake, and mix the filling just before assembling. Fully baked tarts can be refrigerated and reheated shortly before serving to maintain freshness.
-
What if I don’t have gluten-free flours on hand?
You can substitute with all-purpose flour if gluten isn’t an issue, but I recommend reducing water slightly as wheat flour behaves differently. The crust might be less crumbly but will still be tasty.
-
How do I slice olives so thinly for the mouth?
Use a sharp paring knife and slice slowly with steady pressure. Cutting lengthwise on the olive’s side helps get those narrow strips. If you want extra help, chill the olives first so they’re firmer and easier to slice thinly.
-
Can I make this recipe dairy-free?
Yes! Try using plant-based cream cheese or ricotta alternatives, vegan butter for the crust, and coconut or almond yogurt in place of Greek yogurt. Adjust seasoning to taste and keep an eye on baking times since textures may differ.
Final Thoughts
This Halloween Jack Skellington Ricotta Olive Tarts Recipe has become one of my go-to festive savory treats because it’s just so fun to make and share. I love watching my family’s faces light up when they spot Jack’s mischievous grin on their plates! If you’re looking for a recipe to impress your friends and bring playful elegance to your Halloween spread, grab your rolling pin and give this one a try—you’ll thank me later.
Print
Halloween Jack Skellington Ricotta Olive Tarts Recipe
- Prep Time: 45 minutes
- Cook Time: 37 minutes
- Total Time: 1 hour 22 minutes
- Yield: 8 tarts
- Category: Appetizer
- Method: Baking
- Cuisine: American
- Diet: Gluten Free
Description
These Halloween Jack Skellington Ricotta Olive Tarts are a festive and delicious gluten-free treat perfect for Halloween parties. Featuring a crisp gluten-free tart crust filled with creamy ricotta and Greek yogurt, black olives, sun-dried tomatoes, and fresh thyme, they combine spooky aesthetics with savory flavors.
Ingredients
Gluten-Free Tart Crust
- ½ cup sweet rice flour
- ¼ cup millet flour
- ⅓ cup gluten-free oat flour
- 3 tablespoons tapioca flour
- ¼ teaspoon kosher salt
- 8 tablespoons cold unsalted butter, cut into tablespoon-sized pieces
- 7 tablespoons ice water
Filling
- 1 can black olives
- 4 tablespoons julienned sun-dried tomatoes packed in oil
- 3 teaspoons fresh thyme leaves
- 3 tablespoons freshly grated parmesan cheese
- 1½ cups ricotta cheese
- 6 tablespoons Greek yogurt
- 3 egg whites
- 3 cloves garlic, minced
- ½ teaspoon kosher salt
Instructions
- Prepare the crust: Whisk together the sweet rice flour, millet flour, oat flour, tapioca starch, and salt in a large bowl. Add the cold butter pieces and mix with your hands, breaking up the butter until the largest pieces are about the size of a pea. Gradually add ice water a tablespoon at a time, mixing continuously until the dough holds together when pinched.
- Chill the dough: Divide the dough into 6-8 pieces depending on tart size. Roll each into a ball and flatten into a disc. Wrap in plastic and refrigerate for 30 minutes.
- Preheat oven and roll dough: Preheat the oven to 400ºF. Roll out each dough disc between sheets of parchment or wax paper dusted with millet flour until about 1 inch larger than the tart pan diameter. Transfer the dough to tart pans, peel off parchment, and press into place. Work in batches if needed.
- Prepare filling toppings: Thinly slice 6 black olives lengthwise into paper-thin strips for the mouth. Cut 12-14 oval slices for the nose and set aside. Chop 3-4 tablespoons of olives for the initial topping.
- Assemble initial tart layer: Divide the chopped olives among each tart, then add 3-5 strips of julienned sun-dried tomatoes per tart. Sprinkle about ¼ teaspoon fresh thyme leaves and evenly distribute parmesan cheese. Bake for 12 minutes until crust is lightly cooked.
- Mix ricotta filling: Meanwhile, whisk together ricotta, Greek yogurt, egg whites, minced garlic, and salt until smooth.
- Fill tarts and decorate: Remove tarts from oven and fill each tart shell to the top with the ricotta mixture. Arrange two whole black olives for eyes, two small olive ovals for the nose, and delicately create a criss-cross mouth with the thin olive strips using chopsticks or tweezers for precision.
- Bake filled tarts: Bake for 25 minutes or until the ricotta filling is set. Start checking doneness around 15 minutes depending on tart size. Serve warm.
- Reheat instructions: To reheat, bake tarts at 400ºF for 7 minutes until warmed through.
Notes
- Use gluten-free oat flour made by grinding whole oats for best texture.
- Control the water quantity to ensure dough is just holding together, avoid over-wetting.
- Thinly slicing olives for the mouth creates a striking Jack Skellington smile.
- Use chopsticks or tweezers to carefully place olive decorations for precision.
- Mini tart pans around 3-4 inches work best for this recipe.
- Sun-dried tomatoes packed in oil add sweetness and color contrast.
- Ricotta filling can be mixed up to a day ahead and refrigerated.
- Check doneness carefully to avoid overbaking the delicate filling.
Nutrition
- Serving Size: 1 tart
- Calories: 210 kcal
- Sugar: 2 g
- Sodium: 280 mg
- Fat: 14 g
- Saturated Fat: 7 g
- Unsaturated Fat: 5 g
- Trans Fat: 0 g
- Carbohydrates: 15 g
- Fiber: 2 g
- Protein: 7 g
- Cholesterol: 45 mg


