
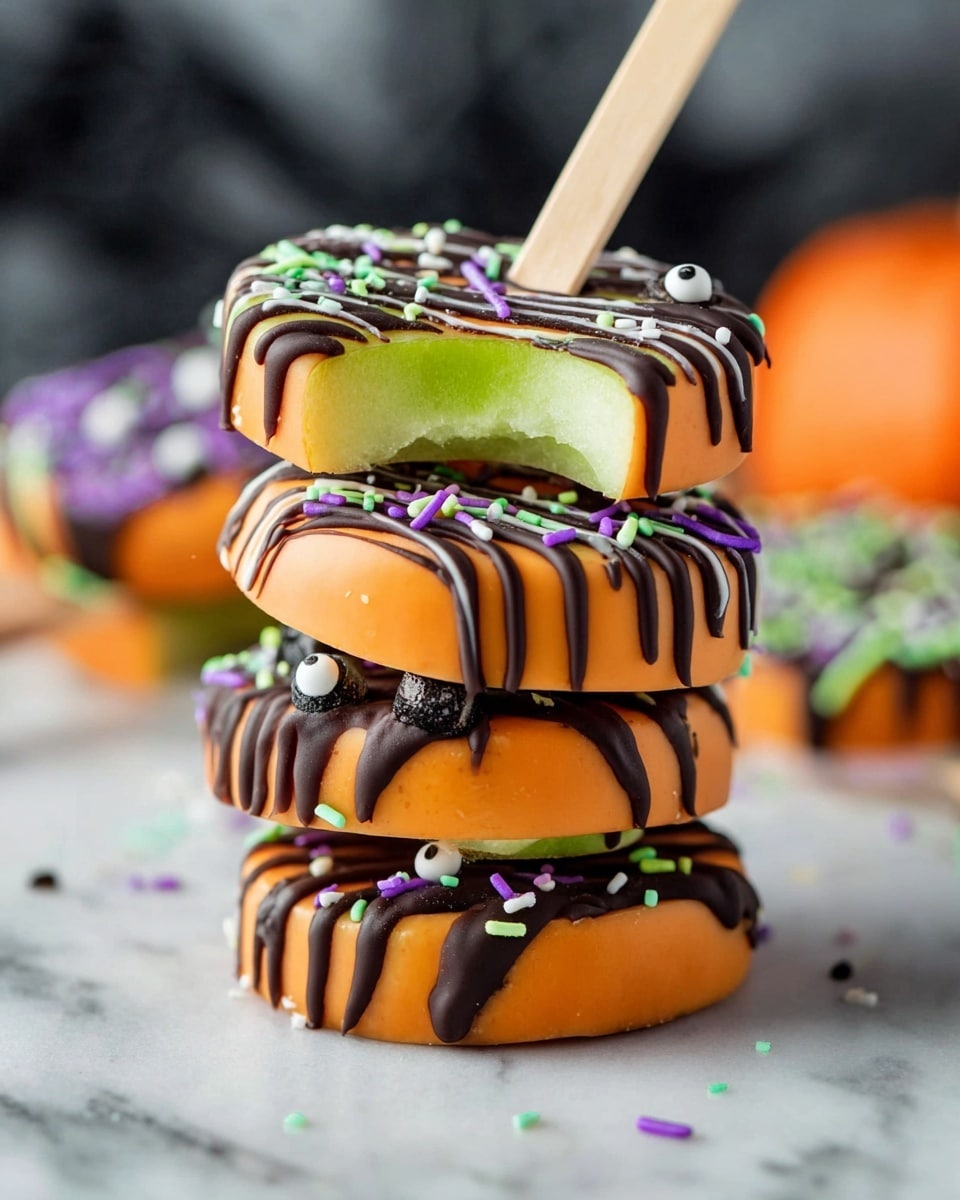
Halloween Chocolate Covered Apple Pops Recipe
If you’re looking for a fun, festive treat that’s perfect for Halloween parties, trick-or-treat handouts, or just a cozy night in, you’ve gotta try this Halloween Chocolate Covered Apple Pops Recipe. It’s a playful spin on classic caramel apples, but way easier and super customizable. Plus, those pops look so adorable staring back at you from the platter that you’ll want to make a double batch – trust me, I do every year!
Why This Recipe Works
- Simple and Quick: No candy thermometer or long cooking times—just melt, dip, and decorate.
- Perfect Balance: The tart Granny Smith apples pair beautifully with rich dark cocoa and bright orange chocolate.
- Super Customizable: You can switch up sprinkles and drizzle colors to match any spooky theme or your mood.
- Kid-Friendly Fun: Easy enough for little hands to help out, making it a perfect Halloween activity.

Ingredients & Why They Work
Every ingredient in the Halloween Chocolate Covered Apple Pops Recipe plays a big role, from the crisp apple slices that give the perfect bite to the melting wafers that make dipping a breeze. Here’s why I love each one and what to look for when shopping.

- Granny Smith Apples: Their tartness cuts through the sweetness and holds up well after dipping—plus they stay crisp longer than other apples.
- Dark Cocoa Melting Wafers: Use melting wafers instead of regular chocolate for a smoother dip that sets nicely without being messy.
- Orange Melting Wafers: These bring the festive pop of color and complement the chocolate flavor with just a hint of fruity sweetness.
- Halloween Sprinkles: You can find tons of themed sprinkles at the store—think bats, pumpkins, ghosts—that make each pop unique and festive.
Tweak to Your Taste
I love making this recipe my own by swapping out sprinkles or adding little extras. Don’t be afraid to get creative—you’ll enjoy seeing what you can come up with!
- Variation: I once used mini marshmallows and crushed pretzels on top for a sweet-salty combo that knocked everyone’s socks off.
- Dietary: Use vegan or dairy-free melting wafers to keep it allergy-friendly without losing any of the fun.
- Seasonal: Swap orange wafers for white chocolate during other holidays and switch sprinkles for mini candy canes or hearts.
Step-by-Step: How I Make Halloween Chocolate Covered Apple Pops Recipe
Step 1: Slice Your Apples Just Right
Start by slicing your Granny Smith apples into about ½ inch thick slices. I always avoid the core to give each pop a crisp, juicy bite without any tough parts messing up the texture. One trick I learned is to slice uniformly—that way, the popsicle sticks slide right through without the apple slices wobbling or breaking apart.
Step 2: Prep Your Melting Wafers
Pop your dark cocoa and orange melting wafers into two separate microwave-safe bowls. Start with 2 minutes on medium heat, then stir well. Keep melting in 30-second increments until your chocolate is smooth and completely melted. Stirring often is the secret to avoid burning and keep that silky texture. If the chocolate feels too thick, a tablespoon of Crisco stirred in will loosen it up beautifully.
Step 3: Stick ‘Em and Dip ‘Em
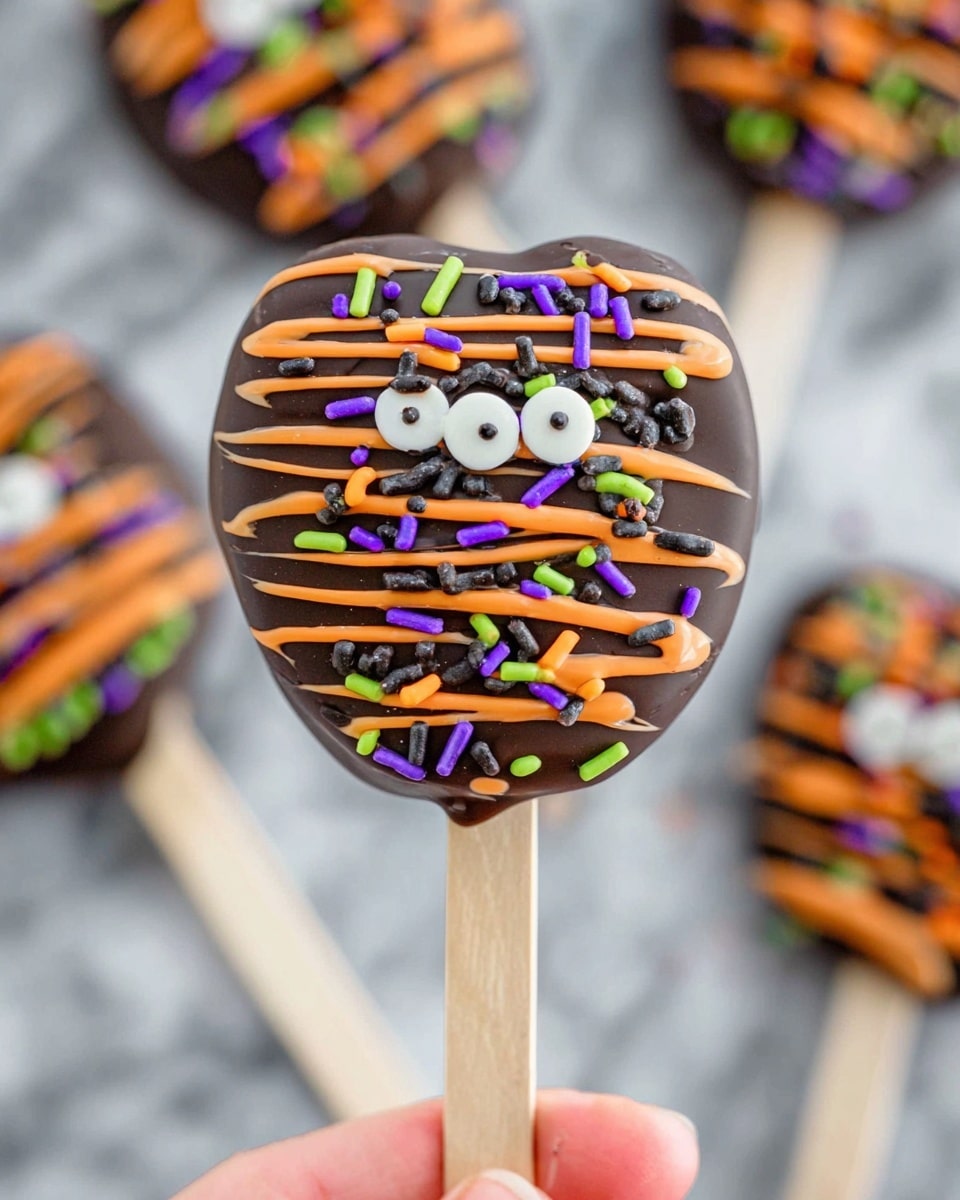
Carefully push a popsicle stick through the center of each apple slice. If the stick doesn’t go in easily, don’t force it; sometimes a dab of melted chocolate on one side will act like glue to hold the stick in place while setting. When your sticks are secure, dip each side of the apple pop into the dark cocoa chocolate, letting any excess drip off. Then grab a spoon to drizzle the orange chocolate artistically over the top.
Step 4: Sprinkle and Set
Quickly top your dipped apple pops with your favorite Halloween sprinkles before the chocolate sets—this adds texture and colors that bring these treats to life. Place the pops on parchment paper or a wire rack and let them set for about 15 minutes at room temperature before enjoying.
Step 5: Repeat with a Twist
Once half of your apples are coated with dark cocoa and orange drizzle, reverse the colors on the others—dip the remaining pops in the orange chocolate and drizzle with cocoa. This switch-up not only looks cool but also keeps the flavor profile exciting for guests.
Pro Tips for Making Halloween Chocolate Covered Apple Pops Recipe
- Keep Your Apple Slices Dry: If your apple surfaces are wet, the chocolate won’t stick well—pat them dry with a paper towel before dipping.
- Use Lemon Juice to Prevent Browning: Brush the apple slices with a little lemon or lime juice right after slicing to keep them looking fresh and bright during prep time.
- Work Quickly with Sprinkles: Chocolate sets fast, so have your sprinkles ready and sprinkle immediately after dipping to avoid any ruined pops.
- Stick Safety First: Avoid slicing apples too thin or pushing sticks through the core—this keeps the pops sturdy and easy to handle, especially for kids.
How to Serve Halloween Chocolate Covered Apple Pops Recipe
Garnishes
I usually stick with festive Halloween sprinkles because they’re simple and pack a ton of visual punch—the tiny bats, witches, and pumpkins bring serious holiday vibes. Sometimes, I’ll toss on crushed nuts or mini chocolate chips for texture variation, but honestly, those classic sprinkles steal the show every time.
Side Dishes
These apple pops pair perfectly with something salty like popcorn or roasted pumpkin seeds. I also like serving them alongside a warm cup of spiced apple cider or hot chocolate to cozy up the dessert experience on chilly October nights.
Creative Ways to Present
A little presentation goes a long way! For a party, I arrange the pops upright in a decorated foam block inside a festive bowl or bucket covered with orange tissue paper. If you want to get really crafty, try adding edible “webs” with melted white chocolate drizzled on top or transform your apple slices into mini “monsters” with candy eyes stuck onto the chocolate before it sets.
Make Ahead and Storage
Storing Leftovers
If you’ve got leftovers (they rarely last long in my house!), pop them in an airtight container and refrigerate. They’re best enjoyed within one day since apples can start browning and the chocolate can soften. For best taste and texture, bring them back to room temperature before serving.
Freezing
Freezing these pops isn’t my first choice because the apples tend to get mushy when thawed. But if you must, wrap each pop tightly in plastic and store in a freezer-safe container for up to a month. Thaw in the fridge and eat quickly to avoid soggy textures.
Reheating
Since these are fresh apples covered in chocolate, reheating isn’t really needed or recommended. If you want the chocolate softer, you can lightly warm them at room temperature or for just a few seconds in the microwave—but be careful not to melt the chocolate too much or make the apples warm and mushy.
FAQs
-
Can I use other types of apples for this recipe?
Absolutely! While Granny Smith apples are perfect because of their tartness and firmness, you can use Fuji, Honeycrisp, or Gala apples if you prefer a sweeter or softer bite. Just remember that softer apples might not hold up as well when dipped and served on sticks.
-
What if I don’t have melting wafers? Can I use regular chocolate?
You can use regular chocolate, but melting wafers are designed to melt evenly and set quickly without tempering. If you use regular chocolate, melt it gently and stir frequently to avoid burning or clumping, and expect it to take a bit longer to set.
-
How do I prevent the apple slices from browning?
Brush the cut surfaces of the apple slices with lemon or lime juice right after slicing—they’re a natural antioxidant that slows browning. Doing this keeps your apple pops looking fresh and appetizing while you dip and decorate.
-
Can kids help with this recipe?
Definitely! Kids can have a blast dipping apples and decorating with sprinkles. Just handle the melting and dipping parts carefully yourself to keep things safe. It’s a great hands-on activity for getting everyone into the Halloween spirit.
Final Thoughts
This Halloween Chocolate Covered Apple Pops Recipe is one of my favorite seasonal treats because it’s easy, festive, and downright fun to make with friends or family. The balance of tart apple and rich chocolate with festive sprinkles makes every bite a little celebration. Give it a try—I promise you’ll be hooked, just like me. And hey, don’t be shy about putting your own twist on it; after all, that’s part of the fun!
Print
Halloween Chocolate Covered Apple Pops Recipe
- Prep Time: 20 minutes
- Cook Time: 0 minutes
- Total Time: 35 minutes
- Yield: 20 pops
- Category: Dessert
- Method: No-Cook
- Cuisine: American
- Diet: Vegetarian
Description
These Halloween Chocolate Covered Apple Pops are a fun and festive treat perfect for any spooky celebration. Crisp granny smith apple slices are dipped in rich dark cocoa and vibrant orange melting wafers, drizzled with contrasting chocolate, and topped with colorful Halloween sprinkles. Easy to prepare and visually delightful, these pops make a perfect snack or party dessert for kids and adults alike.
Ingredients
Apples
- 5 medium/small granny smith apples
Chocolate Coating
- 12 ounces dark cocoa melting wafers
- 12 ounces orange melting wafers
Decoration
- Halloween sprinkles
Extras (optional for tips)
- 1 tablespoon Crisco (to thin chocolate if needed)
- Lemon or lime juice (to prevent apple browning)
- Popsicle sticks
Instructions
- Prepare the Apples: Cut each granny smith apple into 4 slices, avoiding the core. Aim for slices slightly less than 1/2 inch thick for stability. Carefully insert a popsicle stick into the center of each apple slice to create the apple pops.
- Melt the Chocolate: In two separate microwave-safe bowls, melt the dark cocoa wafers and the orange wafers. Heat each bowl for 2 minutes initially, then continue melting in 30 second increments, stirring after each, until fully smooth and melted.
- Coat Apple Pops with Dark Chocolate: Dip each side of an apple pop into the melted dark cocoa chocolate. Use a spoon to drizzle some of the orange melted chocolate decoratively over the dark coating.
- Add Sprinkles and Set: Sprinkle Halloween-themed sprinkles onto the coated apple pops. Place each pop on parchment paper or a wire rack to set.
- Repeat for Half the Pops: Repeat the coating and decorating process described above for 10 of the apple pops.
- Coat Remaining Pops with Orange Chocolate: Dip the remaining 10 apple pops into the melted orange chocolate. Drizzle the dark cocoa chocolate on top and finish with Halloween sprinkles.
- Final Setting: Place all apple pops back on parchment or wire rack to allow chocolate to set completely before serving.
Notes
- Store apple pops in the fridge and consume within 1 day for optimal freshness.
- Have all ingredients, toppings, and tools ready before slicing apples to prevent browning.
- Brush apple slices with lemon or lime juice to keep them from browning if not dipping immediately.
- Avoid using the core and cut apples slightly less than 1/2 inch thick for popsicle stick stability.
- If inserting sticks is difficult, secure sticks with a dab of melted chocolate and let set before dipping.
- Dry apple slices with a paper towel if too wet, ensuring chocolate adheres well.
- To thin thick chocolate, stir in 1 tablespoon of Crisco.
- Get creative with decorations such as mini chocolate chips, M&Ms, crushed Oreos, chopped nuts, mini marshmallows, shredded coconut, or themed designs.
- Consider making apple spider snacks with melted white chocolate webs or other spooky designs for Halloween fun.
Nutrition
- Serving Size: 1 pop
- Calories: 150 kcal
- Sugar: 18 g
- Sodium: 5 mg
- Fat: 7 g
- Saturated Fat: 3.5 g
- Unsaturated Fat: 3 g
- Trans Fat: 0 g
- Carbohydrates: 22 g
- Fiber: 2 g
- Protein: 0.5 g
- Cholesterol: 0 mg


