

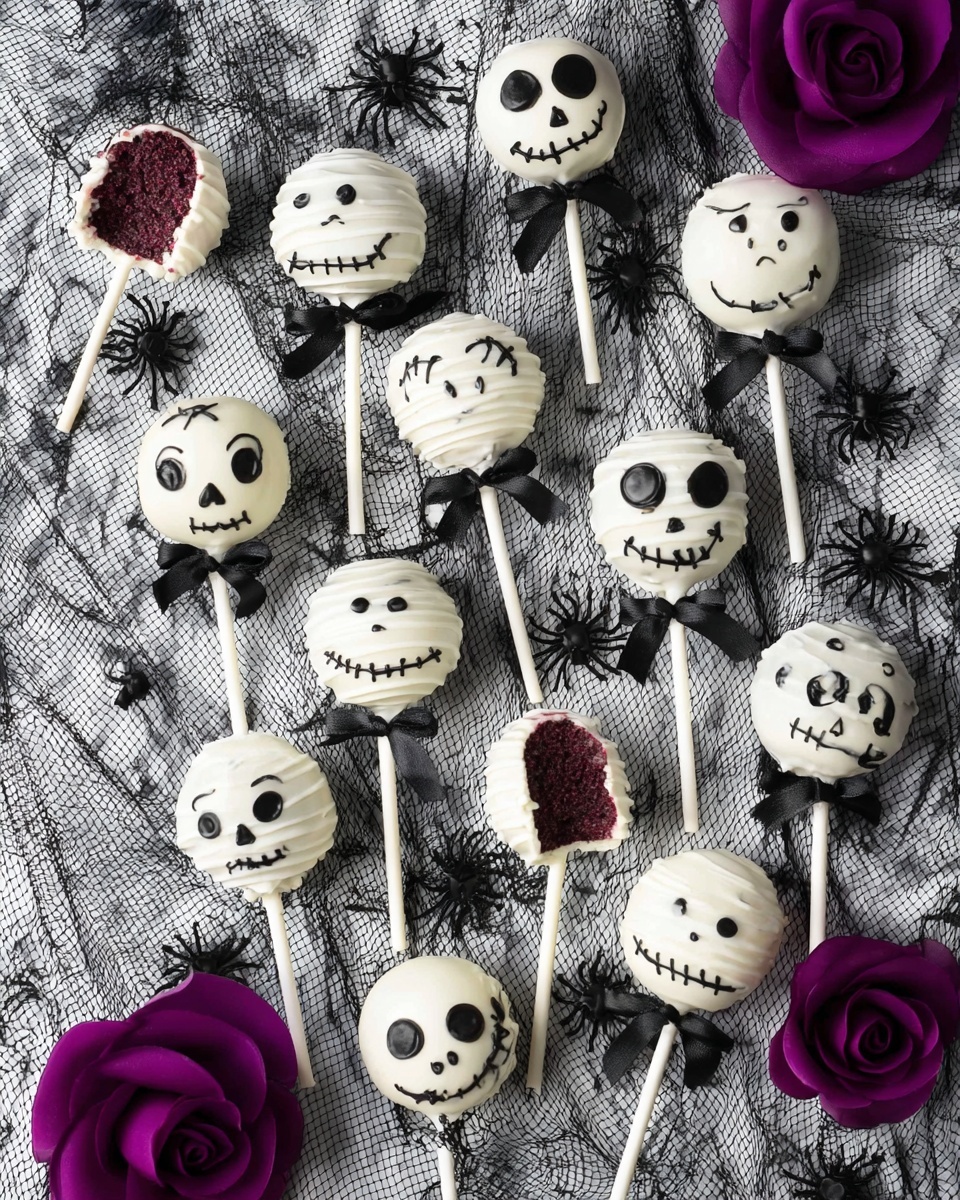
Halloween Cake Pops Recipe
If you’re looking to wow your guests this Halloween with something utterly adorable and totally delicious, let me introduce you to my Halloween Cake Pops Recipe. These bite-sized spooky treats are surprisingly simple to make but deliver a big festive punch—perfect for parties, classroom treats, or just a cozy night in crafting in the kitchen. Trust me, once you try this recipe, you’ll be hooked! Ready to get your hands a little messy and have some fun? Let’s dive in.
Why This Recipe Works
- Perfect Balance of Moistness: The red velvet cake base mixed with cream cheese frosting keeps the pops tender but firm enough to stand up to dipping.
- Easy Decorating Steps: The candy melts and simple piping techniques make impressive spooky designs approachable for everyone.
- Customizable & Fun: From ghosts to mummies to Jack Skellington faces, this recipe lets you get creative with your Halloween vibe.
- Kid-Friendly & Party-Ready: They’re individually portioned and perfect for sharing, making them a crowd-pleaser that’s easy to serve.

Ingredients & Why They Work
These ingredients come together with a few simple tricks to transform a classic boxed cake mix into irresistible Halloween cake pops. I always recommend using quality cream cheese frosting and candy melts for the best flavor and ease of decorating.

- Red Velvet Cake Mix: The base flavor that’s already festive and adds that gorgeous red color without extra effort.
- Eggs, Oil, and Water: Essential for moist cake – don’t substitute oil for butter here as the texture might change.
- Cream Cheese Frosting: Adds tanginess and moisture to help bind the cake crumbs into perfect pop shapes.
- White Chocolate Candy Melting Wafers: Great for coating and decorating, they melt smoothly and harden with a nice shine.
- Black Gel Food Color: Easy vibrant color that doesn’t thin the melted candy – ideal for spooky details.
- Vegetable Shortening: Keeps your candy melts fluid and glossy without seizing up.
- Candy Eyeballs: The cutest and creepiest finishing touch, making your pops come alive.
- Black/White Ribbon and Cake Pop Sticks: For neat presentation and easy handling—don’t skip these!
Tweak to Your Taste
I like to mix things up depending on the party vibe or who I’m making these for. This Halloween Cake Pops Recipe is perfect to customize; feel free to experiment with flavors or decorations to suit your style—you’ll enjoy putting your own spin on it!
- Variation: I once swapped out the red velvet cake mix for chocolate, which gave a richer, deeper flavor—delicious but a little less vibrant on the inside.
- Dietary Friendly: For gluten-free options, some cake mixes work well, just ensure they’re dense enough to hold shape when mixed with frosting.
- Seasonal changes: Try adding a hint of pumpkin spice to the cake batter for an autumn twist. It’s subtle but festive!
Step-by-Step: How I Make Halloween Cake Pops Recipe
Step 1: Bake the Perfect Base Cake
Start by preheating your oven to 350°F. Mix the red velvet cake mix with eggs, oil, and water as per the instructions, then pour into a greased 9×13-inch pan. Bake for 25-30 minutes, until a toothpick inserted in the center comes out clean. Let it cool completely—you don’t want any warmth messing with the frosting stage!
Step 2: Crumble and Combine with Frosting
Once cooled, crumble the cake into tiny pieces using a food processor or by hand. Mix in cream cheese frosting until you get a dough-like consistency that holds together well when squeezed. If it’s too dry, add a tiny bit more frosting but be careful not to overdo it—the balls should hold shape but not be sticky.
Step 3: Shape Your Spooky Cake Pops
Roll the crumb mixture into 2-inch balls for most pops. For the ghosts, shape the balls slightly longer and fan out one end like a little floating sheet. This is the fun part where the magic happens, so take your time and enjoy the creative process!
Step 4: Dip Sticks and Insert Into Cake Balls
Melt about 15 white candy wafers and dip the end of each cake pop stick about an inch into the melted candy. Insert it gently into each cake ball about two-thirds of the way in. This “glue” helps secure the stick. Pop them in the refrigerator for 15 minutes to firm up—this step helps prevent lots of wobbly drama later!
Step 5: Coat in Candy Melts
In a narrow cup, melt half the remaining candy wafers with half the shortening until smooth. Dip each pop straight down—don’t swirl or spin it to avoid sticks popping out. Gently tap off excess and place in your holder (I swear by my trusty cake pop stand, but beans or foam work too). Let them sit for 15 minutes until set.
Step 6: Decorate Your Creepy Cute Characters
Warm the leftover candy coating and put it in a piping bag with a small tip. Create mummy wraps by piping horizontal lines back and forth on the pops, then stick candy eyeballs to the icing dots before it dries. Use black candy melts mixed with black gel color to draw Jack Skellington’s face or ghost eyes and mouths. For an elegant finishing touch, tie little ribbon bows on a few pops—it gives them a festive flair!
Pro Tips for Making Halloween Cake Pops Recipe
- Chill Between Steps: Cooling after inserting sticks and after dipping the coating keeps everything sturdy and neat.
- Use Narrow Containers: Dipping in a smaller opening cup means less candy melt needed and more control.
- Don’t Overmix Frosting: Add just enough to hold cake crumbs; too much makes the balls mushy.
- Handle with Care: When dipping, avoid twisting sticks—it loosens them and causes breakage.
How to Serve Halloween Cake Pops Recipe
Garnishes
I adore using candy eyeballs for an instant creepy effect—they’re fun to get kids involved in decorating, too! Plus, black gel food coloring adds stunning contrast for spider webs, mummy wraps, and spooky faces. Sometimes I sprinkle a little edible glitter or subtle orange and black sprinkles for that extra Halloween sparkle.
Side Dishes
These cake pops shine on their own but pairing them with classic Halloween punch, caramel apple slices, or even mini pumpkin muffins creates a festive spread that’s both charming and delicious.
Creative Ways to Present
I like to arrange mine in a decorative pumpkin bucket or nestle them into a spooky-themed foam block wrapped with black tissue paper. Adding themed ribbons tied around sticks or placing them in a skeleton hand vase made for a memorable Halloween party centerpiece last year!
Make Ahead and Storage
Storing Leftovers
After your masterpiece is complete, store the cake pops in an airtight container at room temperature for up to 3-4 days—this keeps them moist and perfect for snacking. If you refrigerate, they’ll last closer to a week but may lose a touch of softness.
Freezing
I’ve had great luck freezing cake pops in layers separated by wax paper inside a sturdy container. Thaw them in the fridge overnight before serving. Frozen and thawed cake pops keep their shape and flavor amazingly well—helpful if you want to prep way ahead!
Reheating
There’s no need to reheat these sweet treats since they’re best enjoyed cold or at room temperature. If you want the coating shiny again, a few seconds with a warm hair dryer on low can revive the gloss without melting the cake inside.
FAQs
-
Can I use homemade cake instead of cake mix for this Halloween Cake Pops Recipe?
Absolutely! Homemade cake works beautifully as long as it’s fully cooled. Keep in mind, consistency is key—your cake should be moist but sturdy enough to crumble and hold shape when mixed with frosting. If it’s too wet, add a bit more frosting or a touch of graham cracker crumbs to firm up the mixture.
-
What’s the best way to avoid cracking candy coating on cake pops?
One trick I’ve learned is to make sure your cake pops are chilled well before dipping, and don’t dip in candy that’s overheated or too thick. Thin out your candy melts with a little vegetable shortening for a smooth, flexible coating that’s less prone to cracking.
-
How do I make the mummy wraps and other decorations look neat?
Using a small piping tip helps you control the icing flow, so you can create thin, precise lines. Pipe slowly and steady. Also, working in small batches and warming your candy melts frequently ensures the coating stays fluid and your designs set nicely.
-
Can I prepare Halloween Cake Pops Recipe a day ahead?
Yes! You can bake and assemble the cake balls one day, then dip and decorate the next. Just keep the cake balls refrigerated overnight in an airtight container. Cake pops actually taste even better once the flavors meld, so this works great for party prep.
Final Thoughts
There’s something incredibly satisfying about handing out these adorable little spooky bites made from scratch (well, boxed cake mix counts, right?). This Halloween Cake Pops Recipe is a fantastic way to bring a smile to both kids and adults—the perfect mix of sweet, fun, and seasonal flair. I hope you give these a try this year and enjoy every gooey, chocolatey, festive bite as much as I do. Happy baking and even happier haunting!
Print
Halloween Cake Pops Recipe
- Prep Time: 50 minutes
- Cook Time: 30 minutes
- Total Time: 1 hour 20 minutes
- Yield: 14 servings
- Category: Dessert
- Method: Baking
- Cuisine: American
- Diet: Vegetarian
Description
Delightfully spooky Halloween Cake Pops featuring red velvet cake, cream cheese frosting, and white chocolate coating, decorated as ghosts, mummies, and Jack Skellington, perfect for festive celebrations.
Ingredients
Cake
- 1 box Red Velvet Cake Mix
- 3 large eggs
- ½ cup oil
- 1¼ cup water
Assembly
- 5 tbsp cream cheese frosting
- cake pop sticks
Coating & Decoration
- 20 oz white chocolate candy melting wafers
- 1½ tbsp black gel food color
- ⅓ cup vegetable shortening
- candy eyeballs for decorating
- 50 inch black/white ribbon for decorating
Instructions
- Preheat and bake cake: Preheat oven to 350°F. In a large mixing bowl, beat the cake mix, eggs, oil, and water at medium speed for two minutes. Pour into a greased 9×13 baking dish and bake for 30 minutes until a toothpick comes out clean. Cool in the dish for 10 minutes, then transfer to a cooling rack to cool completely.
- Prepare cake crumbs: Break cooled cake into pieces and pulse in a food processor until fine crumbs form. Transfer crumbs to a large bowl and mix with cream cheese frosting until well combined.
- Shape cake pops: Roll the mixture into 2-inch balls with your hands. For ghost shapes, shape 4 balls into slightly elongated cylinders with one end fanned out.
- Attach sticks: Melt about 15 white candy wafers. Dip one end of each cake pop stick into the melted candy about 1 inch deep. Insert sticks 2/3 into each shaped cake ball while coating is wet. Wipe excess candy off and refrigerate pops for 15 minutes to set.
- Prepare coating: In a narrow jar or cup, combine half the melting wafers with half the shortening. Melt in microwave stirring every 30 seconds until smooth and dip-friendly.
- Dip cake pops: Dip each cake pop into the coating once; avoid twisting to prevent stick loosening. Allow excess coating to drip off by holding still and tapping the stick. Place dipped cake pops upright in a stand or foam holder and let set for 15 minutes.
- Decorate mummies: Warm remaining coating and add more shortening if needed. Transfer to a piping bag with a #3 tip. Pipe straight lines back and forth on four round cake pops to create mummy bandages. Add dots of icing as adhesive and place candy eyeballs. Let set in holder.
- Decorate Jack Skellington: Melt remaining wafers and shortening, mix in black gel food color thoroughly. Use piping bag or dispensing bottle to pipe Jack Skellington’s face on remaining round cake pops. Tie 10-inch ribbons as bows around sticks and place in holder.
- Decorate ghosts: Use black icing to dot eyes for candy eyeballs and pipe a large round mouth. Attach eyeballs on the dots and allow to dry in cake pop holder.
- Display: Arrange decorated cake pops on a stand or preferred holder for a festive Halloween party display.
Notes
- Store cake pops in an airtight container at room temperature for 3-4 days or refrigerate for 5-7 days to keep fresh.
- Freeze cake pops in a freezer-safe container with layers separated by wax paper; freeze up to 6-8 weeks.
- Use a narrow container for melting coating to achieve easier dipping without excessive leftover coating.
- When dipping, avoid twisting the cake pop to keep the stick firmly attached.
- Use additional shortening to adjust coating consistency if it becomes too thick during decorating.
- Refrigerate sticks inserted into cake pops before dipping to help them set firmly.
Nutrition
- Serving Size: 1 cake pop
- Calories: 220 kcal
- Sugar: 18 g
- Sodium: 150 mg
- Fat: 12 g
- Saturated Fat: 7 g
- Unsaturated Fat: 4 g
- Trans Fat: 0 g
- Carbohydrates: 26 g
- Fiber: 1 g
- Protein: 2 g
- Cholesterol: 35 mg

