

Grinch Oreo Balls with Red Velvet Oreos Recipe
If you’re on the hunt for a festive, fun, and downright adorable holiday treat, you’re going to flip for my Grinch Oreo Balls with Red Velvet Oreos Recipe. Honestly, these little bites are as delightful to make as they are to eat. Imagine the perfect mashup of tangy cream cheese, sweet red velvet Oreos, and that pop of green candy magic that totally channels the Grinch vibe. Trust me, these will be the star of your Christmas party or cozy night in – and I’m excited to walk you through exactly how to nail them!
Why This Recipe Works
- Perfect Texture Combo: The creamy cheese and crunchy Oreo crumbs melt into soft, truffle-worthy balls.
- Festive Flavor Twist: Using Red Velvet Oreos adds a subtle cocoa flavor that pairs beautifully with the green candy melts for a Grinchy look.
- Simple & Quick Prep: Just a few ingredients and easy steps make this an approachable holiday treat for any skill level.
- Visual Wow Factor: The bright green coating with a cute red heart sprinkle makes these irresistibly fun and giftable.

Ingredients & Why They Work
When you combine bold red velvet Oreos with smooth cream cheese and vibrant green candy melts, magic happens. Each ingredient plays a crucial role in both flavor and texture, so here’s a little peek at why I love these components for the Grinch Oreo Balls with Red Velvet Oreos Recipe.
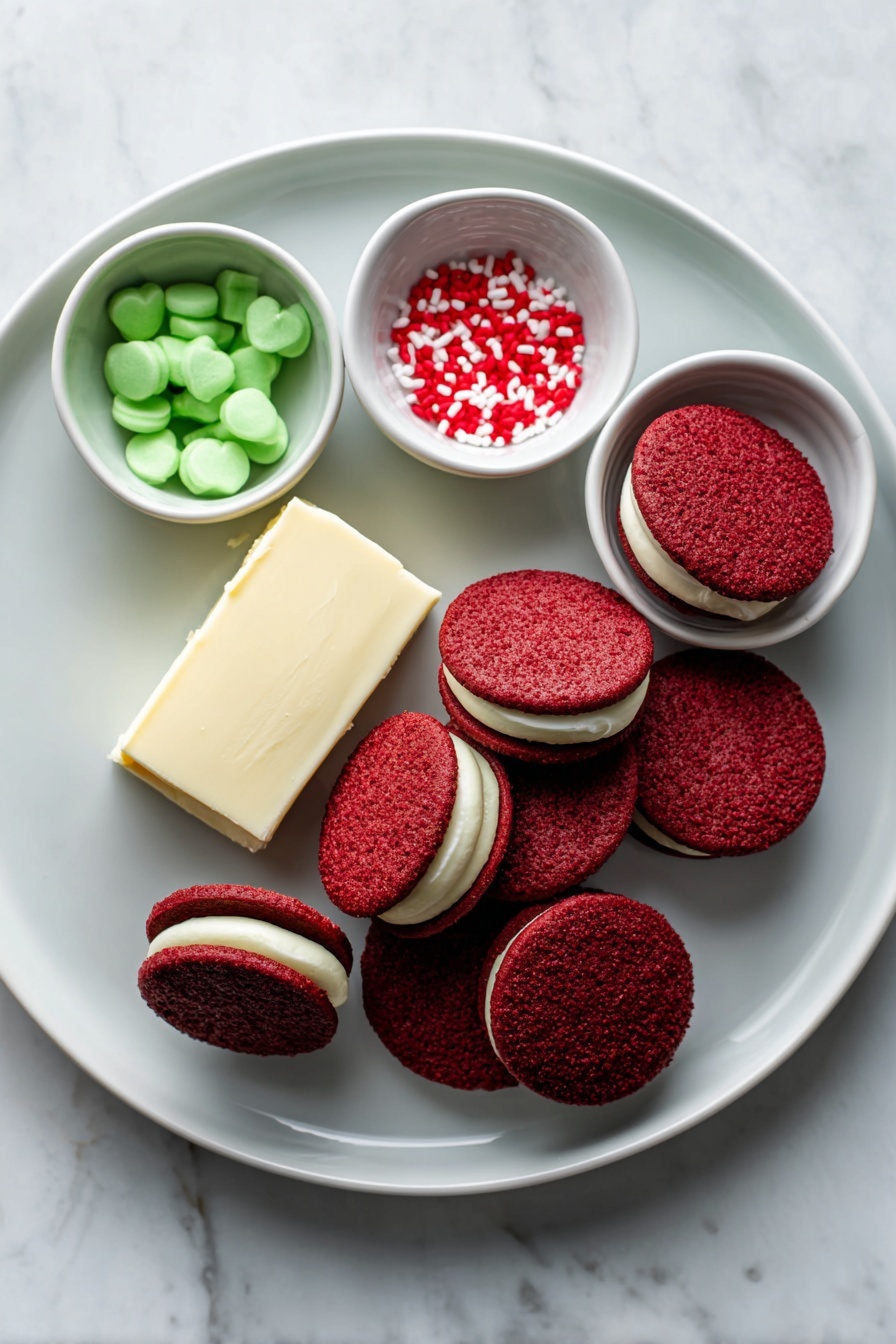
- Red Velvet Oreos: These give the balls a rich cocoa flavor and a festive touch with their red color, making the truffles pop visually and taste amazing.
- Cream Cheese: It brings moistness and softness so your Oreo crumbs stick together without being dry or crumbly.
- Green Candy Melts: They add that iconic bright green color and smooth shell that’s perfect for the Grinch theme while sealing in the flavor.
- Red Heart Sprinkles: These little hearts finish the look with an adorable, eye-catching detail that says “love” in true Grinch style.
Tweak to Your Taste
This recipe is a perfect base, but I love how you can tweak it for your own flavor preferences or dietary needs. I sometimes swap out the cream cheese for a vegan version or add a little peppermint extract for extra holiday cheer. You’ll find it so easy to make it your own!
- Minty Variation: Adding peppermint extract to the melted candy melts or dough gives these truffles a refreshing holiday twist—I tried this last year, and it was a hit at my family party.
- Dairy-Free Option: Use dairy-free cream cheese and vegan candy melts to keep it friendly for sensitive stomachs without losing the magic.
- Sprinkle Swap: Red heart sprinkles can be swapped for tiny red nonpareils or green sugar crystals depending on what you have on hand.
Step-by-Step: How I Make Grinch Oreo Balls with Red Velvet Oreos Recipe
Step 1: Crush Those Cookies to Perfection
Start by tossing your package of Red Velvet Oreos into a food processor. Pulse them just until they become fine crumbs – not powdery, but crumbly enough so they’ll blend nicely with the cream cheese. This is the secret to getting a smooth, creamy texture without chunks of cookie shell in every bite. If you don’t have a processor, you can bag the cookies and gently crush with a rolling pin, just take care not to overdo it.
Step 2: Mix in the Cream Cheese Until Soft Dough Forms
Add the cream cheese to your Oreo crumbs and pulse again until it forms a soft, dough-like mixture. It’s okay if it’s a bit sticky – you want it that way so it holds its ball shape beautifully. When I first made these, I underestimated the cream cheese, and the mixture was too crumbly, so don’t shy away from fully incorporating it!
Step 3: Roll, Chill, and Chill Some More
Use a tablespoon to scoop the dough, then roll each portion in your palms into a smooth ball. I like to keep my hands slightly cool – it helps prevent the dough from sticking like crazy. Place each ball on a parchment-lined baking sheet and pop them in the freezer for about 30 minutes to firm up.
Step 4: Melt the Candy and Get Ready to Dip
While your Oreo balls chill, melt the green candy melts in a microwave-safe bowl in 30-second bursts, stirring between each. If the melts feel too thick for dipping, stir in about half a teaspoon of coconut or any neutral oil—that little trick gives you a silky, smooth coating that’s easier to work with.
Step 5: Dip, Decorate, and Set
Using a dipping fork or two spoons, dunk each chilled Oreo ball in the melted candy until fully coated. Let the excess drip back into the bowl before placing it on your parchment-lined tray. Once all balls are coated, take the remaining candy melts, put them in a piping bag, and drizzle a little green ribbon on top. Finish with a red heart sprinkle for that iconic Grinch-heart look. Pop them in the fridge for a few minutes until the coating is set, and voilà!
Pro Tips for Making Grinch Oreo Balls with Red Velvet Oreos Recipe
- Keep It Cold: Chilling the balls before dipping is key — it prevents the candy coating from cracking or melting your Oreo mixture.
- Smooth Dipping Surface: Use parchment paper or a silicone mat for easy removal and no sticky messes.
- Candy Melt Thinning Trick: A little coconut oil added to candy melts thins them out so they coat like a pro without clumping.
- Decoration Timing: Add the sprinkles before the drizzle sets to make sure they stick perfectly and look picture-perfect.
How to Serve Grinch Oreo Balls with Red Velvet Oreos Recipe

Garnishes
I love keeping it simple with classic red heart sprinkles because that pops on the green so well, but you can also have fun with edible glitter or even tiny candy canes broken into bits for holiday sparkle. For a fun twist, a little white drizzle over the green gives a frosty look that’s pretty charming too.
Side Dishes
Pair these Grinch Oreo Balls with hot cocoa or a peppermint mocha for the ultimate cozy vibe. They also work great alongside other holiday treats like gingerbread cookies or spiced nuts if you’re hosting a festive dessert spread.
Creative Ways to Present
I’ve wrapped mine individually in mini cupcake liners and placed them in clear cellophane bags tied with green and red ribbon for gifts. You could arrange them on a tiered holiday platter or even freeze them on skewers covered with candy melts – perfect for little party pops that steal the show!
Make Ahead and Storage
Storing Leftovers
I usually keep any extras in an airtight container in the fridge. They stay deliciously fresh for up to a week, and the candy shell keeps them from drying out. Just make sure they’re not stacked too tightly so they don’t stick together.
Freezing
These are freezer-friendly too! I pop them in a single layer on a sheet first to freeze solid, then transfer to a zip-top bag. When you want a treat, just thaw in the fridge for a few hours or at room temperature for about 30 minutes, and they’re as good as freshly made.
Reheating
Since these are no-bake treats, you don’t really need to “reheat” them. But if your candy coating loses its shine or texture after freezing, letting them sit at room temp for a little bit revives their fondant-y charm and makes them just right to enjoy.
FAQs
-
Can I use regular Oreos instead of Red Velvet Oreos for this recipe?
Absolutely! Regular Oreos will work just as well for texture, but you’ll lose that festive red color and subtle cocoa flavor unique to the red velvet variety. It changes the look but keeps the taste delicious, so it’s a good backup if you can’t find Red Velvet Oreos.
-
How do I prevent the candy coating from cracking?
Chilling your Oreo balls thoroughly before dipping is key to avoid cracking. Also, avoid double-dipping or adding too thick a layer of candy melts. Thinning the candy melts with a little oil helps create a smooth, flexible shell that sets perfectly.
-
Can I make these ahead of time for a party?
Yes! These are fantastic make-ahead treats. You can prepare the Oreo mixture and shape the balls up to two days before, keeping them refrigerated. Dip and decorate on the day of your event for freshest appearance, or do everything ahead and keep them chilled until serving.
-
What if I don’t have a food processor?
No worries! Just crush those Oreos in a sturdy zip-top bag with a rolling pin or heavy pan until they’re nice and fine. It takes a little more elbow grease but works just as well for the dough.
-
Can I use colored candy melts other than green?
You can, but I highly recommend green for that classic Grinch look. If you want to get creative, try red, white, or even metallic colors for different holiday themes, but it won’t have quite the same festive charm.
Final Thoughts
Honestly, the Grinch Oreo Balls with Red Velvet Oreos Recipe is one of those feel-good treats that makes holiday prep feel joyful instead of stressful. I love how easy it is to whip up, the no-bake aspect is a lifesaver, and the result is truly crowd-pleasing. If you give these a try, I guarantee you’ll want to make them year after year, and maybe even sneak a few for yourself before anyone sees. They’re sweet, colorful, and full of holiday spirit – just like the best kind of Christmas memories.
Print
Grinch Oreo Balls with Red Velvet Oreos Recipe
- Prep Time: 15 minutes
- Cook Time: 0 minutes
- Total Time: 50 minutes
- Yield: 22 truffles
- Category: Dessert
- Method: No-Cook
- Cuisine: American
Description
Delight in these festive Grinch Oreo Balls made with Red Velvet Oreos, cream cheese, and coated in vibrant green candy melts. Perfect for holiday gatherings or themed parties, these no-bake treats are easy to make and visually fun with red heart sprinkles to complete the iconic Grinch look.
Ingredients
Main Ingredients
- 1 package (22 cookies) Red Velvet Oreos
- 4 oz cream cheese
- 7 oz green candy melts
- Red heart sprinkles
Instructions
- Prepare the workspace: Line a large baking sheet with parchment paper and set aside to prevent sticking during the dipping and chilling process.
- Make the Oreo dough: In a food processor, pulse the Red Velvet Oreo cookies until fine crumbs form. Add the cream cheese and process again until a soft dough forms, combining evenly.
- Form the truffles: Using a 1 tablespoon measuring spoon, scoop out the dough and roll it between the palms of your hands into balls. Place each ball on the prepared baking sheet. Continue until all dough is used. Chill the truffle balls in the freezer for 30 minutes to firm up.
- Melt the candy coating: In a microwave-safe bowl, melt the green candy melts in 30-second intervals, stirring between each to avoid burning. If the coating is too thick for dipping, add 1/2 teaspoon of coconut oil or an unflavored oil and mix until smooth and dip-friendly.
- Coat the truffles: Using a chocolate dipping fork, dip each chilled truffle ball into the melted candy melts coating it fully. Return the coated truffles to the baking sheet.
- Decorate: Place leftover melted candy melts into a piping bag and drizzle over the coated truffles. Quickly add red heart sprinkles on top while the drizzle is still wet to mimic the iconic Grinch heart.
- Set and serve: Chill the decorated oreo balls in the fridge for a few minutes to set the coating. Once firm, they are ready to be enjoyed!
Notes
- For best results, use full-fat cream cheese softened to room temperature for smooth mixing.
- If you don’t have a food processor, place Oreos in a sealed bag and crush with a rolling pin until fine crumbs form.
- The green candy melts can be replaced with white chocolate tinted green with food coloring if preferred.
- Add a little coconut oil carefully to avoid thinning the coating too much, which can cause dripping.
- Store truffles in an airtight container in the refrigerator for up to 1 week to maintain freshness.
Nutrition
- Serving Size: 1 truffle (approximate)
- Calories: 120 kcal
- Sugar: 14 g
- Sodium: 90 mg
- Fat: 7 g
- Saturated Fat: 4 g
- Unsaturated Fat: 2 g
- Trans Fat: 0 g
- Carbohydrates: 14 g
- Fiber: 0.5 g
- Protein: 1 g
- Cholesterol: 10 mg
