

Grinch Cookies with Hershey’s Kisses Recipe
If you’re looking for a fun, festive treat that will wow everyone at your holiday gathering, you’ve got to try my Grinch Cookies with Hershey’s Kisses Recipe. These little green delights are bursting with flavor, packed with chocolatey goodness, and just plain adorable. Honestly, every year I make a batch (or three!), and they’re gone in no time. Stick around, and I’ll share all my tips to make sure your cookies come out perfectly green, soft, and irresistible.
Why This Recipe Works
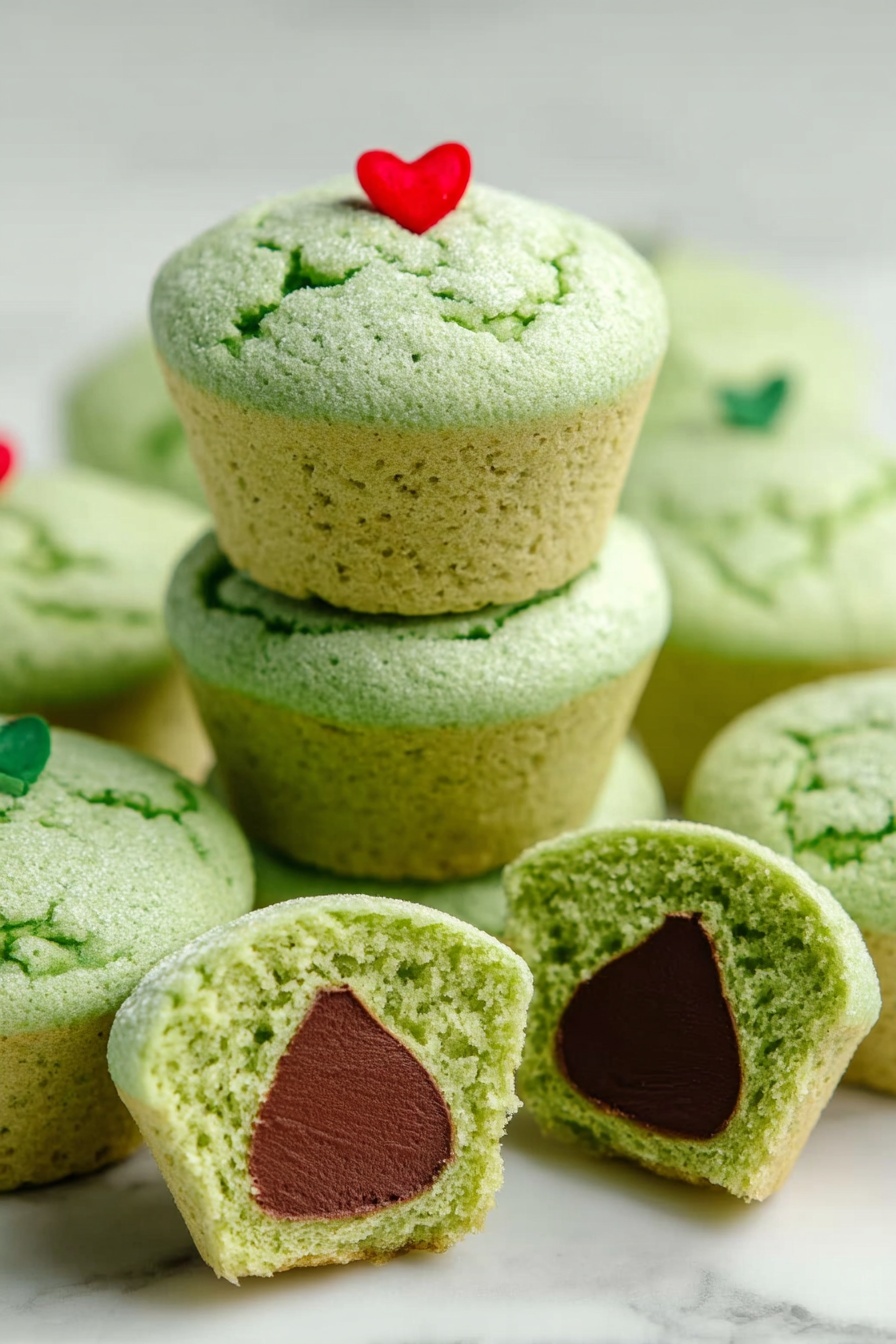
- Fun and Festive: The bright green dough and Hershey’s Kisses surprise inside perfectly capture the playful Grinch spirit.
- Easy and Quick: Using a sugar cookie mix simplifies the process and ensures reliable results every time.
- Perfect Texture: These cookies stay soft with a gooey chocolate center thanks to careful baking and the mini muffin tin format.
- Eye-Catching Presentation: The addition of heart candy sprinkles on top adds a charming finishing touch that makes these cookies party-ready.

Ingredients & Why They Work
This recipe balances convenience with creativity. Using a sugar cookie mix saves tons of time while the green food coloring and Hershey’s Kisses make it festive and fun. Plus, each ingredient plays a role in creating that soft, tender texture and delicious flavor.
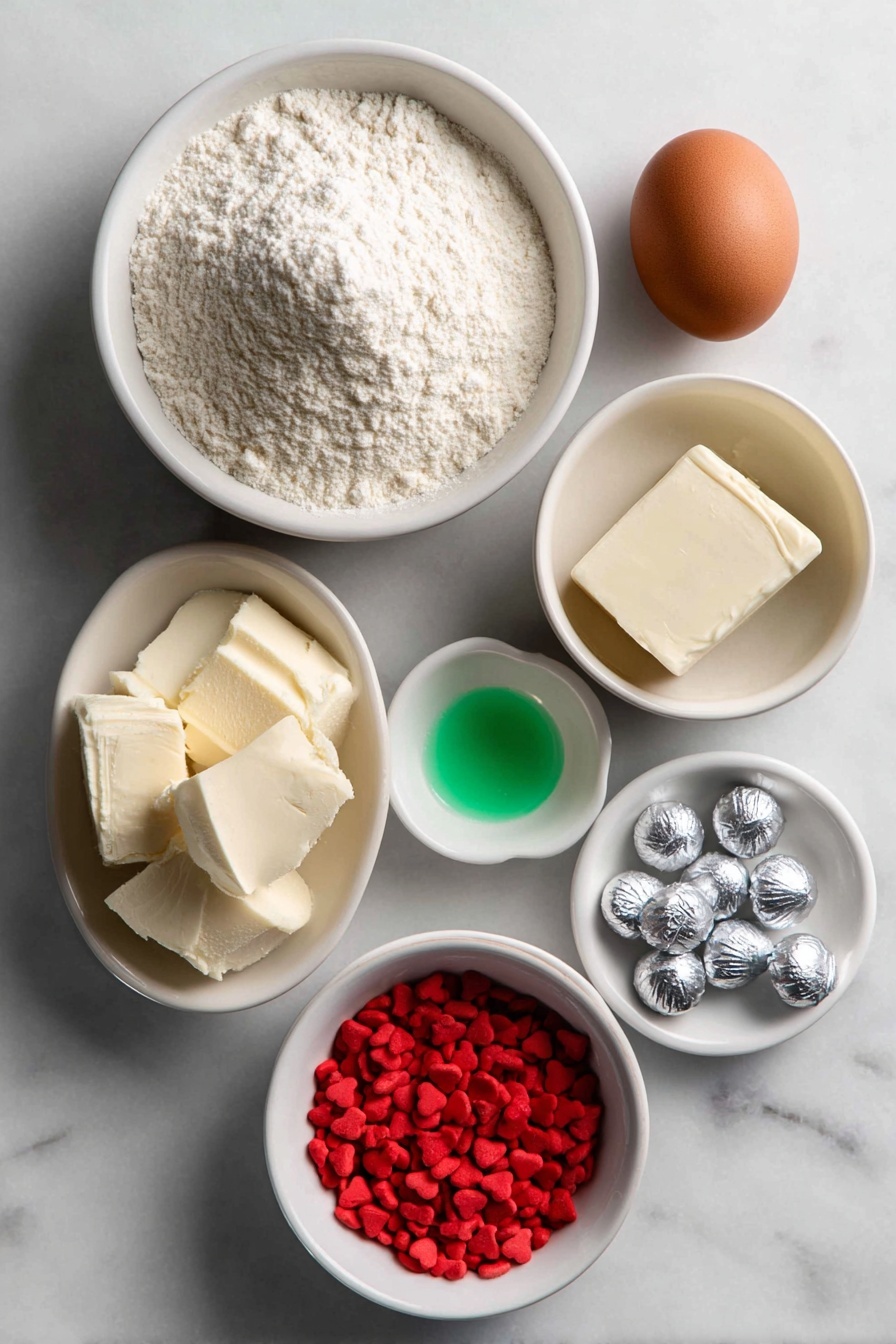
- Sugar Cookie Mix: Using a mix means you get consistent texture without fuss, perfect if you want great cookies fast.
- All-Purpose Flour: Helps firm up the dough and gives the cookies that classic structure.
- Large Egg: Mixing this with the gel food coloring makes it easier to get that perfect even green hue.
- Unsalted Butter: Room temperature is key for smooth dough; it gives richness and tenderness to the cookies.
- Green Gel Food Coloring: Gel is a must because it gives vivid color without thinning the dough like liquid food coloring might.
- Hershey’s Kisses: The melty chocolate center is the best surprise in every bite – and the star of the show.
- Heart Candy Sprinkles: These add a cute, festive pop right at the end for that special “Grinch heart grows” touch.
Tweak to Your Taste
I love making this recipe my own each year, depending on the crowd and occasion. Don’t hesitate to get creative—this recipe is forgiving and fun to experiment with.
- Variation: Once, I swapped the Hershey’s Kisses for peppermint-flavored chocolate kisses. The mint-chocolate combo added a festive twist everyone loved!
- Dietary Modifications: For dairy-free versions, try using vegan butter and dairy-free chocolate kisses; just watch baking times closely as textures might change slightly.
- Color Fun: You can use different gel colors if you want to make “Whoville” cookies themed for other characters or simply a fun splash of color.
Step-by-Step: How I Make Grinch Cookies with Hershey’s Kisses Recipe
Step 1: Prep Your Mini Muffin Tin
First things first: preheat your oven to 375°F. While it warms up, lightly grease your mini muffin pan with baker’s spray or line the cups with paper liners. This step is a lifesaver for easy cookie removal later, especially since these cookies are soft and delicate.
Step 2: Mix the Green Egg Mixture
Grab a small bowl and whisk the egg with your green gel food coloring until it’s a vibrant uniform shade of green. This little trick helps the color blend evenly into the dough rather than patchy blobs. I’ve done the opposite before, and let me tell you—future you will thank present you if you mix the color with the egg first!
Step 3: Combine the Dough Ingredients
In a large bowl, add your sugar cookie mix, flour, room-temp butter, and that green egg mixture. Use a handheld mixer on low speed for about 2 to 3 minutes. The dough will be thick and lush—don’t worry, that’s exactly what you want. If it feels too dry, a tiny splash of milk could help, but usually, the egg and butter combo nails the texture.
Step 4: Shape the Cookies Around Hershey’s Kisses
Using a 1½ tablespoon cookie scoop makes scooping dough balls even and easy. Flatten each dough ball into a 3-inch disc in your hand, then place a Hershey’s Kiss right in the center. Now gently pull the cookie dough sides up and around the Kiss—think of it like wrapping a tiny present! Make sure the flat bottom of the Kiss stays down so it’s upright when you pop it in the muffin tin.
Step 5: Bake Just Right
Place those dough-covered Kisses carefully into your prepared mini muffin pan. Bake for 10 to 12 minutes—watch closely so the cookies don’t get brown. You want them just cooked through but still soft. The centers will be gooey thanks to the chocolate, and that’s the magic moment.
Step 6: Add the Heart Sprinkles and Cool
Right after the cookies come out of the oven, press one heart candy sprinkle slightly off-center onto each cookie. This little offset placement reminds me of how the Grinch’s heart grew bigger—it’s such a cute detail. Let your cookies cool for at least 10 minutes in the pan before removing them to cool completely on a wire rack.
Pro Tips for Making Grinch Cookies with Hershey’s Kisses Recipe
- Keep the Hershey’s Kiss Upright: It’s tempting to just drop the chocolate in any way, but keeping it standing up prevents it from melting unevenly and maintains those iconic “kiss” points.
- Don’t Overbake: These cookies look done way before they’re brown, so check early to avoid dry, crumbly results.
- Gel Food Coloring Magic: I’ve tried liquid coloring before, and gel is a game-changer since it gives you that rich green without making the dough sticky.
- Easy Removal Hack: Cooling the cookies in the pan for a good 10 minutes softens them just right so they pop out without breaking.
How to Serve Grinch Cookies with Hershey’s Kisses Recipe
Garnishes
I usually keep it simple with those bright red heart candy sprinkles, which add a lovely color contrast and festive vibe. If I’m feeling extra, I sometimes dust a tiny bit of powdered sugar over the cooled cookies for a snowy touch—but definitely don’t skip the hearts.
Side Dishes
These cookies make a perfect companion to a mug of hot chocolate or peppermint-flavored coffee. I like serving them alongside holiday fruit platters or even a creamy whipped dip for a little balance. Basically, anything cozy and sweet pairs beautifully!
Creative Ways to Present
One year, I arranged these Grinch Cookies on a platter with red and white striped peppermint sticks and fresh pine sprigs to create a Whoville-inspired centerpiece. Kids and adults alike loved the storybook charm. Another fun idea is to package them in clear cellophane bags tied with red ribbon to give as sweet homemade gifts.
Make Ahead and Storage
Storing Leftovers
I keep leftover cookies in an airtight container at room temperature. They stay soft for several days, though I recommend enjoying them within 3 to 4 days for the best melt-in-your-mouth experience. If you have kids, plan to hide some or they’ll disappear overnight!
Freezing
If you want to make them ahead of time, these cookies freeze like a charm. I freeze the unbaked cookie dough balls on a tray first, then transfer to a freezer bag. When ready, pop them in the muffin tin and bake a couple minutes longer than fresh dough. Cookies baked this way still come out just as soft and delicious.
Reheating
To warm up day-old cookies, I give them 10-15 seconds in the microwave. This brings back some softness and makes the chocolate center gooey again. Just don’t overdo it, or the cookies get too hot and lose that tender texture. A quick warm-up is all you need.
FAQs
-
Can I use homemade sugar cookie dough instead of a mix?
Absolutely! Just make sure your dough is thick enough to hold a Hershey’s Kiss inside without spreading too much. You might want to chill the dough slightly before shaping for easier handling.
-
Why do I need to keep the Hershey’s Kiss upright?
Keeping the Kiss upright prevents it from melting into a flat blob. It also helps maintain that iconic pointed shape, making your cookies look more like the classic “Grinch” style and ensuring the chocolate melts evenly inside.
-
Can I make these cookies without food coloring?
Sure, but then you’d lose the signature green Grinch effect! The green gel food coloring is what really ties the theme together. If you don’t have green, you could try a light dye of any color, but green is the classic choice.
-
What if my cookie dough is too sticky to shape?
Try chilling the dough for 20-30 minutes. Cold dough is much easier to handle and shape around the chocolate. Also, using flour-dusted hands helps keep things from sticking.
-
Can I use other chocolate candies instead of Hershey’s Kisses?
You can! Mini peanut butter cups or truffles could work as a fun alternative. Just keep in mind the size and meltability to ensure your cookies bake evenly and stay together.
Final Thoughts
This Grinch Cookies with Hershey’s Kisses Recipe is one of those special treats that brings smiles and nostalgia every holiday season. I love how simple it is to make yet how impressive it looks—all while being completely scrumptious and kid-friendly. Whether you’re baking with family or looking to impress friends, these green gems won’t disappoint. Trust me, once you try making these, you’ll want to keep the tradition going year after year!
Print
Grinch Cookies with Hershey’s Kisses Recipe
- Prep Time: 5 minutes
- Cook Time: 12 minutes
- Total Time: 17 minutes
- Yield: 18 servings
- Category: Dessert
- Method: Baking
- Cuisine: American
Description
These festive Grinch Cookies feature a green-tinted sugar cookie dough wrapped around a Hershey’s Kiss, baked into mini muffin cups and topped with heart candy sprinkles. Perfect for holiday celebrations, they combine a soft cookie texture with a chocolate surprise center.
Ingredients
Cookie Dough
- 17.5 ounces sugar cookie mix
- ¼ cup all-purpose flour
- 1 large egg
- ½ cup unsalted butter, room temperature
- ¾ teaspoon green gel food coloring
Filling and Topping
- 18 Hershey’s kisses, unwrapped
- 18 large heart candy sprinkles
Instructions
- Preheat oven: Preheat the oven to 375°F. Lightly spray a mini muffin pan with baker’s spray or line with paper cups, and set aside.
- Mix egg and food coloring: In a small bowl, whisk together the egg and green gel food coloring until fully combined to ensure even green coloring in the dough.
- Combine dough ingredients: In a large mixing bowl, using a handheld mixer on low speed, combine the sugar cookie mix, flour, unsalted butter, and the green egg mixture for 2 to 3 minutes until the dough is thick and well incorporated.
- Form dough balls with candy: Using a 1½ tablespoon scoop, take a ball of dough and flatten it into a 3-inch disc. Place a Hershey’s Kiss in the center and carefully pull the dough edges up to cover the candy, shaping it into a ball. Keep the Hershey’s Kiss upright when placing it into the muffin tin.
- Bake the cookies: Place each dough ball into the mini muffin tins with the Hershey’s Kiss standing upright. Bake for 12 minutes, ensuring the cookies do not brown but are fully cooked through.
- Add heart candy and cool: Immediately after removing from the oven, gently press one heart candy sprinkle offset to the right onto each cookie. Let the cookies cool in the muffin tin for at least 10 minutes, then transfer them to a wire rack to cool completely.
Notes
- Whisking the green gel food coloring with the egg helps distribute the color evenly throughout the dough for a uniform green appearance.
- Keep the Hershey’s Kiss candy upright during baking to prevent it from shifting and ensure the chocolate remains centered.
- Do not overbake the cookies to avoid browning; they should be soft and fully cooked in the center.
- Using a mini muffin pan helps shape the cookie dough around the candy evenly for perfect cookie cups.
Nutrition
- Serving Size: 1 cookie
- Calories: 150 kcal
- Sugar: 12 g
- Sodium: 90 mg
- Fat: 7 g
- Saturated Fat: 4 g
- Unsaturated Fat: 3 g
- Trans Fat: 0 g
- Carbohydrates: 20 g
- Fiber: 1 g
- Protein: 2 g
- Cholesterol: 25 mg


