

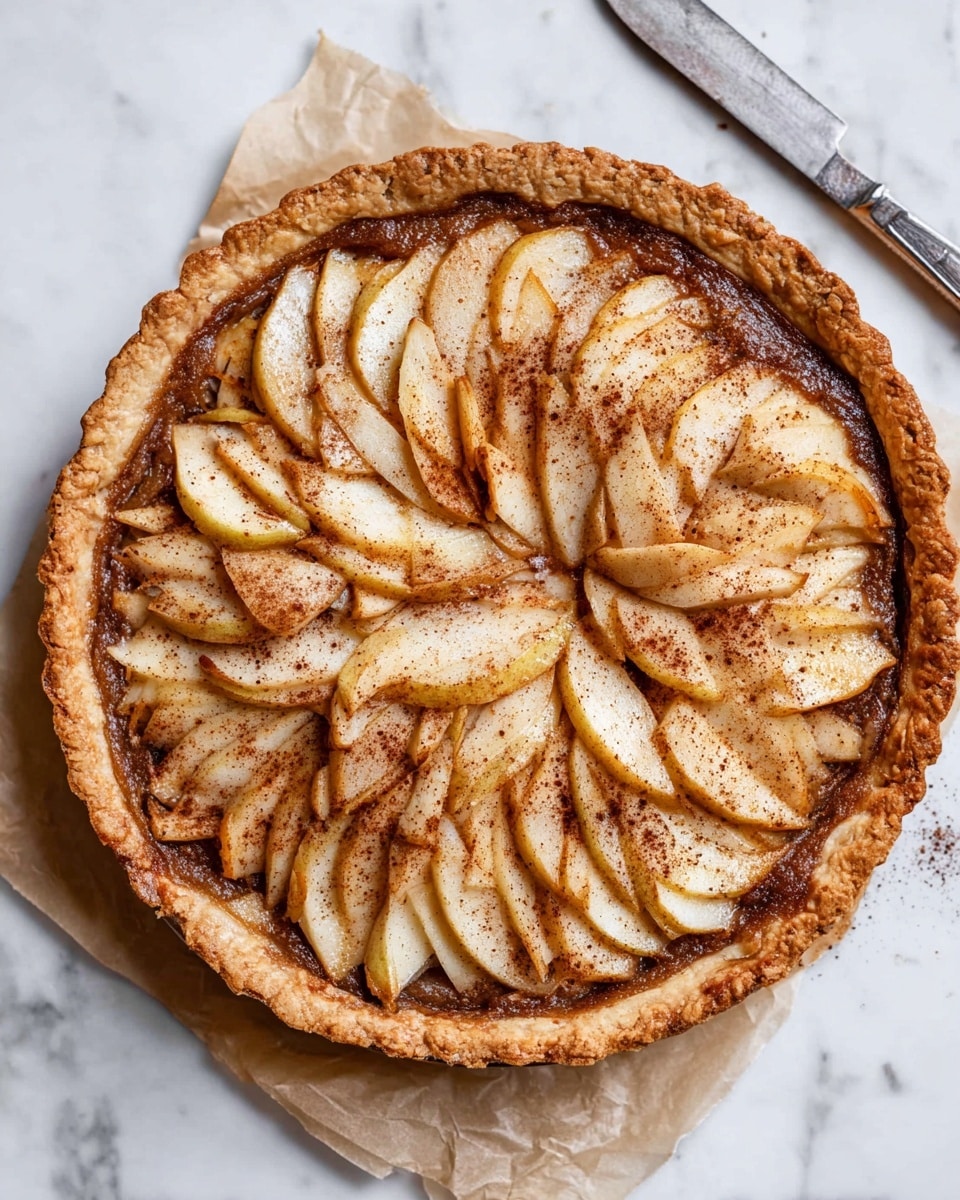
Easy Apple Pear Pie Recipe
There’s something so comforting about the mix of apples and pears baked into a warm, cinnamon-spiced pie. This Easy Apple Pear Pie Recipe takes all those cozy flavors and makes them accessible, whether you’re a seasoned baker or just dipping your toes into pie-making. I love how the crisp tartness of the apples blends beautifully with the delicate sweetness of pears, making each bite balanced and satisfying without working too hard for it.
This pie is perfect for any time you want a dessert that feels homemade but doesn’t have you in the kitchen all day. Whether it’s a casual family dinner, a friendly potluck, or just a craving for something fruity and spiced, this Easy Apple Pear Pie Recipe has got you covered. Trust me, once you try this, you’ll keep coming back to it whenever you want to impress with that perfect fall flavor combo.
Why This Recipe Works
- Simple Yet Flavorful: Combines tart apples with tender pears and warm cinnamon for a classic, crowd-pleasing taste.
- Easy Assembly: Uses straightforward steps—no complicated crust skills required, perfect if you want to keep it casual.
- Balanced Sweetness: Brown sugar and lemon juice keep the filling from being too sweet or flat, adding brightness and depth.
- Beautiful Presentation: Topped with sliced pears brushed in a glossy glaze for a pie that looks as good as it tastes.

Ingredients & Why They Work
Each ingredient in this Easy Apple Pear Pie Recipe plays a part in building that perfect balance between tart, sweet, and warmly spiced. Choosing ripe but firm fruits helps them hold their shape during baking, and simple pantry staples come together to create a gloriously fragrant and gooey filling.

- Apples: Tart varieties like Granny Smith work best to provide structure and a nice tang that balances sweetness.
- Brown Sugar: Adds moisture and a hint of caramel richness that brightens the fruit flavors.
- Cornstarch: Essential for thickening the filling and avoiding a soggy crust.
- Cinnamon: Brings warmth and classic autumnal spice to the pie.
- Salt: A pinch enhances all the flavors and stops things from tasting flat.
- Lemon Juice: Keeps the fruit fresh and prevents browning while cutting through sweetness with acidity.
- Pears: Thinly sliced pear topping adds softness, floral notes, and a lovely decorative touch.
- Coconut Oil: Used in the glaze for a luscious shine and subtle tropical undertone.
Tweak to Your Taste
One of the fun things about this Easy Apple Pear Pie Recipe is how customizable it is. I often experiment by adjusting spices or mixing up fruit ratios depending on what’s freshest or what I’m in the mood for—don’t be afraid to make it your own!
- Variation: Sometimes I swap some apple slices for more pears inside the filling to get an even softer texture and deeper pear flavor—it’s a delicious twist.
- Lower Sugar: If you prefer less sweetness, cut the brown sugar amount, especially if your pears or apples are naturally sweeter.
- Spice it Up: Feel free to add a pinch of nutmeg or ginger for extra warming notes that really complement fall vibes.
- Gluten-Free: You can use any gluten-free pie crust to keep it approachable for friends with dietary needs.
Step-by-Step: How I Make Easy Apple Pear Pie Recipe
Step 1: Prepare Your Pie Crust
Start by preheating your oven to 375°F, then lightly grease a 9” pie plate. Whether you use store-bought or homemade dough, roll it out or press it evenly into the pie pan. I like to crimp the edges with my fingers for that rustic feel—it makes the pie look homier and helps hold the filling better.
Step 2: Mix the Filling
In a large bowl, toss your peeled, cored, and thinly sliced apples with brown sugar, cinnamon, salt, lemon juice, and cornstarch. This step is critical—make sure you coat every slice well! If the mixture starts to pool liquid, stir in an extra tablespoon of cornstarch. This helps avoid any soggy crust surprises later.
Step 3: Assemble and Add the Pears
Spoon the apple filling evenly into your prepared crust and smooth out the top gently. Next, arrange your pear slices on top in a pretty circular pattern—this not only looks stunning but helps the pears bake evenly. Brush the pear topping generously with the warm glaze made from brown sugar, coconut oil, and lemon juice.
Step 4: Bake and Enjoy!
Cover the pie loosely with foil to keep the glaze from burning, then bake for about 35-40 minutes. You’ll know it’s done when the crust is golden brown and the pears have softened to a lovely amber color. Let the pie cool a bit before slicing so the filling sets up nicely—this is where the anticipation pays off!
Pro Tips for Making Easy Apple Pear Pie Recipe
- Even Slices: Slice fruits uniformly so everything bakes at the same rate and no one part becomes mushy or underdone.
- Adjust Sweetness: Taste your fruit before adding sugar—if your apples or pears are super sweet, you may want less brown sugar to allow natural flavors to shine.
- Glaze Magic: Don’t skimp on brushing that glaze! It helps give the pears a beautiful sheen and seals in moisture during baking.
- Watch the Crust: Use foil or a crust shield if edges brown too quickly; this way your crust is evenly golden without burning.
How to Serve Easy Apple Pear Pie Recipe
Garnishes
I like to keep it simple by topping slices with a dollop of whipped cream or a scoop of vanilla ice cream. Sometimes I sprinkle a tiny pinch of cinnamon on top just before serving—that warm spice aroma makes all the difference to me.
Side Dishes
While this pie stands beautifully on its own, I’ve served it alongside a hot cup of chai tea or a fresh spring salad for contrast when entertaining guests. It’s great with cozy drinks that complement the pie’s fruity warmth.
Creative Ways to Present
For holidays or special occasions, I sometimes swap the regular crust for a lattice topping to show off those colorful layers inside. You can also garnish the edges with chopped nuts or dust the top lightly with powdered sugar for a pretty finish.
Make Ahead and Storage
Storing Leftovers
Leftover slices store well covered in the fridge for up to 3 days. I like to loosely cover the pie with foil or plastic wrap to keep the crust from absorbing fridge odors. Just let it come to room temperature or warm slightly before enjoying again.
Freezing
You can freeze this pie baked or unbaked. For baked pies, wrap tightly in plastic wrap then foil, and freeze up to 2 months. I always thaw in the fridge overnight and reheat gently to keep the crust flaky and filling juicy.
Reheating
Reheat slices in a 325°F oven for 10-15 minutes until warm. Avoid microwaving if you want to keep that crispy crust texture. I find using a baking sheet with foil works best to catch any drips while warming.
FAQs
-
Can I use other types of apples or pears for this pie?
Absolutely! Feel free to experiment with your favorite apple or pear varieties—just choose firmer fruits that hold up well during baking, like Granny Smith apples and Bartlett or Bosc pears. Softer or overly ripe fruit might turn mushy in the pie.
-
Do I have to peel the fruit for this recipe?
Peeling is recommended to create a smooth texture and make it easier to slice fruit evenly, which helps the pie bake consistently. However, if you prefer, you can leave skins on for extra fiber and a more rustic look.
-
How do I prevent the crust from getting soggy?
Make sure to fully coat your fruit with cornstarch to thicken excess liquid. Using lemon juice also helps by tightening the fruit’s structure. Additionally, avoid overfilling the pie and bake it long enough for the crust to brown and set.
-
Can I make this pie ahead of time?
Yes! You can assemble the pie a day ahead, cover it tightly, and refrigerate before baking. This lets flavors meld and can actually improve the taste. Just remember to bring the pie to room temperature before baking if refrigerated.
Final Thoughts
This Easy Apple Pear Pie Recipe is one of those dishes that always makes me feel right at home. It’s straightforward enough to whip up when time is tight but impressive enough to serve guests with confidence. I hope you enjoy baking and sharing it as much as I do—it’s a little reminder that simple ingredients and a touch of love can create something truly special.
Print
Easy Apple Pear Pie Recipe
- Prep Time: 30 minutes
- Cook Time: 40 minutes
- Total Time: 1 hour 10 minutes
- Yield: 8 servings
- Category: Dessert
- Method: Baking
- Cuisine: American
- Diet: Vegetarian
Description
This easy apple pear pie combines tart apples and sweet pears in a classic pie crust, topped with a glossy brown sugar and coconut oil glaze. Perfect for a comforting dessert, it features a tender, golden crust and a nicely balanced fruity filling with warm cinnamon and a hint of lemon.
Ingredients
Filling
- 4 medium tart apples (peeled, cored and sliced thinly)
- ½ cup brown sugar
- 3 tablespoons cornstarch
- 1 tablespoon cinnamon
- ½ teaspoon salt
- 2 tablespoons lemon juice
Topping
- 2 pears (peeled, cored and sliced thinly)
Glaze
- 2 teaspoons brown sugar
- 2 teaspoons coconut oil
- 2 teaspoons lemon juice
Crust
- Pie dough sufficient to line a 9-inch pie plate
Instructions
- Prepare the crust: Preheat the oven to 375 degrees F. Lightly grease a 9-inch pie plate. Roll out or press the pie dough evenly into the pie plate and crimp the edges with your fingers.
- Make the filling: In a large bowl, combine sliced apples, brown sugar, 2 tablespoons cornstarch, cinnamon, salt, and lemon juice. Toss well to coat. If liquid pools at the bottom, stir in the additional tablespoon of cornstarch to thicken the mixture.
- Assemble the pie: Spoon the apple filling into the prepared crust and smooth the top evenly.
- Prepare the glaze: In a small saucepan, heat brown sugar, coconut oil, and lemon juice over low heat until melted and combined. Remove from heat and set aside.
- Add pear topping: Arrange the thinly sliced pears in a decorative circular pattern on top of the apple filling.
- Glaze and bake: Brush the pear topping liberally with the prepared glaze. Cover the pie loosely with foil and bake in the preheated oven for 40 minutes until the crust is browning and pears are soft and golden.
- Cool and serve: Remove the pie from the oven and allow it to cool before slicing to let the filling set properly.
Notes
- Slice the fruit evenly to ensure it bakes uniformly.
- Adjust sweetness by taste, especially if using sweeter apple varieties.
- You can mix apples and pears in the filling instead of using pears only on top for a different flavor balance.
- Make sure no liquid pools in the filling to avoid a soggy crust; increase cornstarch if needed.
- Use a tart apple variety like Granny Smith for balanced flavor.
- If pie dough is homemade, chill it well for better handling and flakier crust.
Nutrition
- Serving Size: 1 slice (1/8 pie)
- Calories: 320 kcal
- Sugar: 25 g
- Sodium: 180 mg
- Fat: 12 g
- Saturated Fat: 6 g
- Unsaturated Fat: 5 g
- Trans Fat: 0 g
- Carbohydrates: 50 g
- Fiber: 4 g
- Protein: 2 g
- Cholesterol: 15 mg


