
Christmas Tree Sheet Cake with White Chocolate Frosting Recipe
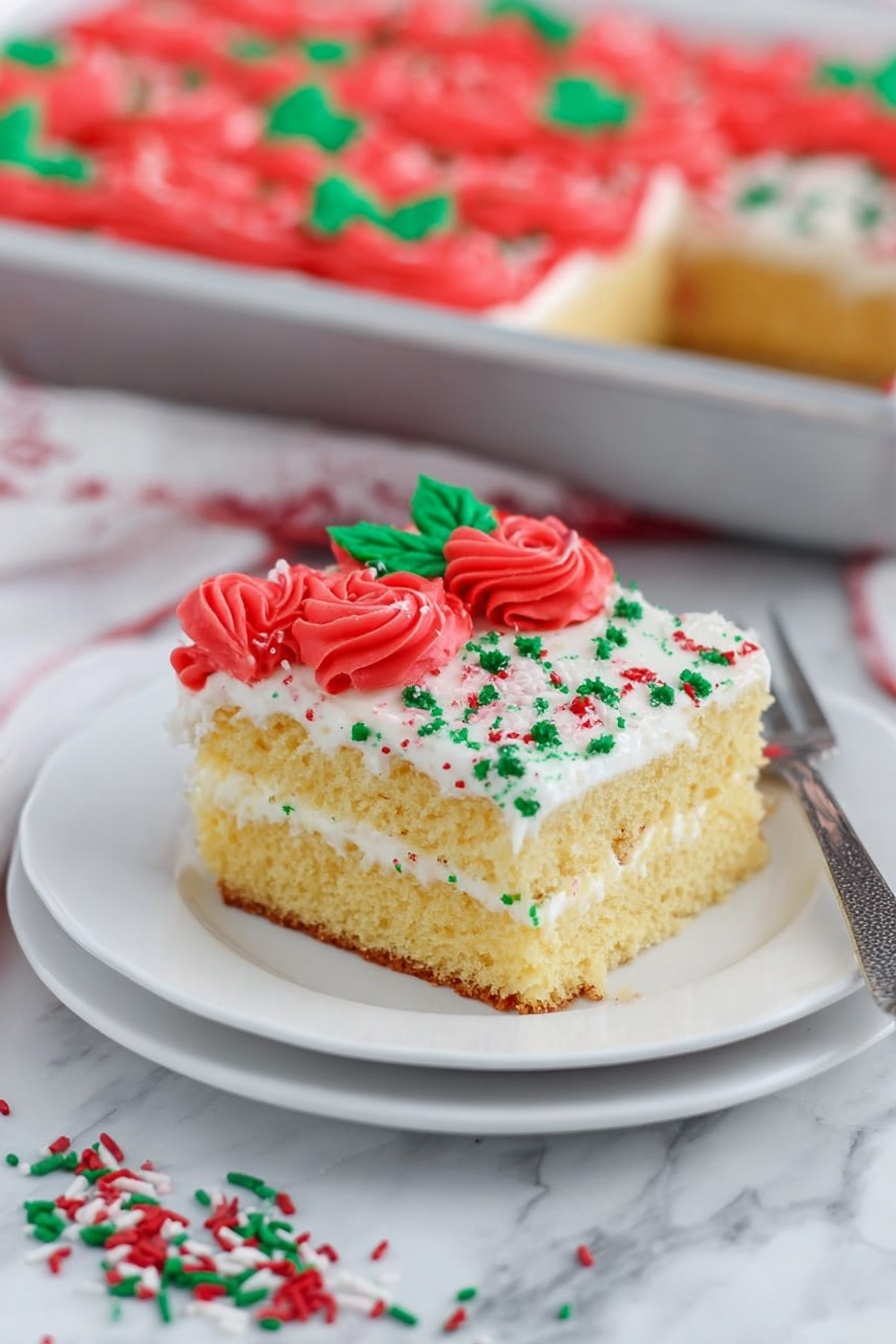
If you’re looking for a festive, show-stopping dessert that’s both fun to make and downright delicious, you’ve got to try this Christmas Tree Sheet Cake with White Chocolate Frosting Recipe. Trust me, it’s one of those cakes that steals the spotlight at holiday gatherings and leaves everyone asking for seconds. It layers a moist yellow cake with fluffy whipped cream and a silky white chocolate buttercream that I just can’t get enough of. Stick with me, and I’ll walk you through every step so your Christmas baking turns out perfect!
Why This Recipe Works
- Moist, Tender Cake: Using both buttermilk and sour cream adds richness and keeps the yellow cake exceptionally soft and moist.
- Light Yet Decadent Fillings: The whipped cream filling balances the richness of the white chocolate buttercream, avoiding anything too heavy.
- Festive and Fun Design: The use of sanding sugar and holiday sprinkles creates a joyful, kid-friendly Christmas tree look without any complicated decorating skills.
- Easy to Make in a Sheet Pan: This recipe saves time and hassle, yet looks like you spent hours fussing over it.

Ingredients & Why They Work
The magic of this Christmas Tree Sheet Cake with White Chocolate Frosting Recipe lies in how well these ingredients play off each other — a tender cake base, fluffy cream filling, and rich frosting come together perfectly. Plus, I’ll share tips for choosing the best versions and handling them gently for ultimate texture.

- Buttermilk: Adds acidity that tenderizes the cake, keeping it moist and giving a subtle tang that cuts the sweetness.
- Sour Cream: Boosts moisture and richness, making the cake wonderfully tender without weighing it down.
- Eggs: Room temperature eggs help with volume and structure to keep the cake fluffy.
- Vegetable Oil: Keeps the cake soft and moist — don’t swap it for butter here or you’ll lose that tender crumb.
- Vanilla Extract: Brings warmth and depth to the cake and frosting flavors.
- Yellow Cake Mix: Using a trusty cake mix speeds things up and guarantees consistent texture, but you still get to customize it with fresh ingredients.
- Heavy Whipping Cream: Essential for that cloud-like, stable whipped filling to keep layers fluffy and light.
- Powdered Sugar: Gives smooth sweetness to fillings and frosting without grit.
- White Chocolate Chips: Melted into the buttercream adds luxury and a creamy flavor that’s uniquely festive.
- Unsalted Butter: Room temperature butter whipped to airy perfection creates the ideal buttercream base.
- Green Sanding Sugar & Christmas Sprinkles: Easy, colorful decorations that turn your cake into a holiday masterpiece.
- Red Gel Coloring: For piping festive borders that really pop against the white frosting.
Tweak to Your Taste
I love that this Christmas Tree Sheet Cake with White Chocolate Frosting Recipe is incredibly versatile. I’ve tried it with a few twists depending on the crowd — and it never fails to impress. Feel free to customize toppings and even add a splash of your favorite extract to the frosting.
- Variation: For an adult twist, I sometimes add a teaspoon of peppermint extract to the white chocolate buttercream — it gives a classic Christmas flavor boost.
- Dietary Modifications: You can swap the cake mix for a gluten-free version if needed but be mindful the texture might vary slightly.
- Difficulty Level: This cake is beginner-friendly, but take your time with the frosting step — a chilled bowl and room temperature butter make all the difference.
Step-by-Step: How I Make Christmas Tree Sheet Cake with White Chocolate Frosting Recipe
Step 1: Prep and Bake the Yellow Cake
Start by preheating your oven to 325°F and greasing a 9×13 sheet pan well. I like to use a combo of baking spray and a light dusting of flour — it helps the cake release easily later. In a large bowl, whisk together the buttermilk, sour cream, eggs, vegetable oil, and vanilla until smooth. Then sift in the yellow cake mix to avoid lumps, folding gently until just combined. Pour the batter into the pan and bake for about 22-25 minutes. Keep an eye on it; you want a toothpick to come out with a few moist crumbs but not wet batter. Once baked, let it cool completely before moving on. Cooling is key here; warm cake will tear when sliced.
Step 2: Slice the Cake for Layering
Once your cake is fully cooled, carefully flip it out onto a sheet of parchment paper on your counter. I use a cake leveler for this step — it’s a game-changer for thin, even layers. Slowly slice the cake in half horizontally. Here’s a tip: slide a thin cutting board or flat piece of cardboard underneath the top layer so you can lift it gently without breaking. Place the bottom layer back into your pan — it’s ready for the luscious whipped cream filling next!
Step 3: Whip the Cream Filling
Chill your mixing bowl and whisk attachment in the freezer for about 5 minutes before whipping your heavy cream. This little trick helps the cream whip up faster and hold its structure. Start on low speed and gradually increase to high over 2-3 minutes, watching for stiff peaks (those nice, sturdy peaks that stand tall without drooping). Then add vanilla, almond extract if you like, and powdered sugar, whipping until everything is combined. Spread this whipped cream evenly over the bottom cake layer in the pan, then carefully place the top cake layer back on.
Step 4: Make the White Chocolate Buttercream
In a small microwave-safe bowl, heat the heavy cream and white chocolate chips in 30-second increments, stirring between, until melted and smooth. Don’t overheat or scorch the chocolate! Meanwhile, whip the room temperature butter with a paddle attachment until fluffy and pale. Add salt and vanilla, then slowly mix in the white chocolate ganache. Once combined, beat in the powdered sugar until thick and spreadable. If it feels too dense, add a splash of heavy cream to loosen it. For the best texture, whip on high for about two minutes to lighten the color and consistency, then gently beat down with a spoon to reduce any air bubbles.
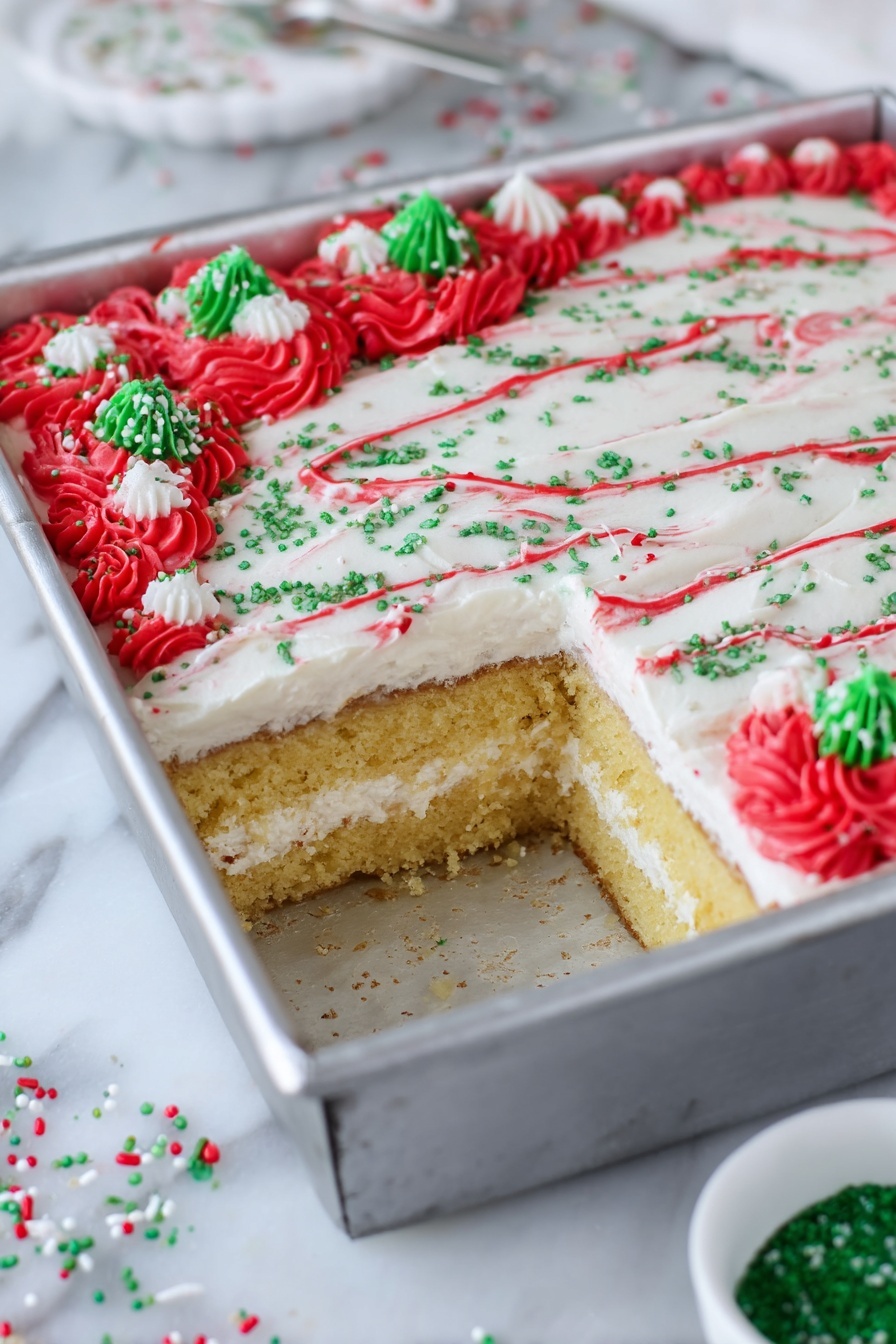
Step 5: Frost and Decorate Your Christmas Tree Sheet Cake
Use a flat cake scraper to frost your entire cake smoothly, then reserve about 2 ½ to 3 cups of buttercream for the borders and decorations. Add a few drops of red gel color to the remaining buttercream to pipe a playful wavy red pattern onto the cake with a small circle tip. Then switch to a large star tip to pipe a festive shell border around the edge of the cake. Sprinkle green sanding sugar generously over the center to mimic pine needles, and finish with holiday-themed Christmas tree sprinkles around the edges. It’s such a joyful cake to look at—and even better to taste!
Pro Tips for Making Christmas Tree Sheet Cake with White Chocolate Frosting Recipe
- Keep Everything at Proper Temperature: Room temperature eggs and butter help ingredients blend smoothly without curdling or graininess.
- Freeze Your Whisk & Bowl: Chilled equipment whips cream faster and yields better volume for the filling.
- Use a Cake Leveler: A serrated knife works, but a cake leveler gives even layers and makes stacking simpler.
- Don’t Rush Cooling: Let the cake cool completely to avoid breaking or sliding layers when slicing and frosting.
How to Serve Christmas Tree Sheet Cake with White Chocolate Frosting Recipe
Garnishes
I love garnishing this cake with green sanding sugar because it mimics pine needles and adds a delightful crunch. Then a scattering of Christmas tree sprinkles, stars, and tiny edible pearls instantly transforms it into a winter wonderland on a plate. If you want, add some finely chopped toasted almonds or pistachios for a nutty twist that bumps up the texture.
Side Dishes
This cake pairs beautifully with simple holiday sides like hot cocoa, peppermint mocha, or a fresh cran-apple cider. For savory balance, a cheese platter with nuts, olives, and crackers nearby lets guests nibble lighter bites between slices.
Creative Ways to Present
To amp up the festive vibe, I’ve placed the cake on a cake board covered in tinsel ribbon and surrounded it with miniature faux pine cones and fairy lights. You can also carve the frosting into a scalloped pine tree shape for a fun touch, or pipe on little edible snowflakes with white royal icing for extra charm.
Make Ahead and Storage
Storing Leftovers
I always cover leftover cake tightly with plastic wrap and store it in the fridge. It keeps the whipped cream filling stable and preserves that fresh-baked texture for 3-4 days. Just be sure not to leave it uncovered, or the cake will dry out.
Freezing
If you want to freeze the cake, it’s best to freeze individual slices wrapped well in plastic and foil to avoid freezer burn. While the whipped cream doesn’t always freeze perfectly, the white chocolate buttercream holds up nicely.
Reheating
Since this is a cream-filled cake, I don’t recommend reheating it. Instead, just let refrigerated slices sit at room temperature for 15-20 minutes before serving to bring out the flavors and soften the frosting slightly.
FAQs
-
Can I make this Christmas Tree Sheet Cake with White Chocolate Frosting Recipe dairy-free?
Yes, you can substitute dairy alternatives such as coconut or almond milk-based sour cream and whipped toppings, as well as a dairy-free butter substitute. Just keep in mind that the texture and flavor may slightly differ from the original, but it’s still delicious.
-
How do I prevent my white chocolate buttercream from being grainy?
Make sure to melt the white chocolate slowly and avoid overheating it. Stir often and use room temperature butter to help the sugar dissolve fully during mixing. Also, beat the frosting thoroughly to get a smooth and silky texture.
-
Can I use homemade yellow cake instead of cake mix?
Absolutely! If you prefer homemade, just use your favorite yellow cake recipe that yields a tender crumb. The key is balancing moisture with acidity, so consider adding a bit of sour cream or buttermilk to mimic the mix’s effect.
-
What’s the best way to slice the cake evenly?
A cake leveler is your best friend here—it helps you get even horizontal layers perfect for stacking. If you don’t have one, a serrated knife used slowly and carefully can work just fine.
Final Thoughts
This Christmas Tree Sheet Cake with White Chocolate Frosting Recipe holds a special place on my holiday dessert table every year. It’s simple enough to make with kids or friends and always brings smiles and that cozy, festive feeling you want around Christmas time. If you try it out, I’m confident you’ll love slicing into that soft cake, the creamy whipped layer, and the dreamy white chocolate frosting as much as I do. So go ahead, bake this joyful cake and make your holidays a little sweeter!
Print
Christmas Tree Sheet Cake with White Chocolate Frosting Recipe
- Prep Time: 30 minutes
- Cook Time: 25 minutes
- Total Time: 1 hour 10 minutes
- Yield: 12 servings
- Category: Dessert
- Method: Baking
- Cuisine: American
Description
This Little Debbie Christmas Tree Sheet Cake is a festive holiday dessert featuring a classic yellow cake layered with whipped cream filling and frosted with a luxurious white chocolate buttercream. Decorated with red buttercream borders, green sanding sugar, and holiday sprinkles, it makes a perfect centerpiece for any Christmas celebration.
Ingredients
Classic Yellow Cake
- 3/4 cup buttermilk, room temperature
- 2/3 cup sour cream, room temperature
- 3 whole eggs, room temperature
- 1/3 cup vegetable oil
- 1 tablespoon vanilla extract
- 1 15.25 oz box Yellow Duncan Hines Cake Mix
Whipped Cream Filling
- 4 cups heavy whipping cream
- 1 teaspoon vanilla extract
- 1/2 teaspoon almond extract (optional)
- 2 cups powdered sugar
White Chocolate Buttercream
- 1/2 cup white chocolate chips
- 1/2 cup heavy cream
- 3 sticks (1 1/2 cups) unsalted butter, room temperature for 10-15 minutes
- Pinch of salt
- 1 tablespoon vanilla extract
- 8-9 cups powdered sugar
- 1/4 cup heavy cream (if needed to thin)
Red Buttercream Border & Decorating Elements
- 1/2 cup green sanding sugar
- 1 cup Wilton Christmas Tree Sprinkles or any other holiday sprinkles
- 2-3 drops red gel coloring
Instructions
- Preheat and Prepare Pan: Preheat the oven to 325 degrees Fahrenheit. Prepare a 9×13 inch cake pan by greasing it with cake goop, baking spray, or a mixture of shortening and flour, then set aside.
- Mix and Bake Cake: In a large bowl, whisk together buttermilk, sour cream, eggs, vegetable oil, and vanilla extract. Sift in the yellow cake mix and gently stir until just combined. Pour the batter into the prepared pan and bake for 25 minutes. Remove and let the cake cool completely.
- Slice Cake Layers: Place a sheet of parchment paper on the counter and invert the cooled cake onto it. Using a cake leveler or serrated knife, carefully slice the cake horizontally in half. Slide a thin cutting board under the top layer and carefully lift it off. Place the bottom layer back into the 9×13 pan.
- Prepare Whipped Cream Filling: Chill a metal bowl and whisk in the freezer for 5 minutes. Pour heavy whipping cream into the chilled bowl on a stand mixer. Whip on low speed for 1 minute, medium for 1 minute, then high for 1 minute until stiff peaks form. Add vanilla extract, almond extract (if using), and powdered sugar, then whip again until combined.
- Assemble Cake with Filling: Spread the whipped cream filling evenly over the bottom cake layer in the pan. Carefully place the top cake layer over the whipped cream filling.
- Make White Chocolate Buttercream: In a small bowl, microwave heavy cream and white chocolate chips for 30 seconds. Stir and heat for an additional 10 seconds if needed, until smooth. In a stand mixer with paddle attachment, whip butter until light and fluffy. Add salt, vanilla extract, and white chocolate mixture, then whip again. Gradually add powdered sugar, and add extra heavy cream if needed to reach desired consistency. Beat on high for about 2 minutes until light in color and texture, then beat down with a spoon to remove air bubbles.
- Frost the Cake: Using a flat cake scraper, frost the entire cake with the white chocolate buttercream, reserving 2 1/2 to 3 cups for decorating.
- Color and Pipe Red Buttercream: Add 2-3 drops of red gel coloring to the reserved buttercream. Using a small circle piping tip, pipe a red wavy pattern on the cake and Christmas tree decorations. Then, using a large star piping tip, pipe a shell border around the outside edge of the cake.
- Decorate with Sprinkles: Sprinkle green sanding sugar in the center of the cake and add the Christmas sprinkles around the edges. Your festive Christmas tree sheet cake is ready to enjoy!
Notes
- For best results, make sure all dairy ingredients are at room temperature before mixing.
- Almond extract in the whipped cream filling is optional but adds a lovely subtle flavor.
- If the buttercream is too thick, add heavy cream one tablespoon at a time until it reaches desired consistency.
- Use a serrated knife or cake leveler for clean, even cake layers.
- Chilling the mixing bowl and whisk helps achieve stiff peaks in the whipped cream.
- You can substitute Duncan Hines Cake Mix with any preferred yellow cake mix.
- Store the cake refrigerated and consume within 3 days for optimal freshness.
Nutrition
- Serving Size: 1 slice
- Calories: 450 kcal
- Sugar: 40 g
- Sodium: 150 mg
- Fat: 30 g
- Saturated Fat: 18 g
- Unsaturated Fat: 10 g
- Trans Fat: 0.5 g
- Carbohydrates: 40 g
- Fiber: 1 g
- Protein: 4 g
- Cholesterol: 95 mg


