
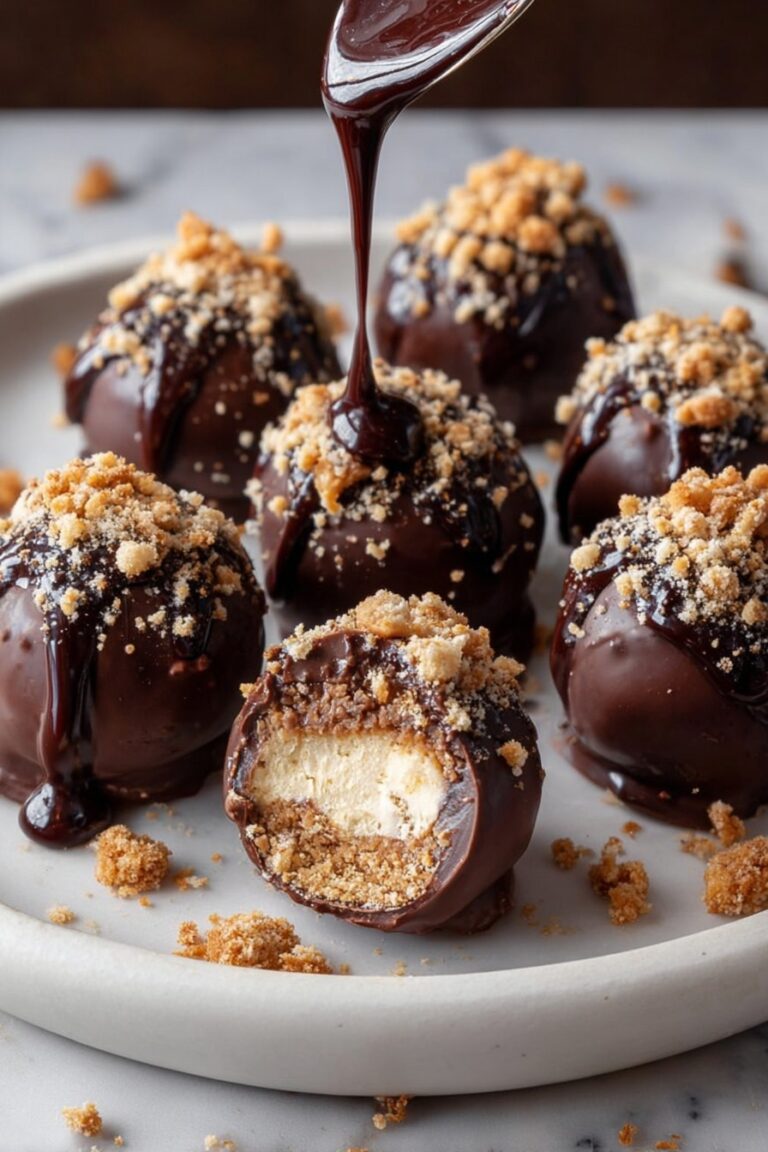
Christmas Chocolate Covered Oreos Recipe
If you’re looking for a fun and festive treat to wow your friends and family this holiday season, you’ve got to try my Christmas Chocolate Covered Oreos Recipe. They’re ridiculously easy to make, deliver that perfect chocolate crunch with a soft Oreo center, and on top of that, they look stunning with colorful Christmas sprinkles and swirls of red and green chocolate. Trust me, once you make these, you’ll find yourself reaching for just one more (or ten) as you sip your holiday hot cocoa. Ready to deck your dessert table out with these festive beauties? Let’s dive in!
Why This Recipe Works
- Simple Ingredients, Big Impact: With just Oreos, chocolate melts, and sprinkles, you get a dessert that looks impressive but is easy for anyone to make.
- Perfect Chocolate Coverage: Using melting wafers instead of chips ensures smooth, glossy chocolate coats that stick well to the cookies.
- Customizable Festive Flair: The option to double-dip in white chocolate and add colored drizzle makes these Oreos uniquely Christmas-ready.
- Great Make-Ahead Treat: These store well at room temp, fridge, or freezer, so you can prep early and enjoy stress-free holiday moments.

Ingredients & Why They Work
This Christmas Chocolate Covered Oreos Recipe keeps things simple with readily available ingredients that come together beautifully. I like to use mint Oreos around this time for that extra festive touch, but whether you pick classic or Double Stuf, it all works well. The key to the chocolate coating is using high-quality melting wafers — they make the dipping process a dream.
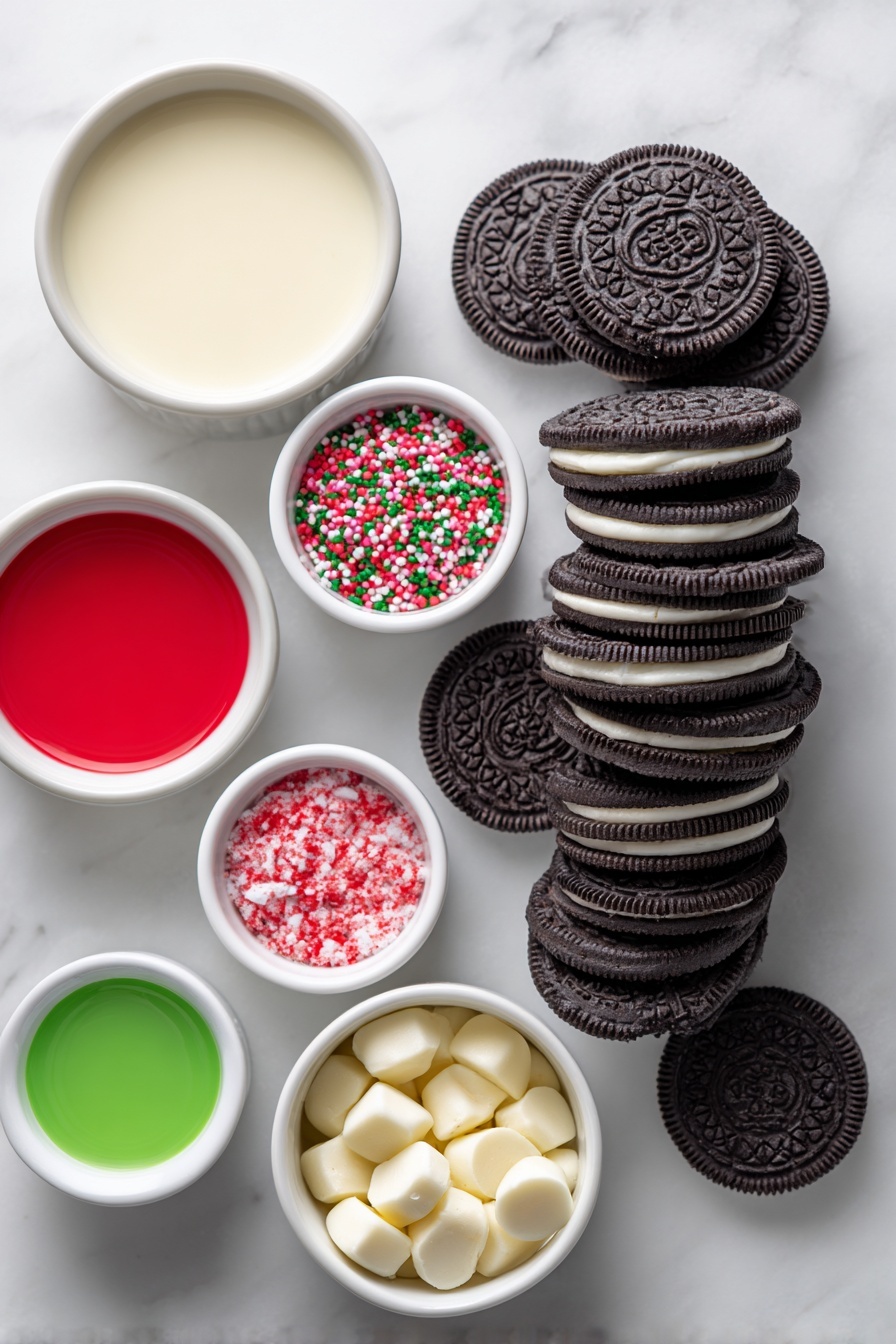
- Oreos: Choose your favorite variety—mint adds a festive zing, but classic or Double Stuf are delicious too.
- Ghirardelli Milk Chocolate Melts: These melts are silky smooth, melt evenly, and stay melted longer, making dipping a breeze.
- Ghirardelli White Chocolate Melts: Optional if you want to double-dip or decorate with colorful drizzle; quality melts prevent clumps or seizing.
- Assorted Christmas Sprinkles: Pick your favorites—stars, snowflakes, or nonpareils add that festive sparkle.
- Red & Green Food Coloring: Add to white chocolate melts for a fun way to brighten up your Oreos with Christmas colors.
Tweak to Your Taste
I love playing around with this recipe depending on who I’m making it for. Sometimes I add crushed candy canes on top for a peppermint crunch, other times I skip the double-dip and swirl just milk chocolate for a quicker version. You truly can make it your own, which is part of the fun!
- Variation: Try dipping the Oreos fully in white chocolate, then drizzling milk chocolate on top for a beautiful reversed look — my kids love that contrast.
- Dietary Mods: Use dairy-free melts for vegan-friendly treats, and pick gluten-free Oreos if needed.
- Texture Play: Add chopped nuts or crushed peppermint candies on wet chocolate for extra texture.
Step-by-Step: How I Make Christmas Chocolate Covered Oreos Recipe
Step 1: Melt That Chocolate Perfectly
I always melt the milk chocolate wafers in a microwave-safe bowl, heating in 30-second bursts and stirring gently in between until smooth and shiny. This slow method helps avoid burning or scorching. If I’m doing the double-dip, I melt the white chocolate melts separately the same way – this way both chocolates stay fluid longer, making the dipping easier.
Step 2: Give Your Oreos a Chocolate Coat
To coat your Oreos, I use a fork to dip each cookie into the melted milk chocolate, letting the excess drip off between the fork’s tines—that’s a game changer for avoiding drippy messes. Then, I gently lay each chocolate-covered Oreo on a wire rack lined with wax paper. If you’re double-dipping, wait for the milk chocolate to fully set before dipping just half of the cookie into the white chocolate. This waiting is key — if the first layer isn’t set, the double dip will smear.
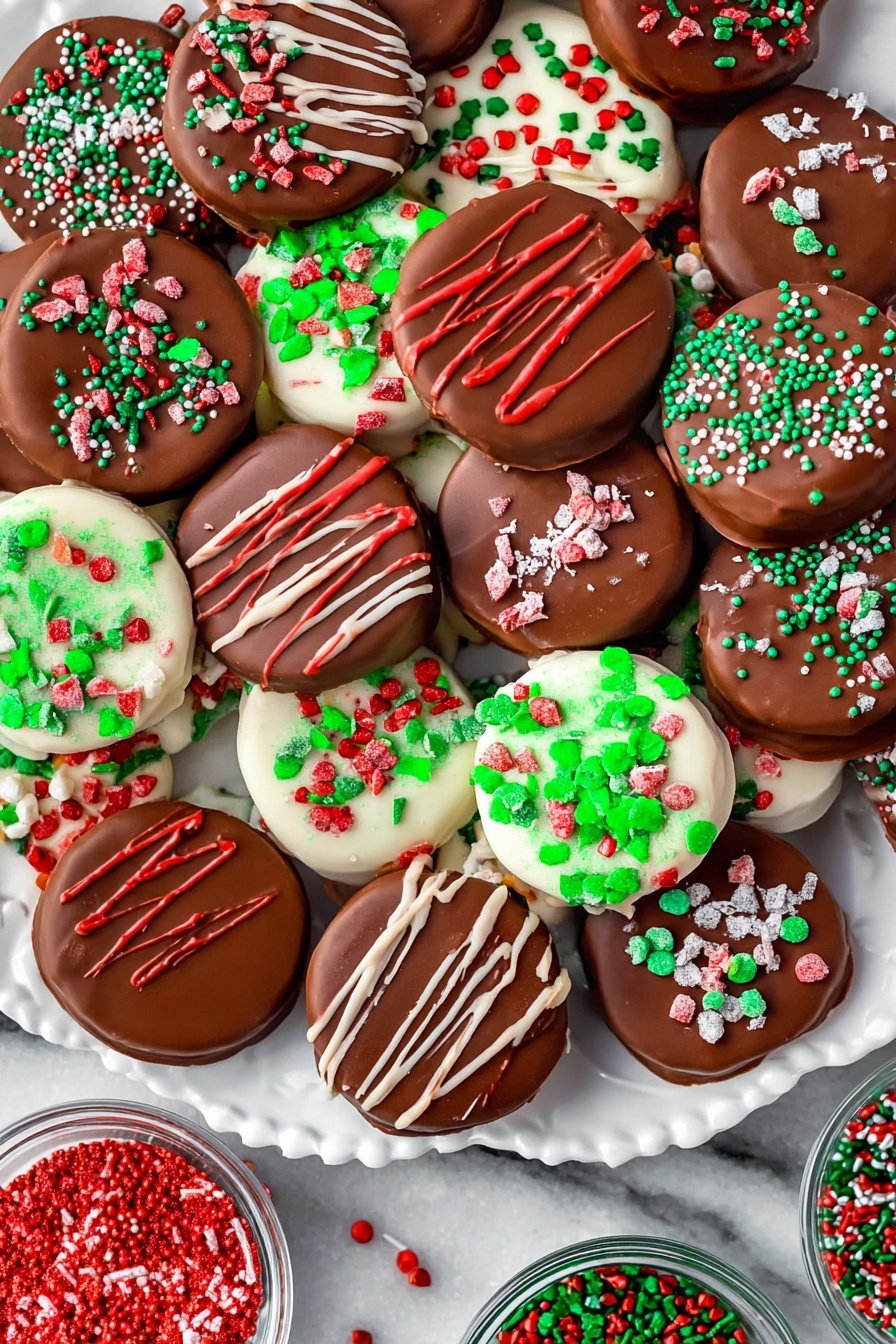
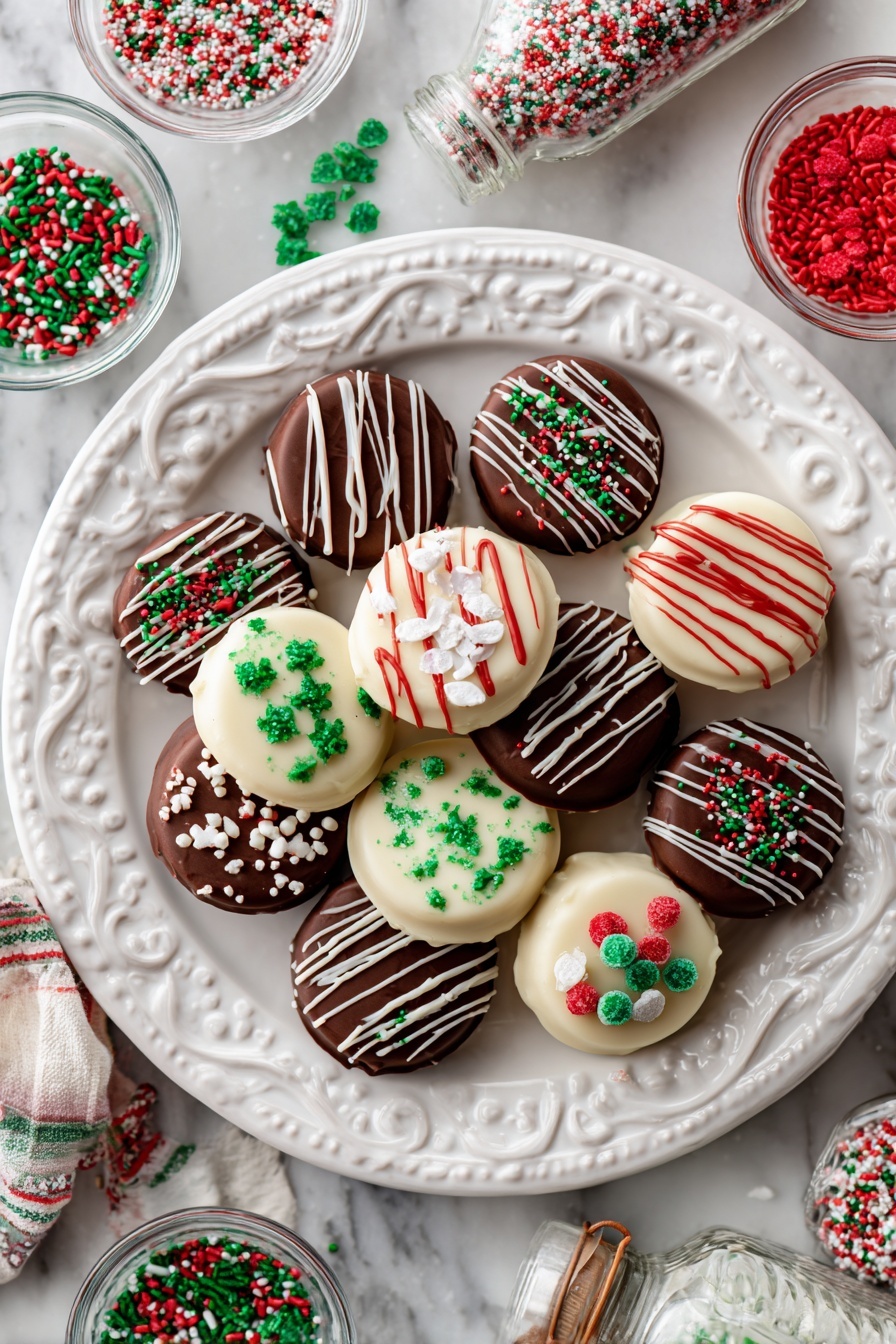
Step 3: Sprinkle and Decorate Like a Pro
Before the chocolate hardens, it’s time to get creative! I sprinkle on my favorite Christmas-themed sprinkles—anything from tiny stars to red and green jimmies. For some extra flair, I add red or green food coloring to white chocolate melts, pour those into small plastic bags, snip a tiny tip off, and drizzle festive lines over the Oreos. It’s surprisingly simple and looks so professional. My family always applauds the presentation.
Step 4: Let the Chocolate Set (Patience, Friend!)
I usually let the Oreos sit at room temperature for about an hour to set. Yes, you can speed this up in the fridge, but I noticed the chocolate loses its glossy shine that way, looking a bit dull. I prefer that beautiful sheen that comes from gentle, slow setting. Once firm, they’re ready to eat or package up for gifting.
Pro Tips for Making Christmas Chocolate Covered Oreos Recipe
- Use Quality Melting Wafers: I swear by Ghirardelli melts—they melt evenly and stay fluid longer, perfect for dunking.
- Don’t Rush Setting: Letting your chocolate dry naturally at room temp keeps it glossy and beautiful, perfect for gifting or dessert tables.
- Fork Dipping Trick: Using a fork to dip your Oreos helps the excess drip off and prevents messy chocolate clumps.
- Watch Double Dipping Timing: Always wait for the first coat of chocolate to fully set before the second dip to keep those clean design lines.
How to Serve Christmas Chocolate Covered Oreos Recipe
Garnishes
I’m all about those sparkly, festive touches! I usually top my Oreos with a mix of red and green sanding sugar and mini candy canes crushed just right for a little crunch. Sometimes I go for edible glitter for a magical shimmer that makes them party-ready at a glance.
Side Dishes
These chocolate-covered Oreos are perfect alongside a mug of rich eggnog or a warm cup of peppermint hot chocolate. I also love arranging them on a dessert platter with sugar cookies and gingerbread for a full holiday cookie spread.
Creative Ways to Present
For parties, I like to place the Oreos in clear glass jars tied with festive ribbons or stack them in decorative tins lined with parchment paper. Another fun idea is to create Oreo “trees” by skewering them on sticks and decorating like mini Christmas trees with sprinkles and drizzles.
Make Ahead and Storage
Storing Leftovers
I usually keep mine in an airtight container at room temperature for up to two weeks—they stay fresh and still taste incredible. Just make sure they’re stored out of direct sunlight and heat to prevent any melting or blooming on the chocolate.
Freezing
Freezing is a great option if you want to prepare way in advance. I carefully layer the Oreos in a freezer-safe container with parchment between layers to avoid sticking. They freeze beautifully for up to six months. When I thaw them, I let them sit at room temperature for about 30 minutes before serving, and they taste just as good as fresh!
Reheating
Since these are cold treats, reheating isn’t necessary or recommended. Just allow frozen Oreos to thaw naturally. If the chocolate looks dull after chilling or freezing, letting them come to room temperature helps restore some shine and softens the chocolate for that perfect bite.
FAQs
-
Can I use regular chocolate chips instead of melting wafers for this recipe?
While you technically can, I don’t recommend it. Melting wafers melt more smoothly and stay liquid longer, making dipping much easier. Regular chocolate chips, especially white chocolate chips, can seize up or become grainy. If you must use chips, temper them carefully and be prepared for a different texture and finish.
-
How do I prevent the chocolate from dulling when chilling the Oreos?
The best way is to let the chocolate set slowly at room temperature instead of in the fridge. Chilling can cause the chocolate to lose its shiny appearance. If you must chill, try to minimize the time in the fridge and serve soon after removing them.
-
What’s the best way to add the food coloring without ruining the chocolate texture?
Use oil-based or candy-specific food coloring since regular water-based colors can cause the chocolate to seize. Add a few drops slowly to the melted white chocolate melts, stirring gently until you reach your desired shade.
-
Can I double-dip all the Oreos in white and milk chocolate?
Absolutely! Feel free to dip fully in white chocolate then into milk chocolate, or vice versa. Just make sure to let the first coating fully firm up before the second dip so you keep clean, sharp layers.
-
How long can I store Christmas Chocolate Covered Oreos?
Stored airtight at room temperature, they stay fresh for about two weeks. In the fridge, they can last up to a month, and if frozen properly, up to six months.
Final Thoughts
This Christmas Chocolate Covered Oreos Recipe is seriously one of my go-to festive treats. It’s easy enough to make with the kids or whip up last minute for holiday parties, yet it looks like you spent hours crafting it. I love how versatile it is, too—you can keep it simple or dress it up with colors and sprinkles. Most importantly, it never fails to bring smiles and holiday cheer. So go ahead, grab those Oreos and melting wafers, and make your holiday season a little sweeter. You won’t regret it; I promise!
Print
Christmas Chocolate Covered Oreos Recipe
- Prep Time: 15 minutes
- Cook Time: 0 minutes
- Total Time: 1 hour 15 minutes
- Yield: 36 servings
- Category: Dessert
- Method: No-Cook
- Cuisine: American
Description
These Christmas Chocolate Covered Oreos are a festive and delightful treat perfect for holiday celebrations. Featuring crunchy Oreo cookies dipped in smooth Ghirardelli milk and optional white chocolate melts, they are decorated with colorful Christmas sprinkles and can be double-dipped for an extra special look. With easy microwave melting and simple dipping techniques, they make a fun and impressive homemade holiday gift or party snack.
Ingredients
Cookies
- 1 (15-ounce) package Oreos (mint, regular, or Double Stuf)
Chocolate Melts
- 1 (10-ounce) package Ghirardelli milk chocolate melts
- 1 (10-ounce) package Ghirardelli white chocolate melts (optional for double-dipped cookies)
Decorations
- Assorted Christmas sprinkles, as desired
- Red food coloring, optional and as desired
- Green food coloring, optional and as desired
Instructions
- Melt Milk Chocolate: Place the Ghirardelli milk chocolate melting wafers in a medium microwave-safe bowl and melt them according to the package directions, stirring occasionally until smooth.
- Optional Melt White Chocolate: If you want to double dip your cookies, melt the Ghirardelli white chocolate melting wafers in a separate medium microwave-safe bowl following the package instructions.
- Dip Oreos in Milk Chocolate: Set a wire rack over a piece of wax paper. Using a fork, dip each Oreo cookie into the melted milk chocolate, letting the excess chocolate drip off between the fork tines before placing it gently on the rack.
- Double Dip with White Chocolate: Once the milk chocolate coating has fully set on the Oreos, pick up each cookie and dip half into the melted white chocolate if desired. Return to the rack.
- Add Sprinkles: Before the chocolate sets, decorate the dipped cookies with assorted Christmas sprinkles for a festive touch.
- Color & Drizzle White Chocolate: Optionally, add red and/or green food coloring to the melted white chocolate till you reach your desired shade. Transfer the colored chocolate to small plastic bags, snip the corners, and pipe or drizzle over the cookies creatively.
- Let Set: Allow the chocolate on the cookies to set at room temperature for about 1 hour until completely firm. Avoid refrigerating for the best glossy finish, though chilling is possible if preferred.
- Store Properly: Once set, store the cookies airtight at room temperature for up to 2 weeks, refrigerated for 1 month, or frozen for up to 6 months. Note that refrigeration or freezing may dull the chocolate’s shine but not the flavor.
Notes
- Milk chocolate is recommended for dipping due to its smooth melting properties, but semi-sweet chocolate can be used if preferred.
- White chocolate chips are difficult to melt smoothly and prone to seizing, so use white chocolate melting wafers for best results.
- Chocolate candy melts like Ghirardelli Melting Wafers provide an even, smooth melt and maintain a good working time for dipping.
- You can fully dip cookies in white chocolate or combine any dipping methods creatively for a unique look.
- For the best finish, avoid refrigerating the cookies immediately after dipping as it can dull the chocolate’s gloss.
Nutrition
- Serving Size: 1 cookie
- Calories: 150 kcal
- Sugar: 15 g
- Sodium: 90 mg
- Fat: 8 g
- Saturated Fat: 5 g
- Unsaturated Fat: 2 g
- Trans Fat: 0 g
- Carbohydrates: 20 g
- Fiber: 1 g
- Protein: 1 g
- Cholesterol: 10 mg
