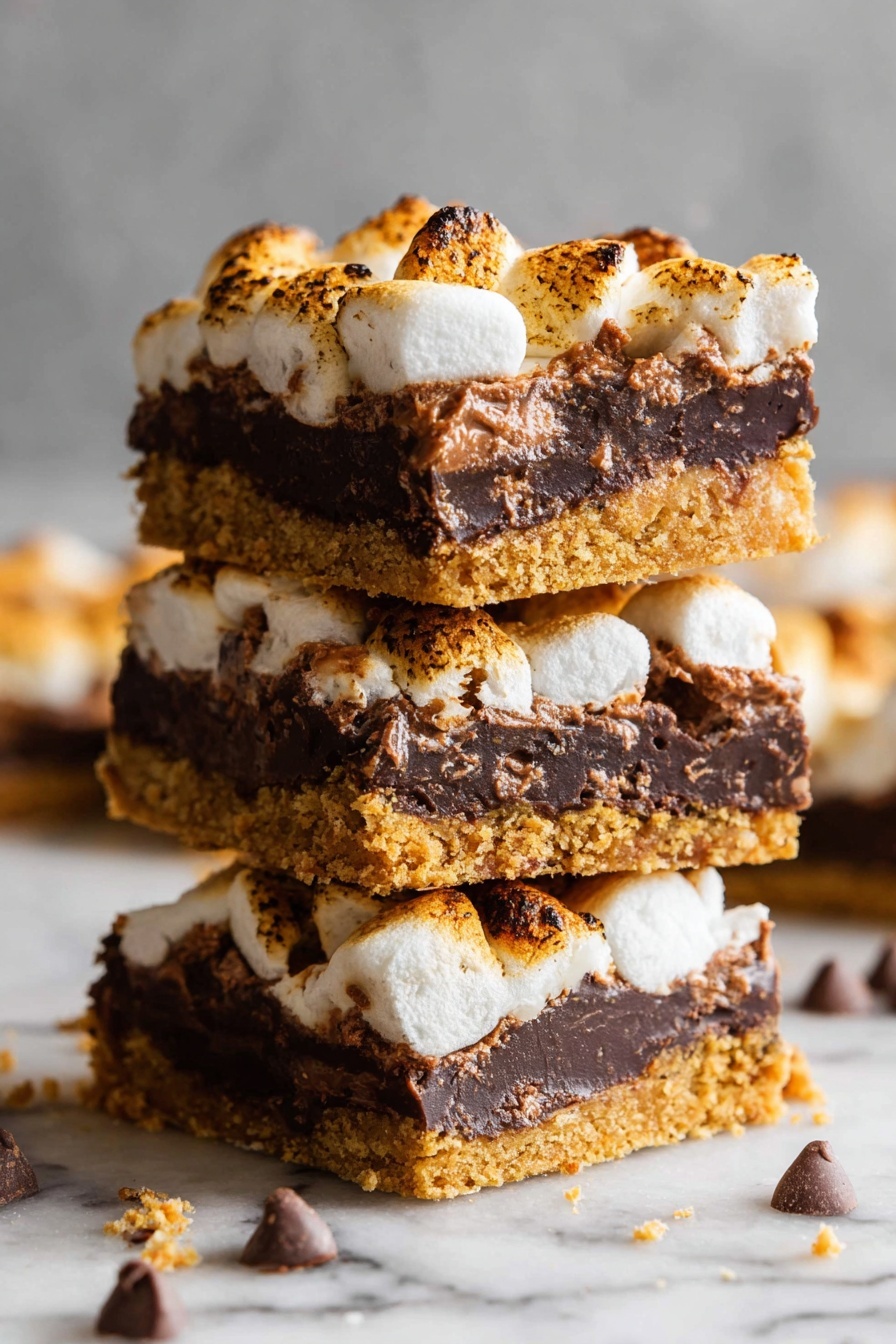
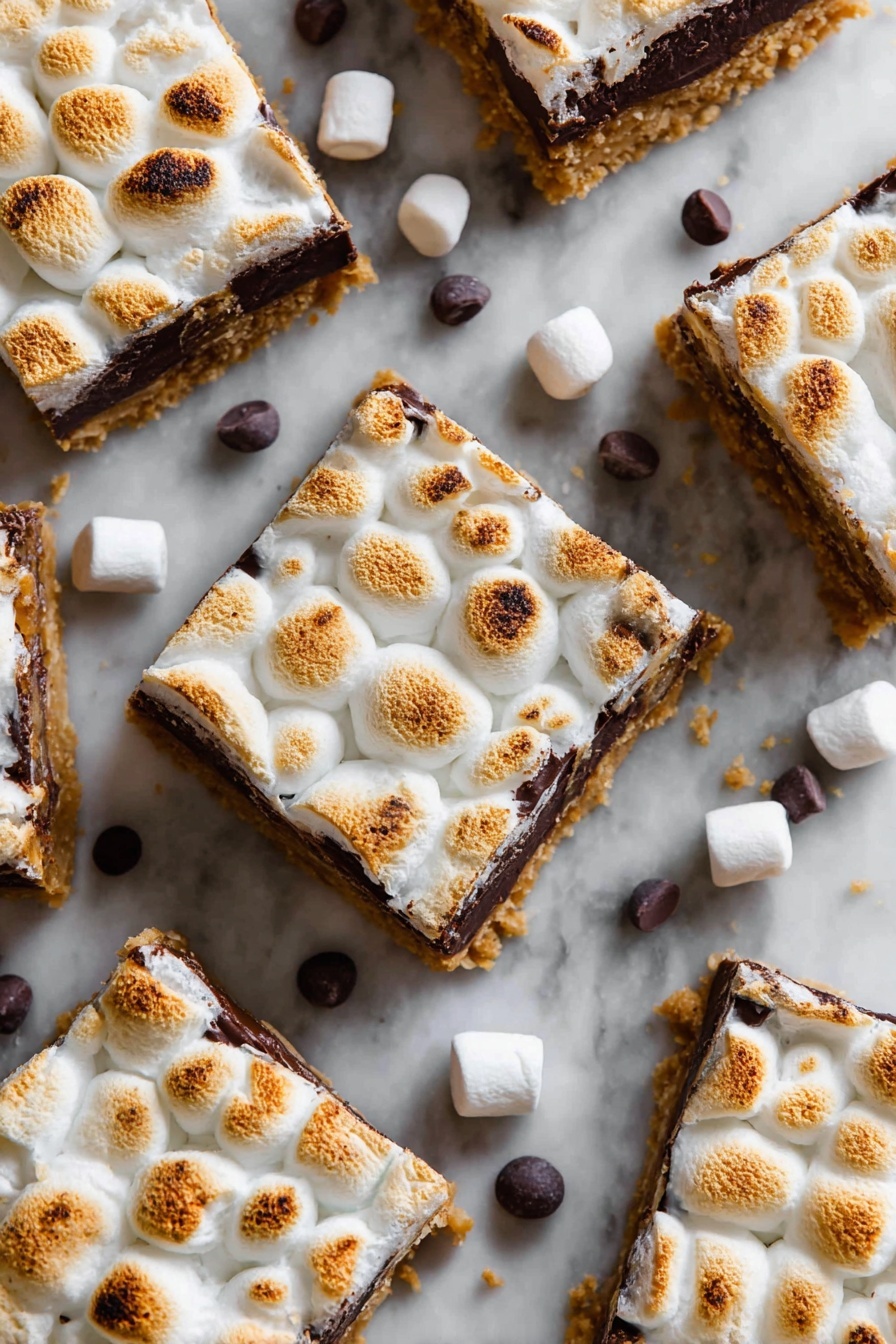
Chocolate S’mores Bars Recipe
If you’ve been dreaming about that perfect blend of chocolate, marshmallows, and graham crackers all melted into one irresistible treat, you’re going to love this Chocolate S’mores Bars Recipe. It’s like campfire s’mores without the fire — perfect for when you want that classic flavor indoors. Seriously, these bars are fan-freaking-tastic and super easy to pull off. Stick with me, and I’ll walk you through exactly how to make these gooey, chocolatey, marshmallowy delights that everyone will rave about.
Why This Recipe Works
- Simple Ingredients: You only need a handful of pantry staples that come together effortlessly.
- No Campfire Needed: Enjoy that nostalgic s’mores flavor without heading outdoors.
- Perfect Texture Balance: Crunchy graham cracker crust meets melty chocolate and toasted marshmallow topping.
- Kid-Friendly and Crowd-Pleasing: From family dinners to potlucks, this recipe is always a hit.

Ingredients & Why They Work
Each ingredient in this Chocolate S’mores Bars Recipe plays a special role in creating that gooey, crunchy, sweet bite we all crave. Plus, I’ll share little tips to get the best results when you’re shopping or prepping.

- Graham cracker crumbs: The crunchy base and the start of that classic s’mores flavor; I like to use finely crushed crumbs so the crust stays sturdy yet tender.
- Melted butter: This binds the crumbs and adds richness; make sure it’s melted but not scorching hot to avoid soggy crust.
- Chocolate chips: Semi-sweet chips work wonderfully here, but feel free to go all chocolatey with milk or dark depending on your mood.
- Mini marshmallows: Perfect for that golden toasted top – the small size ensures even melting and browning without burning.
Tweak to Your Taste
One of the best things about this Chocolate S’mores Bars Recipe is how easy it is to make it your own. I love switching up the chocolate or adding a little sea salt on top sometimes — it’s all about what makes your sweet tooth sing!
- Chocolate Type Swap: I once used white chocolate chips for a friend’s birthday — it was a creamy twist that got everyone curious and craving more.
- Add Nuts: Chopped toasted pecans or walnuts can add a nice crunch if you’re into a bit of texture contrast.
- Dietary Modifications: Use dairy-free chocolate chips and vegan butter to whip up a vegan-friendly version without sacrificing yum.
Step-by-Step: How I Make Chocolate S’mores Bars Recipe
Step 1: Prepare the Pan and Crust
First things first, preheat your oven to 350°F. Grease a 9×13 pan generously with cooking spray so nothing sticks. Then stir together your graham cracker crumbs and melted butter — I find that mixing it well ensures every crumb is coated without being soggy. Pour that mixture into the pan and press it firmly all over the bottom and slightly up the sides; you want a compact crust that holds together after baking.
Step 2: Bake the Crust
Bake your crust for about 8 minutes. This step is key because it helps set the base so it won’t crumble when you cut the bars later. When it comes out, it should smell toasty and feel firm — just like my grandma’s old cookie crust!
Step 3: Add Chocolate and Marshmallows
Once the crust is out of the oven, sprinkle chocolate chips evenly over the top — it’s so satisfying watching them soften and melt. Then pile the mini marshmallows on like a fluffy cloud. Don’t be shy; generous coverage means that perfect ooey-gooey finish everyone loves.
Step 4: Final Bake Till Golden
Pop the pan back in for about 20 minutes, or until the marshmallows are beautifully toasted and golden brown. Keep an eye on them toward the end — you want that signature s’mores toast but no charring. When it’s done, resist the urge to dive in right away and let it cool on the counter for a bit.
Step 5: Chill and Cut
Here’s a trick I’ve learned for clean slices: after the bars cool down a bit, transfer them to the fridge for at least an hour. The chilling firms up the bars so cutting squares is less messy. Then slice, serve, and prepare for all the compliments coming your way!
Pro Tips for Making Chocolate S’mores Bars Recipe
- Pressing the Crust Firmly: When you press the graham mixture firmly into the pan, it bakes into a sturdy crust that holds its shape well.
- Watch the Marshmallows Closely: Marshmallows can go from golden to burnt quickly, so keep an eye in those last few minutes.
- Cool Before Chilling: Let the bars cool at room temp first to avoid condensation that can make the marshmallows soggy when chilled.
- Cut with a Hot Knife: Wiping a warm knife blade between cuts helps you get clean edges every time.
How to Serve Chocolate S’mores Bars Recipe
Garnishes
I usually keep it simple and serve these bars as is, but sometimes I sprinkle a tiny pinch of flaky sea salt on top right after they come out of the oven — it really lifts the chocolate and adds a gourmet touch. You can also drizzle some caramel sauce or dust with powdered sugar if you want to look fancy without extra fuss.
Side Dishes
My go-to side when serving these bars is a big glass of cold milk or a scoop of vanilla ice cream for those extra indulgent moments. They also pair beautifully with fresh berries if you want a little fruity contrast.
Creative Ways to Present
For a fun party presentation, I sometimes cut these into bite-sized squares and skewer them with decorative toothpicks alongside marshmallows and strawberries — kind of like mini dessert kabobs. They’re a huge hit on lazy summer evenings or as after-dinner treats during cozy game nights.
Make Ahead and Storage
Storing Leftovers
After they’ve cooled and chilled, I store the leftover bars in an airtight container in the fridge. They stay fresh and gooey for up to 4 days — perfect for sneaking a sweet bite midweek without the hassle of baking again.
Freezing
I’ve frozen these bars successfully wrapped tightly in plastic wrap and foil. Just thaw overnight in the fridge and they’re almost as good as fresh. It’s a handy way to have s’mores on standby for surprise guests or a quick dessert fix.
Reheating
When I want to warm them up, I pop a single serving in the microwave for about 10-15 seconds—just enough to melt the chocolate a bit and revive that gooey marshmallow feel without turning them into a sticky mess.
FAQs
-
Can I use regular-sized marshmallows instead of mini ones?
Absolutely! Just keep in mind that regular marshmallows will take a little longer to toast and melt, so watch them closely to avoid burning. You might also want to halve or quarter larger marshmallows for more even coverage.
-
What type of chocolate works best for this Chocolate S’mores Bars Recipe?
Semi-sweet chocolate chips are my favorite because they balance sweetness without overpowering the marshmallows. But feel free to get creative with milk chocolate, dark chocolate, or even a mix — all delicious options.
-
Can I make these bars ahead of time?
Definitely! They taste fantastic when made the day before and stored in the fridge. Just make sure to chill them well before cutting to avoid crumbs and messy slices.
-
How do I prevent the marshmallows from burning?
My best advice is to keep a close eye during the last 5 minutes of baking. Marshmallows brown fast near the end, so turn off the oven as soon as they’re golden and pull them out immediately.
-
Is there a gluten-free option for this recipe?
Yes! Substitute regular graham crackers with gluten-free versions, which are widely available now. Make sure the chocolate chips and marshmallows you use are also gluten-free for the safest choice.
Final Thoughts
This Chocolate S’mores Bars Recipe holds a special place in my heart because it captures that campfire magic anytime you want it—no matches needed. I’ve made these countless times for family gatherings and casual nights, and each batch disappears fast. If you want a straightforward, crowd-pleasing dessert that tastes like nostalgia wrapped in chocolate and marshmallow, you can’t go wrong with this. Trust me, once you try it, these bars are going to be your new go-to sweet fix.