

Chocolate Peanut Butter Rice Krispy Cups Recipe
If you’ve ever craved a sweet and salty treat that’s as crunchy as it is creamy, you’re going to fall head over heels for this Chocolate Peanut Butter Rice Krispy Cups Recipe. These little delights are super simple to whip up, take just minutes, and they’re absolutely addictive. Trust me, once you try them, they’ll become your go-to snack for movie nights or whenever you need a quick sugar fix without the fuss.
Why This Recipe Works
- Simple Ingredients: Uses pantry staples like peanut butter, honey, Rice Krispies, and chocolate — nothing fancy, yet oh so delicious.
- Perfect Texture Combo: The crispy cereal blends beautifully with gooey peanut butter and silky melted chocolate for that perfect bite.
- No-Bake & Quick: Ready in about 10 minutes, no oven needed—a lifesaver when you want a sweet treat fast.
- Customizable: You can tweak the type of chocolate or peanut butter to suit your taste or dietary needs.

Ingredients & Why They Work
Each ingredient in this Chocolate Peanut Butter Rice Krispy Cups Recipe plays a unique role that turns a simple snack into something memorable. From creamy, comforting peanut butter to the crisp crunch of Rice Krispies, everything balances just right.

- Peanut Butter: Creamy works best for smooth mixing, but chunky adds extra texture if you like a bit of crunch.
- Honey: Acts as the natural sweetener and helps bind everything together without overpowering the peanut butter’s flavor.
- Salt: Just a pinch to enhance and balance the sweetness.
- Rice Krispies Cereal: The classic crispy base that provides that signature crunch.
- Chocolate Chips: Semi-sweet is my favorite for a nice contrast, but milk or dark chocolate work great too.
Tweak to Your Taste
I love how flexible this Chocolate Peanut Butter Rice Krispy Cups Recipe is. Sometimes I switch up the peanut butter for almond butter, or add a sprinkle of sea salt on top of the melted chocolate for an extra flavor punch. Feel free to make it your own!
- Nut-free variation: Swap peanut butter for sunflower seed butter to keep things allergy-friendly—I’ve done this for a friend and it worked like a charm!
- Add-ins: Fold in mini marshmallows or chopped nuts for different textures.
- Chocolate twist: Drizzle white chocolate over the top for a pretty contrast.
Step-by-Step: How I Make Chocolate Peanut Butter Rice Krispy Cups Recipe
Step 1: Prep Your Pan and Ingredients
Grab a muffin pan and line it with muffin liners or spray it lightly with cooking spray. This makes cleanup a breeze and helps with easy removal later. Having everything ready before you start melting is a game-changer — trust me, you don’t want to be scrambling once the peanut butter mixture is hot!
Step 2: Melt the Peanut Butter Mixture
In a small saucepan over medium heat, combine the peanut butter, honey, and a pinch of salt. Stir continuously until smooth and silky — this usually takes just a few minutes. Keep an eye on it; you want it warm enough to coat the cereal but not scorching hot. I’ve accidentally burned it before, and it ruins the texture.
Step 3: Mix with Rice Krispies
Pour your Rice Krispies cereal into a medium bowl, then pour the warm peanut butter mixture over the top. Use a spatula to gently fold and stir until every flake is coated. This step is fun—watch how the cereal absorbs that golden peanut butter goodness!
Step 4: Pack Into Muffin Cups
Spoon the peanut butter and cereal mixture into your muffin liners, filling each about two-thirds full. Then press down firmly—think of it like compacting snowballs; this helps the cups hold their shape once set. I usually use the back of a spoon or my fingers covered in a little cooking spray.
Step 5: Add the Chocolate Topping
Melt your chocolate chips in the microwave in short bursts, stirring in between to avoid burning. Once smooth, spoon a layer over each peanut butter cup. The chocolate sets up into a shiny, firm top that just seals in all that yumminess. Then pop the tray in the fridge to chill for at least 30 minutes until the chocolate firms up.
Pro Tips for Making Chocolate Peanut Butter Rice Krispy Cups Recipe
- Smooth Melting: Stir peanut butter and honey gently over medium heat—too hot burns the mixture and makes it gritty.
- Chocolate Choice: Semi-sweet chocolate chips balance the sweetness perfectly, but if you prefer a richer taste, dark chocolate is lovely, too.
- Press Firmly: Compacting the mixture well in muffin cups helps your treats hold shape without crumbling.
- Set Time: Don’t skip chilling! The fridge firming step is what gives you clean slices and that satisfying snap when you bite.
How to Serve Chocolate Peanut Butter Rice Krispy Cups Recipe

Garnishes
I like to sprinkle a few sea salt flakes or crushed peanuts on top of the melted chocolate before chilling — it adds a nice savory crunch that contrasts the sweetness beautifully. Sometimes, a tiny drizzle of melted white chocolate makes for a pretty finish, especially if I’m sharing these for a party.
Side Dishes
These cups are perfect on their own, but if you’re serving a little dessert platter, fresh strawberries or slices of crisp apples complement the flavors and add freshness. A cold glass of milk is always a classic pairing to cut through the richness.
Creative Ways to Present
For special occasions, I like to nestle each cup in colorful mini cupcake wrappers or place them on a pretty serving tray with edible flowers around the edges. Sometimes I’ll layer them in a jar, alternating with whipped cream for a fun peanut butter parfait twist—kids absolutely love that presentation!
Make Ahead and Storage
Storing Leftovers
I keep leftover cups in an airtight container in the fridge. They stay fresh and firm for up to a week, although I rarely have any left past the first two days! Just make sure they’re well-covered to prevent the chocolate from absorbing other fridge smells.
Freezing
These freeze wonderfully! I wrap each cup individually in plastic wrap, then pop them into a freezer-safe bag. When I want a quick treat, I pull one out and let it thaw at room temperature for about 15 minutes — the texture stays spot-on and the flavors don’t change.
Reheating
Since these are best enjoyed cold or at room temp, I don’t recommend reheating. If you want the chocolate soft, just let it sit on the counter for a few minutes. Warmth melts the chocolate beautifully without making the cups mushy.
FAQs
-
Can I use crunchy peanut butter instead of creamy?
Absolutely! Crunchy peanut butter will add some extra texture to your cups, making them delightfully nutty and a bit more rustic. I’ve made them both ways, and while creamy blends more smoothly, crunchy gives a fun contrast.
-
Do I have to use honey as the sweetener?
Nope! You can experiment with maple syrup or agave nectar as alternatives, depending on your preference or dietary needs. Just keep in mind that the honey also helps bind the mixture, so stick to similar liquid sweeteners for the best texture.
-
Is it necessary to chill the cups before eating?
Chilling helps the chocolate set firm and the cups to hold their shape, so I highly recommend it. If you skip this step, the cups might be softer and a bit messier to handle.
-
Can I use other cereals besides Rice Krispies?
Yes! Crisped rice cereals from other brands work just fine. Just make sure they’re light and crunchy to preserve that classic texture. Using puffed wheat or similar cereals will create a slightly different texture but can be a fun variation.
Final Thoughts
This Chocolate Peanut Butter Rice Krispy Cups Recipe holds a special place in my snack rotation because it manages to hit all the right notes—sweet, salty, crunchy, and creamy—without any complicated steps or ingredients. I can whip up a batch in no time and share them with friends or family who always rave about how good they are. I really hope you enjoy making and eating these as much as I do—they’re that kind of treat that’s easy to love and share. Give it a try, and let me know what twist you add to make them truly yours!
Print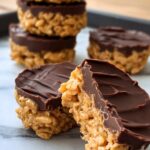
Chocolate Peanut Butter Rice Krispy Cups Recipe
- Prep Time: 10 minutes
- Cook Time: 0 minutes
- Total Time: 10 minutes
- Yield: 16 servings
- Category: Snack
- Method: No-Cook
- Cuisine: American
- Diet: Vegetarian
Description
Delicious and easy-to-make Chocolate Peanut Butter Rice Krispy Cups featuring a perfect blend of creamy peanut butter, honey, and crispy rice cereal topped with a smooth layer of melted semi-sweet chocolate. These no-bake treats are perfect for snacks or dessert and require minimal preparation.
Ingredients
Main Ingredients
- 1 cup peanut butter (creamy or chunky)
- 6 tablespoon honey
- 1 pinch salt
- 3 cups Rice Krispies cereal
- 2 cups chocolate chips (semi-sweet), melted
Instructions
- Prepare the Muffin Pan: Line a muffin pan with muffin liners or spray with cooking spray to prevent sticking.
- Melt Peanut Butter Mixture: In a small saucepan over medium heat, melt the peanut butter, honey, and a pinch of salt together until smooth and well combined.
- Combine with Cereal: Place the Rice Krispies cereal in a medium bowl and pour the melted peanut butter mixture over it. Stir thoroughly to fully coat all the cereal pieces.
- Fill Muffin Cups: Spoon the coated cereal mixture into each muffin cup, filling them about two-thirds full. Press firmly to pack the mixture down tightly in each cup.
- Melt Chocolate: In a microwave-safe bowl, melt the chocolate chips until smooth, stirring occasionally to avoid burning.
- Add Chocolate Topping: Spoon the melted chocolate over the top of each peanut butter cup, spreading it evenly to cover the surface.
- Chill to Set: Place the muffin tray in the refrigerator and let the cups chill until the chocolate is firm, about 30 minutes.
- Serve: Once the chocolate has set, remove the cups from the liners and serve. Enjoy your tasty homemade treats!
Notes
- Use creamy peanut butter for a smoother texture or chunky for added crunch.
- Honey acts as a natural sweetener and binder; you can substitute with maple syrup if preferred.
- Press the mixture firmly into the muffin cups to ensure they hold together well.
- You can use dark or milk chocolate chips instead of semi-sweet if desired.
- Store the cups in an airtight container in the refrigerator for up to one week.
- If you want a nut-free version, consider substituting peanut butter with sunflower seed butter.
Nutrition
- Serving Size: 1 cup
- Calories: 180 kcal
- Sugar: 12 g
- Sodium: 90 mg
- Fat: 9 g
- Saturated Fat: 3 g
- Unsaturated Fat: 5 g
- Trans Fat: 0 g
- Carbohydrates: 22 g
- Fiber: 2 g
- Protein: 5 g
- Cholesterol: 0 mg


