

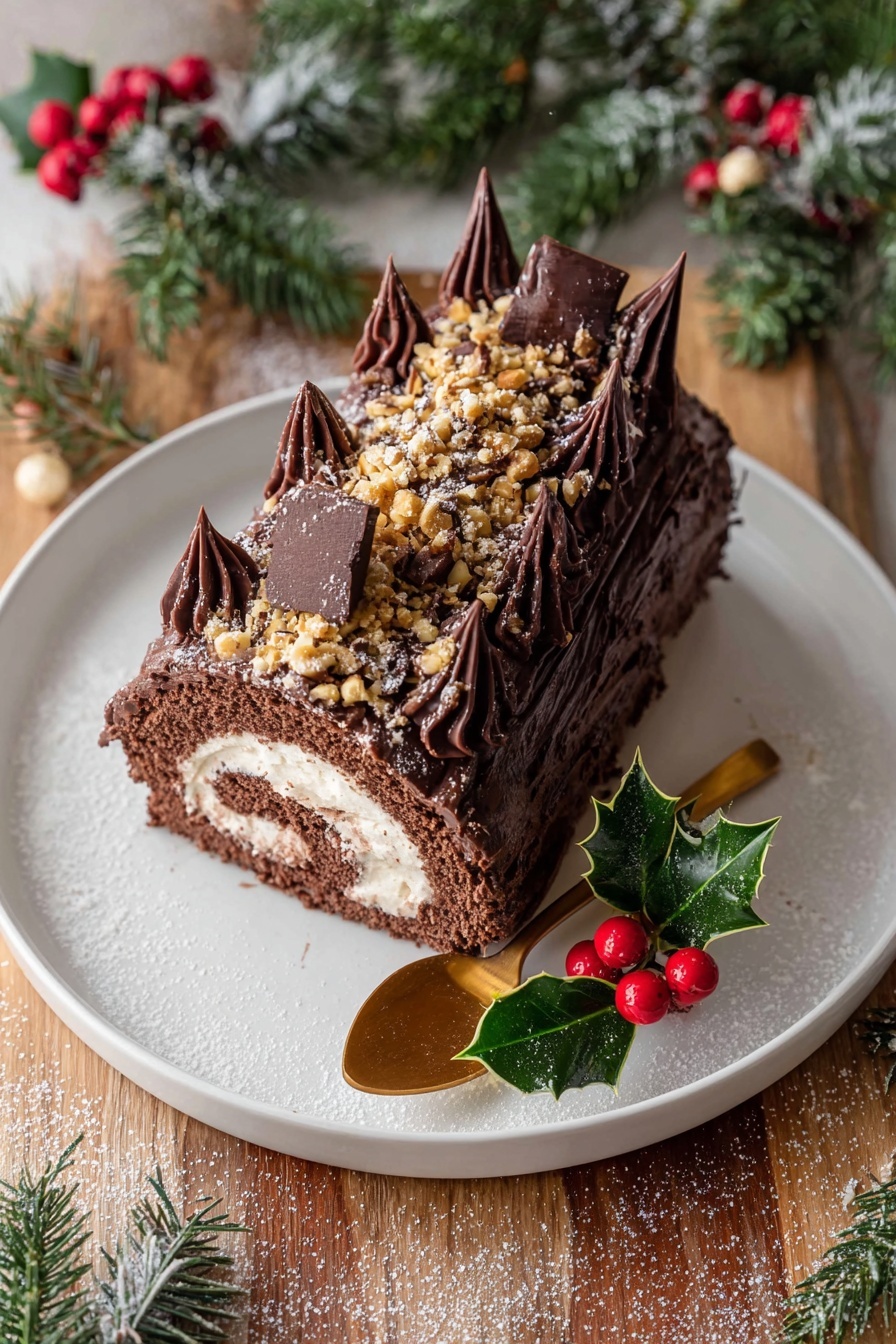
Chocolate Hazelnut Yule Log Recipe
If you’re on the hunt for an unforgettable holiday dessert, you’ve got to try this Chocolate Hazelnut Yule Log Recipe. Seriously, it’s the kind of treat that makes you pause, smile, and savor every bite. Light, fluffy chocolate sponge meets a luscious hazelnut cream filling, all wrapped up like a festive little log. Trust me, once you get a slice of this, your holiday season will feel just a bit sweeter—and dare I say, cooler—with this classic dessert on your table.
Why This Recipe Works
- Perfectly Light Sponge: The folding technique with whisked egg whites keeps the sponge airy, so it’s super soft and rolls without cracks.
- Rich Hazelnut Flavor: Mixing chocolate hazelnut spread inside the whipped cream adds nutty decadence that balances the cocoa’s bitterness.
- Textural Contrast: The crisp chocolate shards on top bring a satisfying crunch to each creamy slice.
- Visual Wow Factor: The bark-like decoration with shards and toasted hazelnuts makes it look like a festive work of art, but it’s surprisingly easy to assemble.

Ingredients & Why They Work
The magic of this Chocolate Hazelnut Yule Log Recipe lies in how a few simple, quality ingredients come together to create something extraordinary. Each element complements the others—from the fluffy sponge that acts as a perfect canvas to the decadent filling that steals the show.
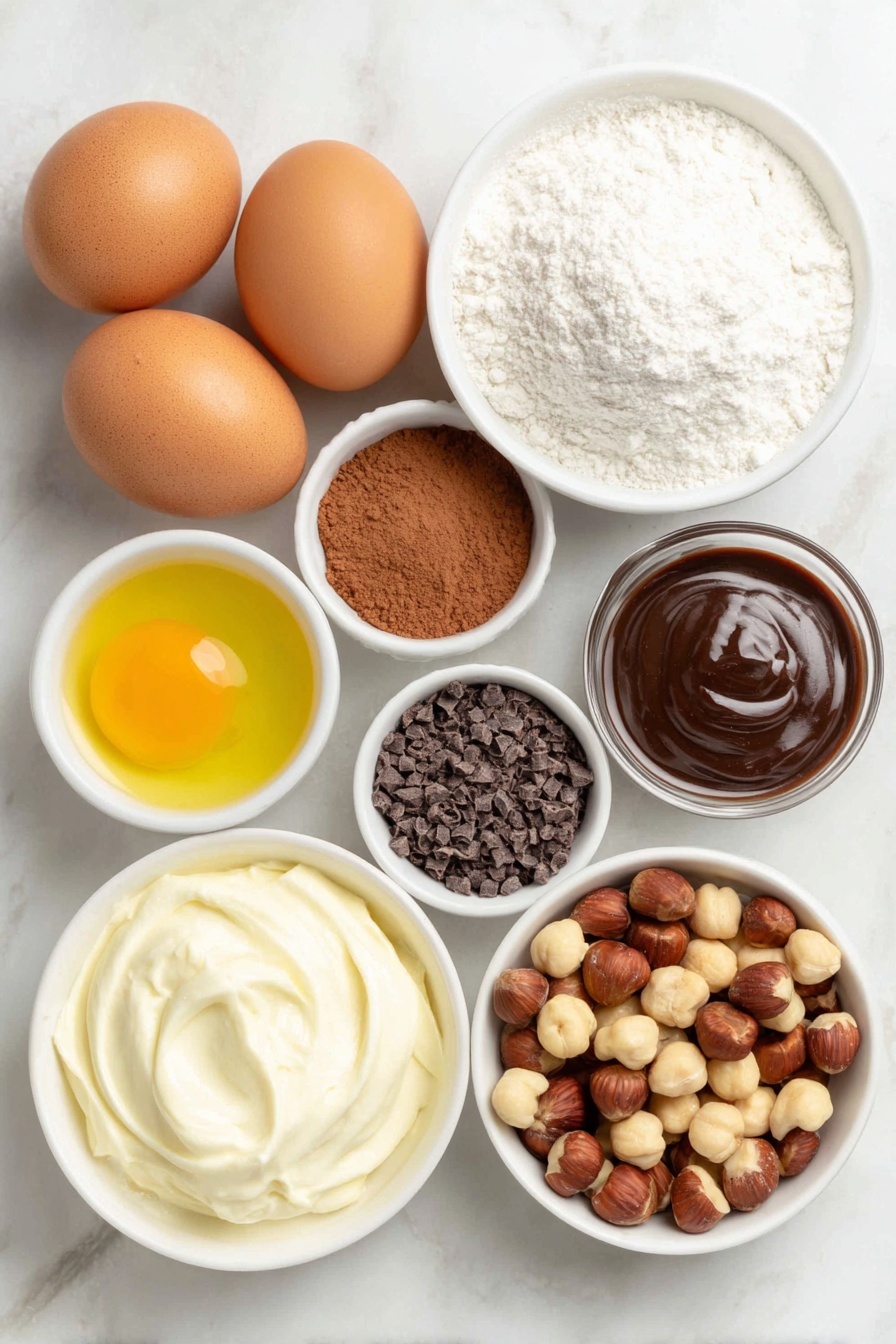
- Eggs: Fresh and at room temperature, they whisk up better, lending volume and structure to the sponge.
- Caster sugar: Its fine grain dissolves easily, ensuring a smooth, light batter without graininess.
- Vanilla extract: I prefer vanilla bean paste for an extra special depth of flavor, but either works beautifully.
- Plain flour & cocoa powder: Sift them together to avoid lumps and to keep the sponge tender and evenly chocolatey.
- Espresso powder: Just a hint intensifies the chocolate flavor without tasting like coffee at all.
- Baking powder & salt: They balance out the sweetness and help the sponge rise perfectly.
- Double cream: Cold and fresh for silky whipped cream that holds firm when whipped.
- Powdered icing sugar: This makes the cream smooth and sweet without any graininess.
- Chocolate hazelnut spread: The star ingredient for that unmistakable nutty, chocolaty flavor.
- Dark chocolate (70%): For melting into crisp shards that mimic natural bark texture on the outside.
- Whole hazelnuts: Toasted and chopped, they add crunch and charm as a finishing touch.
Tweak to Your Taste
I love how this Chocolate Hazelnut Yule Log Recipe lends itself to little tweaks depending on the mood or occasion. It’s like a canvas—you can go classic, jazz it up, or tone it down to fit your family’s tastes.
- Nut-Free Variation: If you’ve got nut allergies, swap the hazelnut spread for plain chocolate ganache, and toss in some crushed freeze-dried raspberries for a fresh twist I’ve tried before—it’s still decadent but allergy-friendly.
- Extra Boozy: Adding a splash of hazelnut liqueur or Amaretto into the whipped cream makes it festive and boozy—perfect for adults-only celebrations.
- Seasonal Twist: Mix in some orange zest to the whipped cream for a bright citrus note that complements the chocolate and hazelnuts beautifully.
- Vegan Option: I’ve experimented with coconut cream and a dairy-free chocolate spread for a dairy-free version that still impresses.
Step-by-Step: How I Make Chocolate Hazelnut Yule Log Recipe
Step 1: Prepping and Whisking the Sponge Batter
Start by preheating your oven to 180°C (350°F) and greasing your 25x38cm baking pan. Line it with parchment paper that hangs over the edges—it’ll be a lifesaver when it’s time to lift out the delicate cake. Whisk the egg whites until soft peaks form; when you lift the whisk, the peaks should gently bend. In a separate bowl, beat the egg yolks, sugar, and vanilla extract for about 5 minutes until light and creamy—this extra step really makes the sponge tender and airy. Meanwhile, sift your dry ingredients together to prevent lumps and ensure an even chocolatey flavor.
Step 2: Folding the Batter Gently
Here comes the crucial part—folding. First, fold half of the dry ingredients into the egg yolk mixture, then carefully add half of the egg whites. Use a rubber spatula and fold gently to keep all the air you whisked intact. Then fold in the remaining dry mix and egg whites the same way. Just a few streaks of flour are perfectly fine; overmixing can deflate the batter and lead to a dense cake. Pour the batter into your pan, wiggle it to spread evenly, and smooth the top with an offset spatula.
Step 3: Baking and Rolling While Warm
Bake for 10-12 minutes until a toothpick comes out clean and the sponge springs back lightly when touched. Don’t let it overbake—it’s the trick to avoiding cracks when rolling. While it cools, lay out a tea towel sprinkled generously with cocoa powder; this coating stops the sponge from sticking when you roll it. Once the sponge is warm (not steaming hot), invert it onto the towel, peel off the parchment, and roll it up in the towel starting from the short end. I promise the first roll feels a little scary but it’s by far easier done warm.
Step 4: Whipping the Cream and Mixing Hazelnut
While the sponge cools fully in its roll, whip your double cream until soft peaks form, then add the powdered sugar and vanilla. Keep whipping until firm peaks stand tall—this part matters so the filling isn’t runny or messes the roll up. Set aside half the cream plain for filling, then fold cocoa powder gently into the rest to coat the outside beautifully. I like to chill both creams so they’re nice and firm when spreading.
Step 5: Filling, Re-Rolling, and Chilling
If your chocolate hazelnut spread chills in the fridge and is stiff, a quick zap in the microwave (just 10 seconds) softens it perfectly for spreading. Unroll your sponge and smooth the hazelnut spread evenly over the surface. Dollop the plain whipped cream on top and spread it out carefully without squeezing the filling out the sides. Gently re-roll the log, wrap it tightly in plastic wrap and baking paper, and chill it for at least two hours—or longer if you can wait. This step lets the filling set and the roll keep its shape.
Step 6: Making Chocolate Bark and Decorating
While your log chills, melt chopped dark chocolate in a double boiler until silky smooth. Spread it thinly over parchment paper, cover it with another sheet, and roll up like a little chocolate tube. Pop it in the fridge to harden. When it’s set, unroll carefully—the chocolate should crack into perfect bark shards. Peel off the top parchment, then decorate the log by smearing chocolate whipped cream all over and pressing chocolate shards into the sides and top, leaving the ends bare for that rustic look. Sprinkle toasted hazelnuts over everything, dust with icing sugar, and add a sprig of holly for holiday charm.
Pro Tips for Making Chocolate Hazelnut Yule Log Recipe
- Room Temperature Eggs: They whisk better, helping the sponge rise and giving you that airy texture I love.
- Fold Gently: Taking your time to fold preserves air and keeps your sponge delicate and crack-free.
- Use a Tea Towel for Rolling: Rolling the sponge immediately while warm in a cocoa-dusted towel prevents sticking and cracking.
- Firm Whipped Cream: Under-whipped cream is a messy disaster—whip firmly so it holds its shape around the roll and keeps your filling neat.
How to Serve Chocolate Hazelnut Yule Log Recipe
Garnishes
I usually stick with toasted hazelnuts scattered over the chocolate bark—they add a beautiful crunch and nutty aroma that echoes the filling inside. A delicate dust of powdered sugar looks like fresh snow, and if you can find edible gold leaf, a few flakes give a festive sparkle. For that final flourish, a sprig of fresh holly or rosemary instantly transforms the log into holiday decor.
Side Dishes
This yule log pairs wonderfully with a simple bowl of fresh berries or a dollop of lightly sweetened mascarpone cream on the side. For something cozy, I love serving it with a warm cup of hot cocoa or espresso to cut through the richness and refresh your palate.
Creative Ways to Present
For a holiday party, I’ve presented the yule log on a wooden board surrounded by pinecones, cinnamon sticks, and cranberries for a rustic festive vibe. Another times, I’ve sliced it into rounds and stacked them in a pyramid shape on a cake stand, creating a playful, modern twist on the classic presentation that always gets “oohs” and “aahs.”
Make Ahead and Storage
Storing Leftovers
I like to keep leftover yule log tightly wrapped in plastic wrap or an airtight container in the fridge. It keeps beautifully for up to 5 days, and the flavors actually deepen a bit after a day, so it’s a win-win for make-ahead dessert plans.
Freezing
If you’re prepping in advance, you can freeze the unfilled rolled sponge by wrapping it in plastic wrap and foil. Thaw in the fridge overnight and bring to room temperature before filling and decorating. I’ve done this multiple times for holiday gatherings, and it saves loads of stress on the big day.
Reheating
This dessert is best served chilled, so I don’t recommend reheating. However, if you want the chocolate shards to soften a bit, let the slices sit at room temperature for 15–20 minutes before serving. This gives you that melt-in-your-mouth experience without losing the creamy texture.
FAQs
-
Can I make the Chocolate Hazelnut Yule Log Recipe ahead of time?
Absolutely! The sponge can be baked and frozen before filling, and the assembled log keeps well refrigerated for up to 5 days. I recommend assembling and decorating no more than a day before you plan to serve it, so it stays fresh and pretty.
-
How do I avoid cracking when rolling the sponge?
The key is to roll the sponge while it’s still slightly warm and flexible, using a cocoa-dusted tea towel to prevent sticking. Letting it cool in the rolled position helps maintain that shape, so it’s ready for filling later.
-
What can I substitute for chocolate hazelnut spread?
If hazelnut spread isn’t your thing or you have allergies, you can use ganache or regular chocolate buttercream. Adding a bit of finely chopped toasted hazelnuts inside the cream helps keep the nutty flavor alive.
-
Can I use canned whipped cream instead of homemade?
Freshly whipped cream holds up much better for this recipe, especially since it needs to hold its shape on and inside the roll. Canned whipped cream tends to be too soft and watery, so I don’t recommend it.
-
What if I don’t have espresso powder for the sponge?
You can leave it out if needed—the espresso powder simply helps intensify the chocolate flavor without adding coffee taste. Your sponge will still taste delicious!
Final Thoughts
This Chocolate Hazelnut Yule Log Recipe is one of my favorite holiday projects because it feels fancy without being intimidating. Every time I slice into its layers, I remember cozy afternoons baking with family and how the rich yet light flavors bring everyone around the table. Give it a go and make it your own—it’s a dessert that feels like a warm hug, perfect for sharing (or not!). Trust me, your friends and family will be asking you for this recipe every year after the first slice.
Print
Chocolate Hazelnut Yule Log Recipe
- Prep Time: 20 minutes
- Cook Time: 12 minutes
- Total Time: 3 hours 30 minutes
- Yield: 12 slices
- Category: Dessert
- Method: Baking
- Cuisine: French
- Diet: Vegetarian
Description
This classic Chocolate Hazelnut Bûche de Noël recipe features a light and airy chocolate sponge rolled with luscious chocolate hazelnut spread and sweetened whipped cream, decorated with chocolate shards and toasted hazelnuts for an elegant Yule log dessert perfect for festive celebrations.
Ingredients
Chocolate Sponge
- 4 large eggs, room temperature
- 100 g caster sugar (super-fine)
- 1 teaspoon vanilla extract
- 65 g plain flour (all-purpose)
- 35 g cocoa powder, plus extra for dusting
- 1 teaspoon espresso powder
- 1 teaspoon baking powder
- ¼ teaspoon fine salt
Sweetened Whipped Cream
- 480 ml double cream (heavy cream), cold
- 45 g powdered icing sugar (confectioners’ sugar)
- 1 teaspoon vanilla bean paste (or extract)
- 10 g cocoa powder
- 210 g chocolate hazelnut spread
Chocolate Shards
- 100 g dark chocolate 70%, finely chopped
To Serve
- 35 g whole hazelnuts, toasted, optional
Instructions
- Prepare Chocolate Sponge: Preheat your oven to 180°C (350°F). Grease a 25x38cm (10×15-inch) baking pan and line with parchment paper that overhangs the sides. Grease parchment to help peel later.
- Whisk Egg Whites: Using electric beaters, whisk egg whites on medium to high speed until soft peaks form.
- Whip Egg Yolks and Sugar: In a separate bowl, whip egg yolks, caster sugar, and vanilla extract on medium-high for 5 minutes until light and creamy and the batter leaves trails on the surface.
- Sift Dry Ingredients: Sift flour, cocoa powder, espresso powder, baking powder, and salt into a bowl and whisk to combine.
- Fold Ingredients: Add half of the dry mixture to the egg yolk mixture, then half the egg whites. Fold gently until just incorporated. Repeat with the remaining dry mixture and egg whites, folding lightly to keep the batter airy.
- Bake Sponge: Pour batter into prepared pan, smooth with an offset spatula and bake for 12 minutes until a toothpick comes out clean and the sponge springs back when pressed lightly.
- Cool Sponge: Remove from oven and cool on a wire rack for 10 minutes until warm but not hot.
- Invert and Roll Sponge: Dust a tea towel with cocoa powder. Invert sponge onto the towel, peel off parchment, then roll sponge gently but firmly from short end into the tea towel. Set seam side down to cool completely.
- Make Sweetened Whipped Cream: Whisk double cream until soft peaks form. Add powdered icing sugar, vanilla bean paste, and whisk until firm peaks. Remove half the cream for filling. Sift cocoa powder into remaining cream and fold gently for the chocolate outer layer. Refrigerate both creams.
- Fill and Roll Cake: Microwave hazelnut spread for 10 seconds if solid. Unroll cooled sponge and spread evenly with hazelnut spread. Dollop half of the firm whipped cream on top and spread evenly. Re-roll sponge carefully and wrap in baking paper and plastic wrap. Refrigerate for minimum 2 hours to set.
- Prepare Chocolate Shards: Melt finely chopped dark chocolate over simmering water, stirring until smooth. Spread thinly over parchment paper similar in size to cake roll. Cover with another parchment sheet and roll tightly into a tube. Refrigerate until solid.
- Create Chocolate Bark Shards: Once cooled, unroll parchment to reveal cracked chocolate shards. Remove top paper and break shards into desired size for decorating.
- Decorate Cake: Unwrap chilled cake roll and spread chocolate whipped cream evenly all over the surface. Press chocolate shards onto the cream covering the top and sides. Sprinkle toasted hazelnuts into cracks and around base. Dust with icing sugar and add a holly sprig for finishing. Refrigerate until serving.
Notes
- Use digital scales for accuracy in weighing flour and cocoa powder.
- Do not overbake sponge to prevent cracking.
- Allow sponge to cool for 10 minutes before rolling to avoid sticking and steam buildup.
- Whip cream to firm peaks to ensure it holds shape during rolling.
- Chill the roll before applying chocolate shards to help the cream set properly.
- The cake can be stored airtight in the refrigerator for up to 5 days.
- Unfilled rolled sponge can be frozen wrapped for up to 2 months; thaw overnight in fridge before filling.
- Step-by-step photos are recommended for guidance through assembly.
Nutrition
- Serving Size: 1 slice
- Calories: 420 kcal
- Sugar: 30 g
- Sodium: 150 mg
- Fat: 28 g
- Saturated Fat: 12 g
- Unsaturated Fat: 14 g
- Trans Fat: 0 g
- Carbohydrates: 35 g
- Fiber: 4 g
- Protein: 6 g
- Cholesterol: 110 mg


