
Black Cat Cookies Recipe
If you’re looking for a fun, spooky twist on your cookie baking this year (or anytime you want to bring a little Halloween cheer), you absolutely have to try my Black Cat Cookies Recipe. These cookies aren’t just delicious—they’re adorably crafted to look like black cats with striking eyes and cute little details that make every bite feel like a treat, both in taste and in appearance. Trust me, once you try these, you’ll want to bake them again and again, whether for parties, gifts, or just a cozy night in.
Why This Recipe Works
- Simple Base with Big Flavor: Using Devil’s Food cake mix keeps the cookie base rich and chocolaty without complicated prep.
- Easy Yet Impressive Decoration: The frosting and candy details turn a plain cookie into an adorable black cat with minimal effort.
- Customizable for Your Taste: You can deepen the cookie color and adjust frosting consistency for perfect results every time.
- Kid-Friendly and Fun: Decorating these with the kiddos is a blast and encourages creativity in the kitchen.

Ingredients & Why They Work
The ingredients here strike a perfect balance between convenience and quality, making it easy for you to whip up these charming black cat cookies without fuss. Plus, a few special touches like black cocoa powder for frosting and edible markers really elevate the look.
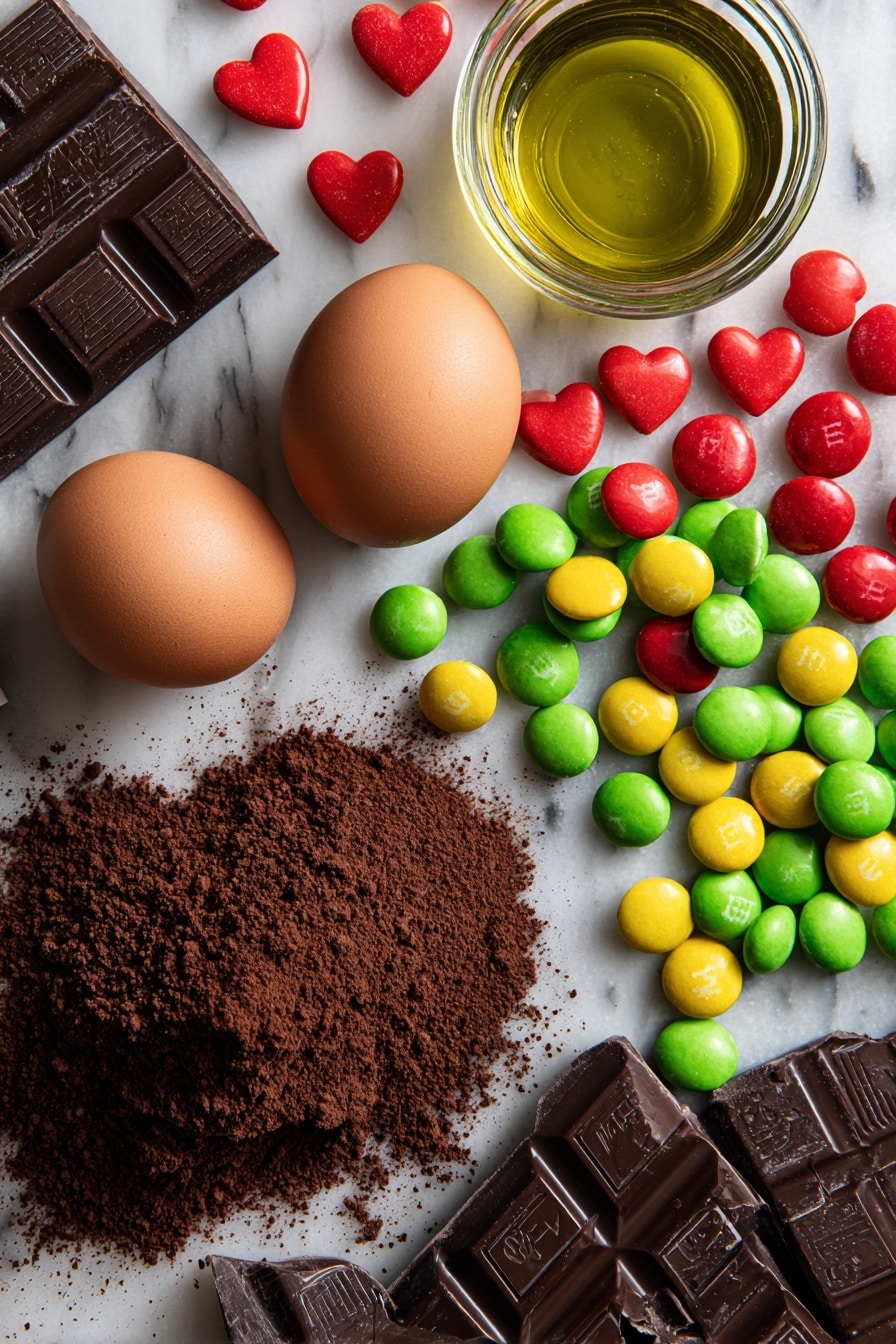
- Devil’s Food cake mix: Acts as your chocolatey cookie base—rich and flavorful with less work than making dough from scratch.
- Eggs: Bind the dough together while adding moisture for tender cookies.
- Canola or vegetable oil: Adds richness and keeps cookies soft; reduce amount slightly if using a smaller cake mix box.
- Black food coloring (optional): Helps deepen the cookie’s color for that classic black cat look—perfect if your cake mix isn’t dark enough.
- Unsalted butter: Creates a creamy base for the frosting without overpowering sweetness.
- Powdered sugar: Sweetens the frosting and makes it smooth and spreadable.
- Black cocoa powder: The secret ingredient for rich black frosting with intense chocolate flavor and color.
- Vanilla extract: Adds warmth and depth to the frosting’s profile.
- Salt: Balances sweetness and enhances all the flavors.
- Milk: Adjusts frosting consistency to the perfect spreadable texture.
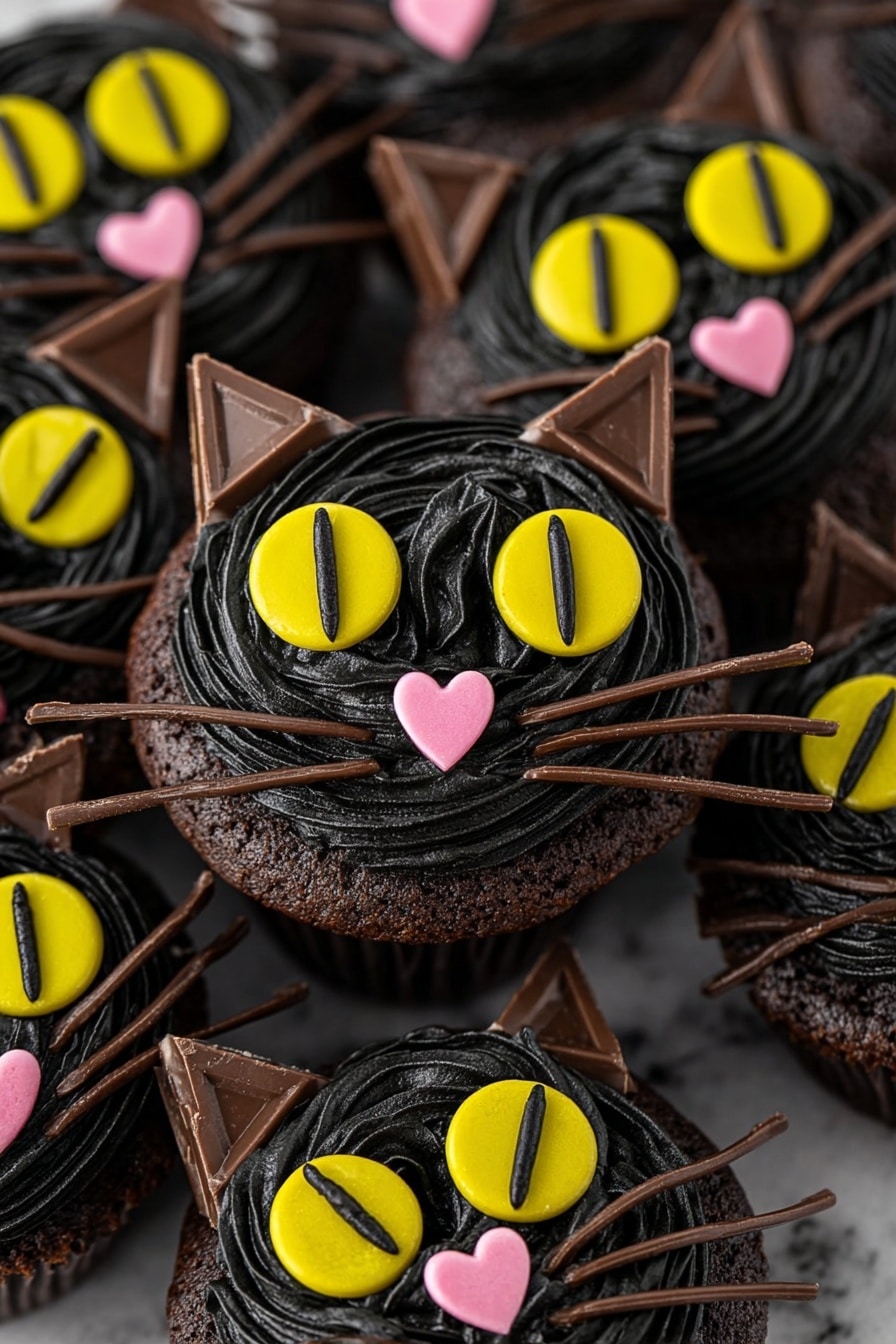
- Green or yellow M&Ms: Turn these into cute cat eyes—just customize with edible markers.
- Black edible marker: For drawing the pupils on M&Ms to give your cats that lifelike stare.
- Heart-shaped sprinkles: Create adorable noses in a pinch—turning these upside down is a charming touch!
- Black licorice: Cut into small pieces to make whiskers that add texture and personality.
- Hershey chocolate bars: Cut into triangles to make those signature pointy black cat ears.
Tweak to Your Taste
I love how versatile this Black Cat Cookies Recipe is—you can make the cookies as dark or colorful as you want with food coloring, swap candies, or even tweak frosting sweetness. I’ve tried a few variations, and there’s plenty of room to experiment and personalize.
- Chocolate lovers’ upgrade: I added a handful of mini chocolate chips into the dough once and it gave the cookies extra melty pockets of gooey chocolate—highly recommend if you’re craving richness.
- Dairy-free modification: Substitute the butter with coconut oil and use a plant-based milk for the frosting; it still comes out creamy with a slight coconut twist.
- Seasonal colors: Swap the green or yellow M&Ms for orange or purple ones around Halloween or any time you want a festive touch.
- Adjusting sweetness: If you prefer your frosting less sweet, cut back on powdered sugar slightly—you can always add more milk for consistency.
Step-by-Step: How I Make Black Cat Cookies Recipe
Step 1: Mix up the Cookie Dough
Start by preheating your oven to 350°F and lining two large baking sheets with parchment paper. Then, in a large bowl, combine the Devil’s Food cake mix, eggs, and oil. I usually add the eggs one at a time and mix well so the dough comes together smoothly. If you want that pitch-black look, this is the time to stir in a few drops of black food coloring. Your dough should have a soft, slightly thick consistency, but don’t overmix or it could get tough.
Step 2: Shape and Bake
Scoop 1 1/2 tablespoon-sized balls of dough and place them about 2 inches apart on your prepared sheets. Don’t flatten them – the cookies will spread just right on their own. Pop them into your oven for 8 to 10 minutes. The edges will be set when they’re done but the centers might still look soft — that’s perfectly fine because they firm up as they cool. Let them sit on the baking sheet for 5 minutes before moving them to a wire rack for complete cooling.
Step 3: Make the Black Cocoa Frosting
While your cookies cool, whip up the frosting. Beat the softened butter until creamy – this takes about 2 minutes with a hand mixer. Gradually add powdered sugar, black cocoa powder, vanilla extract, and a pinch of salt. Pour in 1 tablespoon of milk and continue beating. The goal is smooth, spreadable frosting, so add more milk a little at a time until you get the right consistency. This frosting is what really makes these cookies pop with flavor and that spooky black color.
Step 4: Decorate Your Black Cats
Once your cookies are completely cool, spread a good layer of black cocoa frosting on each. Then, draw pupils on the green or yellow M&Ms using your black edible marker—this step really brings those eyes to life! Press two M&Ms onto each cookie for the eyes. Next, place a large heart-shaped sprinkle upside down under the eyes to make the nose. Cut small pieces of black licorice with kitchen shears to create whiskers and gently press them into the frosting around the nose. Finally, break your Hershey chocolate bars into pieces, cut them into triangles, and stick two “ears” on each cookie. Let the frosting set for a few minutes, and you’re ready to impress!
Pro Tips for Making Black Cat Cookies Recipe
- Don’t Overbake: Keep a close eye during the last minute so cookies stay soft inside and don’t dry out.
- Set Frosting Time: Let the frosting firm up a bit at room temp so the decorations stick better and don’t slide off.
- Sharp Shears for Licorice: Use kitchen scissors for precise whisker cuts—makes a big difference in the overall look.
- Edible Markers Matter: Pick a fine-tipped edible marker for detailed pupils on the M&Ms; avoid smudging by letting ink dry a minute.
How to Serve Black Cat Cookies Recipe
Garnishes
I like to add a little extra flair by sprinkling some edible glitter or tiny white sugar pearls around the cookies for a magical night-time vibe. Sometimes I serve them on a tray lined with black serving paper for that total “black cat” effect. If you want to get playful, a few extra licorice twists nearby reinforce the cat theme.
Side Dishes
These cookies are perfect paired with a cozy cup of hot chocolate or a creamy chai latte to bring out the chocolate notes. For a Halloween party, I’ve served them alongside pumpkin spice cupcakes and candy corn—pure seasonal magic. Even simple vanilla ice cream on the side creates a lovely contrast.
Creative Ways to Present
For themed parties, I like to arrange the Black Cat Cookies Recipe on plates surrounded by mini pumpkins and faux spider webs. Another fun idea is to package them in cellophane bags tied with orange and black ribbons for festive gifts. You can even build little cookie “cat faces” on a platter with other treats as accessories—kids go wild for that!
Make Ahead and Storage
Storing Leftovers
I store leftover cookies in an airtight container at room temperature, tucked away from sunlight so the frosting stays stable. They usually stay fresh and delicious for about 3-4 days, which is enough time for anyone in my house to finish them off quickly!
Freezing
If you want to freeze these cuties, I recommend flash-freezing them on a baking sheet first so they don’t stick together—then transfer carefully into a freezer-safe container or bag. I’ve found they freeze well for up to 3 months without loss of flavor or appearance.
Reheating
Because these are frosted cookies, reheating isn’t typically necessary. But if you want to warm a cookie slightly, just pop it in the microwave for 8-10 seconds—be cautious not to melt the frosting completely. This brings back a bit of that fresh-baked softness.
FAQs
-
Can I make these cookies gluten-free?
Unfortunately, the box of Devil’s Food cake mix usually contains gluten, so you’d need to find a gluten-free chocolate cake mix alternative to keep the same texture and flavor. Be sure to check ingredient labels closely or opt for a recipe built from scratch with gluten-free flour blends if gluten is a concern.
-
What if I don’t have black food coloring or cocoa powder?
No worries! These cookies will still taste delicious without black food coloring—your cake mix usually gives a nice chocolate color. The black cocoa powder in the frosting is key for the rich black tone, but you can try regular cocoa powder for a darker, though less intense color.
-
Can I skip the frosting and decorations?
You can skip the frosting if you want simpler cookies, but the frosting really makes the recipe special—adding flavor, texture, and that signature black cat look. For the decorations, you can get creative or keep it minimalist with just frosting if you prefer.
-
How do I keep the M&M pupils from smudging?
I recommend using a fine-tipped edible marker and letting the ink dry for a minute or two before placing the M&Ms on the frosting. If the frosting is too wet, the ink can run, so spread frosting first and draw pupils just before decorating the cookies.
-
What’s the best way to cut Hershey bar ears?
Break the bar into small sections along the pre-existing grooves. Then, cut each section into squares and slice diagonally for neat triangles. Use a sharp knife, and it helps to do this on parchment paper so the pieces don’t stick or slide.
Final Thoughts
Honestly, the Black Cat Cookies Recipe is one of those whimsical treats that never fail to put a smile on my face—and my friends’ too. It’s the perfect mix of approachable baking and eye-catching presentation, so you feel like a desert artist without the stress. Whether you’re baking for a spooky celebration or just craving a fun chocolate treat, I promise these cookies deliver on taste and charm. Give this recipe a try—the decorating stage is my favorite part and you’ll enjoy the process as much as the cookies themselves!
Print
Black Cat Cookies Recipe
- Prep Time: 25 minutes
- Cook Time: 10 minutes
- Total Time: 35 minutes
- Yield: 20 cookies
- Category: Dessert
- Method: Baking
- Cuisine: American
Description
Delightfully spooky Black Cat Cookies made with Devil’s Food cake mix, rich black cocoa frosting, and fun edible decorations perfect for Halloween or themed parties.
Ingredients
Cookies
- 1 (15.25 ounce) box of Devil’s Food cake mix
- 2 large eggs
- 1/2 cup canola or vegetable oil (reduce to 1/3 cup if using a 13.25 ounce cake mix)
- black food coloring (optional)
Frosting
- 1/2 cup unsalted butter, softened
- 1 3/4 cups powdered sugar
- 1/4 cup black cocoa powder
- 1 teaspoon vanilla extract
- pinch of salt
- 1-3 tablespoons milk
Decorations
- 40 green or yellow M&Ms
- black edible marker
- 20 large heart-shaped sprinkles
- black licorice
- Hershey chocolate bars
Instructions
- Preheat Oven: Preheat the oven to 350 degrees Fahrenheit. Line two large baking sheets with parchment paper.
- Prepare Cookie Dough: In a large bowl, mix the Devil’s Food cake mix, eggs, and oil until well combined. Add black food coloring if you want a deeper black color.
- Scoop Dough: Scoop 1 1/2 tablespoon-sized balls of dough onto the prepared baking sheets, spacing them about 2 inches apart. Do not flatten the dough balls.
- Bake Cookies: Bake for 10 minutes, or until the edges are set. The centers may appear soft but will firm up as they cool. Let cookies cool for 5 minutes on the baking sheet before transferring to a wire rack completely cool.
- Make Frosting: In a medium bowl, beat the softened butter until creamy. Gradually add the powdered sugar, black cocoa powder, vanilla extract, salt, and 1 tablespoon of milk, beating until smooth and spreadable. Add more milk if needed to reach desired consistency.
- Frost Cookies: Once cookies are fully cooled, spread a generous amount of black cocoa frosting on each cookie.
- Decorate Eyes: Draw pupils on the M&Ms using the black edible marker. Press two M&Ms onto each cookie for eyes.
- Add Nose: Place a large heart-shaped sprinkle upside down under the eyes to create the nose.
- Add Whiskers: Use kitchen shears to cut small pieces of black licorice for whiskers, pressing them into the frosting around the nose.
- Create Ears: Break Hershey chocolate bars into pieces, cut each piece into two squares, then diagonally cut squares into triangles. Press two triangles into the top of each cookie to form ears.
- Set Frosting: Allow the frosting to set for a few minutes before serving.
Notes
- Store cookies in an airtight container at room temperature away from sunlight for 3-4 days.
- Freeze cookies for up to 3 months. Flash-freeze on a baking sheet until solid before transferring to freezer-safe container.
- Reduce oil to 1/3 cup if using a smaller 13.25 ounce cake mix to maintain proper dough consistency.
- Use black food coloring sparingly as the black cocoa powder already gives a dark color.
- For easier whiskers, cut licorice pieces when frosting is still soft.
Nutrition
- Serving Size: 1 cookie
- Calories: 180 kcal
- Sugar: 15 g
- Sodium: 120 mg
- Fat: 9 g
- Saturated Fat: 4 g
- Unsaturated Fat: 4 g
- Trans Fat: 0 g
- Carbohydrates: 22 g
- Fiber: 1 g
- Protein: 2 g
- Cholesterol: 20 mg


