
Batter-Fried Chicken (Easy & Extra-Crispy) Recipe
If you’re on the hunt for the ultimate crunchy, flavorful comfort food, this Batter-Fried Chicken (Easy & Extra-Crispy) Recipe might just become your new go-to. It’s that golden, crackly crust that wraps tender, juicy chicken meat inside, combining to give a satisfying bite every time. Whether it’s a weekend dinner or a special gathering, this recipe always delivers that perfect fried chicken experience without any fuss.
I love how versatile this batter-fried chicken is—you can make it ahead, serve it hot or even cold, and everyone seems to ask for seconds. Plus, the secret is really in the brine and the batter mix, which means even if you’re new to frying, you’ll get a consistently crispy result that rivals your favorite chicken joint. Trust me, your kitchen is about to smell amazing!
Why This Recipe Works
- Crisp-Perfect Batter: The mix of flour and cornstarch gives a light, crackly crust that stays crispy longer than regular breading.
- Flavorful Brine: Soaking the chicken in a sweet and salty brine ensures juicy meat packed with flavor before frying.
- Temperature Control: Keeping the oil between 300°F and 350°F locks in moisture and prevents sogginess.
- Simple But Effective Seasoning: A balanced blend of spices like paprika, cayenne, and black pepper adds depth without overpowering.

Ingredients & Why They Work
This Batter-Fried Chicken (Easy & Extra-Crispy) Recipe uses simple pantry staples that come together beautifully for a perfectly textured and seasoned crust. I recommend grabbing fresh chicken pieces and good-quality spices to get the best results.

- Kosher Salt: Essential for the brine to penetrate and season the chicken evenly.
- Granulated Sugar: Balances the saltiness and aids in browning during frying.
- Bone-in, Skin-on Chicken Pieces: Keep the meat juicy and add flavor; I like to halve breasts for uniform cooking.
- All-Purpose Flour: Creates the base of the crispy coating.
- Cornstarch: The secret ingredient for extra crunch and lightness in the batter.
- Black Pepper: Adds a punch—you can adjust the amount for heat level.
- Paprika & Cayenne Pepper: Provide subtle smoky warmth and a slight kick.
- Baking Powder: Introduces tiny bubbles in the batter, giving that airy crisp.
- Cold Water: Keeps the batter thin and helps it cling evenly to the chicken.
- Vegetable or Peanut Oil: High smoke point oils are perfect for frying to golden perfection.
Tweak to Your Taste
I like to customize this Batter-Fried Chicken (Easy & Extra-Crispy) Recipe depending on my mood and occasion. Sometimes, I dial up the spices or add fresh herbs to the batter for an herby twist—don’t be afraid to make it your own!
- Mild Version: I’ve pulled back on the cayenne when serving kids; it’s still flavorful without the heat.
- Spicy Kick: Adding smoked paprika and extra cayenne creates a smoky, fiery edge that my spice-loving friends adore.
- Gluten-Free: I swapped the flour for a gluten-free blend once and was amazed at how crispy it stayed—great alternative!
- Extra Garlic Flavor: Tossing some garlic powder into the batter is a quick way to boost flavor.
Step-by-Step: How I Make Batter-Fried Chicken (Easy & Extra-Crispy) Recipe
Step 1: Brine the Chicken for Juicy Goodness
First things first—you want to brine the chicken. Whisk together cold water, kosher salt, and sugar until everything dissolves. Submerge your chicken pieces, cover the bowl, and pop it in the fridge for an hour. I never skip this step because it makes such a difference in the final juiciness of the chicken. Plus, the brine does the hard work seasoning the meat inside out.
Step 2: Whip Up the Magic Batter
While the chicken chills, mix all the dry batter ingredients—flour, cornstarch, spices, baking powder, salt—in a large bowl. Pour in 1 3/4 cups of cold water and whisk until smooth. Cover and keep it in the fridge until you’re ready to fry. The cold batter helps it cling better to the chicken and keeps your coating ultra-crispy.
Step 3: Heat the Oil and Prep the Chicken
Heat your oil in a deep, heavy-bottomed pot to 350°F. Meanwhile, drain the brine and really pat dry each chicken piece—this is key for the batter to stick. If the batter looks thick after resting, just whisk in a tablespoon or two of cold water until it has the consistency of pancake batter. You want it thick enough to coat but still drip off smoothly.
Step 4: Coat and Fry Carefully
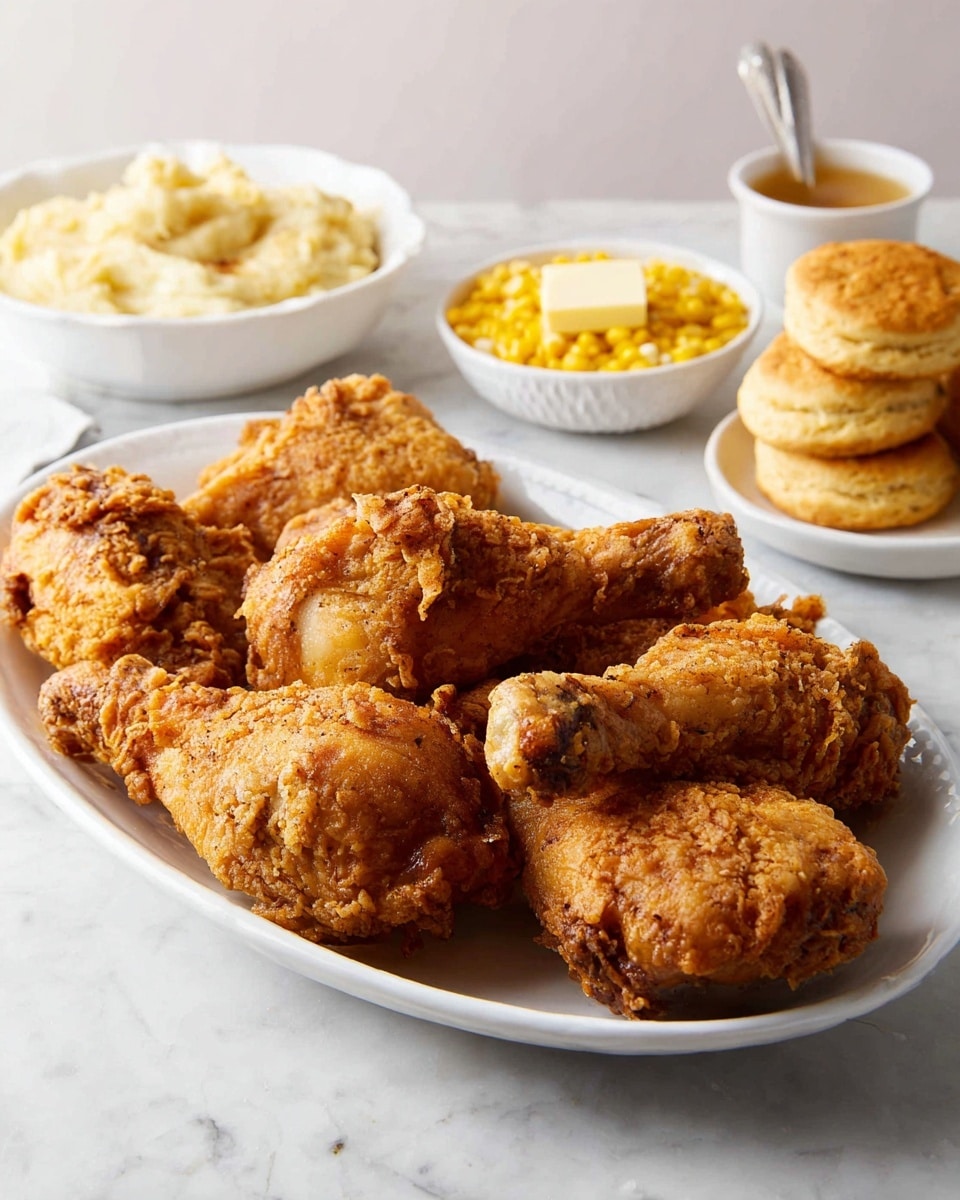
Dip half your chicken pieces in the batter, letting the excess drip off before carefully placing them in the hot oil. Don’t overcrowd the pot; frying in batches keeps the temperature steady so you get that golden crust. Fry between 300°F and 325°F, adjusting heat as needed, until the chicken is deep golden and cooked through (160°F for white meat, 175°F for dark). This usually takes about 12–25 minutes depending on size.
Step 5: Drain and Serve
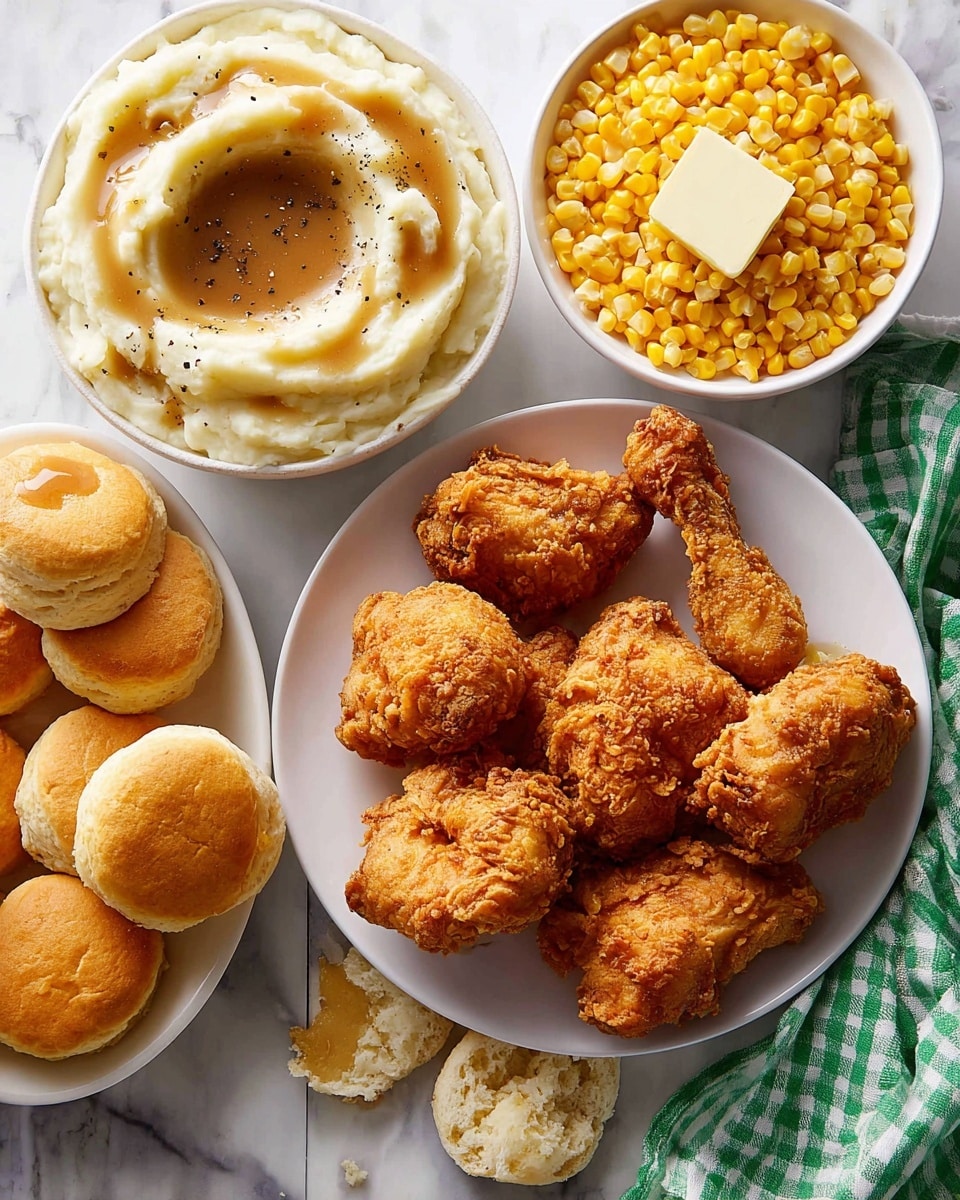
Once cooked, transfer the chicken to a wire rack set over a baking sheet to drain off excess oil and keep that crispiness intact. Bring the oil back to temperature before frying the remaining batch. I find letting the chicken rest a couple of minutes off the oil lets the crust fully set. Serve them hot, or feel free to enjoy this Batter-Fried Chicken (Easy & Extra-Crispy) Recipe even the next day—it’s still delicious!
Pro Tips for Making Batter-Fried Chicken (Easy & Extra-Crispy) Recipe
- Pat the Chicken Completely Dry: I can’t stress this enough—moisture is the enemy of crispy batter, so grab plenty of paper towels and get every piece bone dry.
- Don’t Skimp on Oil Temperature: I learned the hard way that keeping oil hot but not smoking is key—too cool and the coating sogs, too hot and it burns before cooking through.
- Give the Batter Time to Chill: Cold batter sticks better when frying, so don’t rush it—pop it in the fridge while you brine the chicken.
- Use a Wire Rack for Draining: Placing fried chicken on a kitchen towel traps steam underneath and ruins the crunch, so a wire rack is your best friend.
How to Serve Batter-Fried Chicken (Easy & Extra-Crispy) Recipe
Garnishes
I often sprinkle chopped fresh parsley on top just before serving—it adds a pop of color and a mild freshness that cuts through the richness. Sometimes, a wedge of lemon on the side really brightens the chicken up and invites folks to squeeze a little zing over their piece.
Side Dishes
My go-to sides for this batter-fried chicken include creamy coleslaw, buttery mashed potatoes, and a simple green salad. On occasion, I whip up some easy baked beans or corn on the cob for a down-home vibe. These pairings complement the boldness of the fried chicken without overwhelming the flavors.
Creative Ways to Present
For a party, I like arranging the chicken on a rustic wooden board surrounded by small bowls of dipping sauces like honey mustard and spicy aioli. Adding pickles and fresh bread rolls turns it into a casual feast that everyone digs into. I’ve also made mini chicken sliders using leftover batter-fried pieces—they’re always a hit with both adults and kids!
Make Ahead and Storage
Storing Leftovers
I store leftover batter-fried chicken in an airtight container in the fridge for up to 3 days. To keep the crust from getting soggy, I layer pieces between paper towels. It holds up surprisingly well if you don’t pile it in tightly.
Freezing
If I have extra, I freeze the cooked chicken pieces on a baking sheet until solid, then transfer them to a freezer-safe bag. This prevents them from sticking together, and I can quickly reheat single portions when needed. Just be sure to eat frozen leftovers within 1-2 months for best texture.
Reheating
To reheat, I preheat my oven to 375°F and place the chicken on a wire rack set over a baking sheet to keep it crispy. It takes 15–20 minutes to warm through while maintaining that crispy crust, much better than microwaving which makes it soggy. A quick spritz of cooking spray on top can revive the crunch nicely.
FAQs
-
Do I have to brine the chicken for this Batter-Fried Chicken Recipe?
Brining isn’t absolutely mandatory, but I highly recommend it because it keeps the chicken juicy and flavorful inside. Skipping this step can result in drier meat, especially since frying at higher temperatures cooks the exterior quickly.
-
Can I use skinless chicken for this recipe?
You can, but skin-on helps lock in moisture and provides that extra crispiness and flavor. If using skinless pieces, be extra careful not to overcook since they can dry out faster.
-
What if my batter is too thick or too thin?
If the batter looks too thick after resting, just whisk in cold water a tablespoon at a time until it’s the consistency of pancake batter. Too thin and it won’t stick well—adjust carefully to find that perfect coating texture.
-
How do I know when the chicken is cooked through?
The best way is to use an instant-read meat thermometer: 160°F for white meat (breasts) and 175°F for dark meat (thighs and drumsticks). The crust will be a deep golden brown when it’s done, but temperature ensures safety and juiciness.
-
Can I make this recipe dairy-free or gluten-free?
This recipe is naturally dairy-free, which is great if you’re avoiding dairy. For gluten-free, just swap the all-purpose flour with a gluten-free flour blend and make sure your baking powder is gluten-free as well.
Final Thoughts
This Batter-Fried Chicken (Easy & Extra-Crispy) Recipe has become one of my cherished go-to dishes whenever I crave comfort food with that unbeatable crunch. The brine and batter technique ensures every bite is moist and flavorful with a golden, crispy shell that’s downright addictive. I hope you’ll enjoy making it as much as I do—it’s like bringing a little homemade joy to your table with every piece.
Print
Batter-Fried Chicken (Easy & Extra-Crispy) Recipe
- Prep Time: 30 minutes
- Cook Time: 30 minutes
- Total Time: 1 hour 30 minutes
- Yield: 4 servings
- Category: Main Course
- Method: Frying
- Cuisine: American
- Diet: Low Lactose
Description
This easy and extra-crispy batter-fried chicken recipe delivers perfectly golden and crunchy chicken pieces every time. With a simple brine that tenderizes the meat and a homemade batter combining all-purpose flour and cornstarch, the chicken achieves a light and crispy crust. The recipe includes instructions for frying in vegetable oil to an ideal temperature, ensuring juicy, flavorful chicken that’s perfect for any meal.
Ingredients
For the Fried Chicken Brine
- 1 quart cold water
- 1/4 cup kosher salt
- 1/4 cup granulated sugar
- 4 pounds bone-in, skin-on chicken pieces (halve each chicken breast crosswise and separate leg quarters into thighs and drumsticks)
For the Fried Chicken Batter
- 1 cup all-purpose flour
- 1 cup cornstarch
- 5 teaspoons freshly ground black pepper
- 1 teaspoon paprika
- 1/2 teaspoon cayenne pepper
- 2 teaspoons baking powder
- 1 teaspoon kosher salt, plus more to taste
- 1 3/4 cups cold water
- 3 quarts vegetable oil or peanut oil, for frying
Instructions
- Make the chicken brine: In a large bowl, whisk together 1 quart cold water, 1/4 cup kosher salt, and 1/4 cup granulated sugar until dissolved. Add 4 pounds bone-in, skin-on chicken pieces, cover, and refrigerate for 60 minutes.
- Make the fried chicken batter: While the chicken is brining, whisk together 1 cup all-purpose flour, 1 cup cornstarch, 5 teaspoons freshly ground black pepper, 1 teaspoon paprika, 1/2 teaspoon cayenne pepper, 2 teaspoons baking powder, and 1 teaspoon kosher salt in a large bowl. Pour in 1 3/4 cups cold water and whisk until smooth. Cover and refrigerate the batter while chicken brines.
- Heat the oil: Heat 3 quarts vegetable oil in a large Dutch oven or deep-sided pot over medium-high heat until it reaches 350°F (176°C). Set a wire rack on a rimmed baking sheet for draining cooked chicken.
- Prepare chicken for frying: Discard the brine and thoroughly pat chicken pieces dry with paper towels to ensure the batter sticks well.
- Coat the chicken: Whisk the batter again to recombine. If too thick, add cold water a tablespoon at a time until batter resembles pancake batter. Dip half the chicken pieces into the batter, turning to coat, then remove letting excess drip back into bowl.
- Fry the chicken: Carefully place battered chicken pieces into the oil. Maintain oil temperature between 300°F and 325°F (149°C and 163°C) by adjusting heat as needed. Fry each piece until deep golden brown and meat reaches an internal temperature of 160°F (71°C) for white meat or 175°F (79°C) for dark meat, about 12 to 25 minutes depending on size and oil temperature.
- Drain the chicken: Transfer fried chicken to the wire rack to drain excess oil. Bring oil temperature back up to 350°F (176°C) before frying remaining chicken pieces, repeating the process.
- Serve: Serve fried chicken hot, warm, or at room temperature. It can also be enjoyed cold if there are leftovers.
Notes
- To thin the batter, whisk in cold water a tablespoon at a time until it has the consistency of pancake batter.
- Pat chicken pieces completely dry after brining to ensure the batter adheres properly.
- Maintain the combination of all-purpose flour and cornstarch for a light, crispy crust; do not substitute the flours.
- Avoid crowding the chicken in the frying pot to prevent pieces sticking together; fry in batches as necessary.
- Allow oil to return to 350°F between batches to keep the coating crispy and avoid sogginess.
- This recipe is dairy-free. To make it gluten-free, substitute the all-purpose flour with gluten-free all-purpose flour.
Nutrition
- Serving Size: 1 serving
- Calories: 600 kcal
- Sugar: 2 g
- Sodium: 900 mg
- Fat: 35 g
- Saturated Fat: 7 g
- Unsaturated Fat: 26 g
- Trans Fat: 0 g
- Carbohydrates: 40 g
- Fiber: 2 g
- Protein: 40 g
- Cholesterol: 120 mg


