

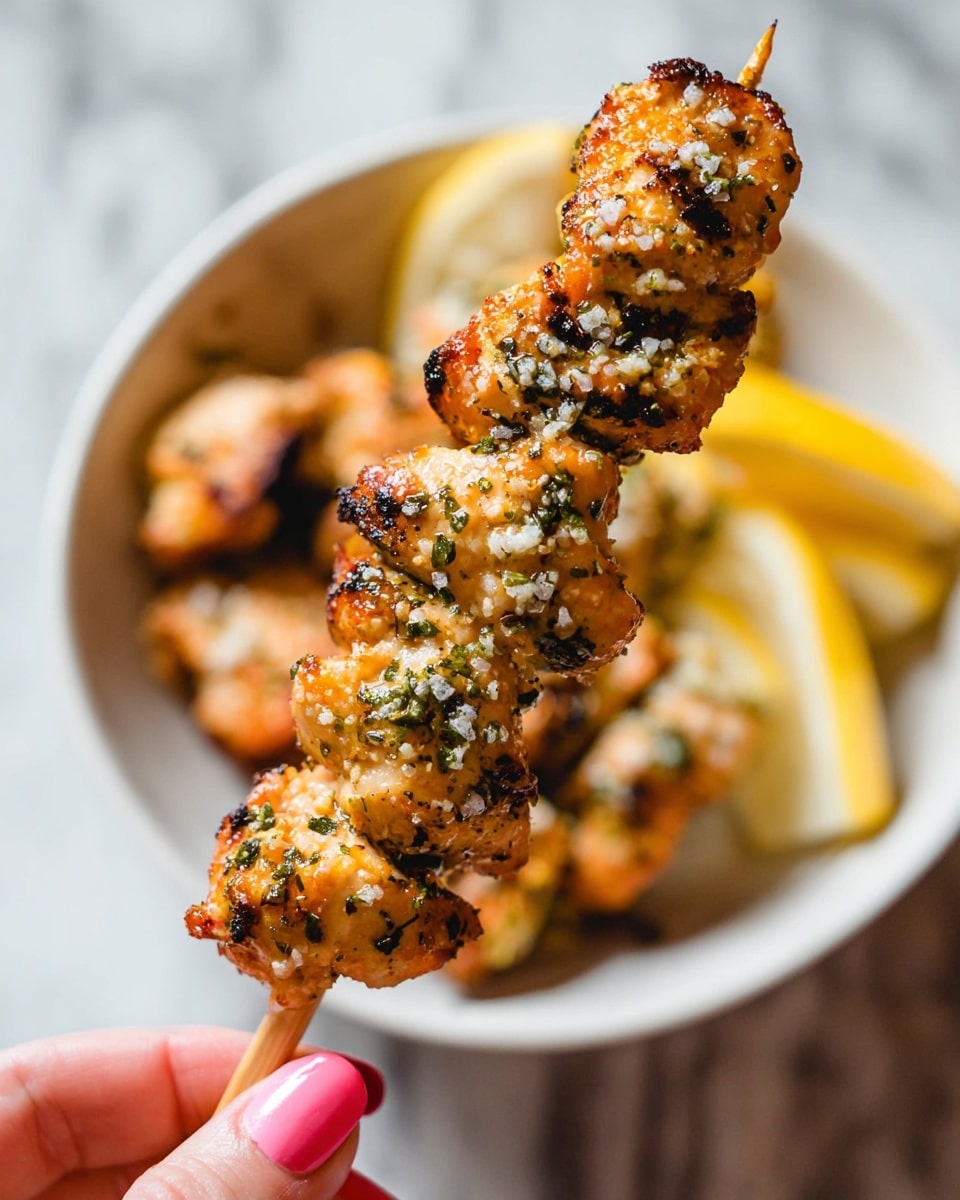
Garlic Parmesan Chicken Skewers Recipe
Oh, if you’re looking for a show-stopping yet surprisingly simple dish to make for any occasion, this Garlic Parmesan Chicken Skewers Recipe should be right at the top of your list. Juicy chicken pieces get coated in a luscious blend of mayo, parmesan, and garlic — then marinated to soak up all those rich flavors. Whether you’re grilling outdoors on a summer evening or whipping up something quick in the air fryer, this recipe never fails to impress.
I’ve made these chicken skewers countless times for family dinners and last-minute gatherings, and they always disappear fast. The combination of creamy parmesan and garlic, with a little kick from chili crunch, is just irresistible, and the skewers make portioning and serving a breeze. Trust me, once you try this Garlic Parmesan Chicken Skewers Recipe, it’s going to be your go-to when you want something both flavorful and fuss-free!
Why This Recipe Works
- Flavor Punch: The perfect marriage of garlic, parmesan, and a touch of chili crisp creates an unbeatable savory taste.
- Versatile Cooking: Air fryer or grill — you get juicy, tender chicken either way without much hassle.
- Easy Prep: A quick marinade that works wonderfully even with just 20 minutes, but shines brightest when given time to develop.
- Simple Ingredients: Common pantry staples come together to create restaurant-quality skewers at home.

Ingredients & Why They Work
Each ingredient in this Garlic Parmesan Chicken Skewers Recipe plays a special role to build layers of flavor and tender juiciness — plus a little zing here and there that keeps things exciting. When you pick your ingredients thoughtfully, especially fresh garlic and quality parmesan, it really lifts the whole dish.
- Chicken thighs or tenders: I prefer thighs for their richer flavor and juiciness; tenders work too if you want a leaner option.
- Seasoning salt: I go for something like Lowry’s seasoning salt to add that all-around savory punch effortlessly.
- Mayonnaise: It seems simple but mayonnaise really helps the marinade cling and keeps chicken moist during cooking.
- Grated Parmesan: Freshly grated if possible — it adds that signature nutty, salty flavor pivotal to this dish.
- Garlic powder & fresh garlic: Garlic powder in the marinade plus fresh garlic in the butter sauce doubles down on the garlic goodness.
- Softened butter: Rich, creamy butter forms the base of the flavorful basting sauce after cooking.
- Fresh parsley: Adds a pop of color and fresh herbal brightness that balances the richness.
- Chili crunch or chili crisp: This adds a subtle spicy crunch, but you can dial up or down depending on your heat tolerance.
- Lemon juice: A splash of acidity lifts all the flavors beautifully for a well-rounded profile.
Tweak to Your Taste
One of the best things about this Garlic Parmesan Chicken Skewers Recipe is how easy it is to customize to suit your flavor mood or dietary needs. I’ve played around with everything from spices to cooking methods, and each tweak brings out something tasty and new.
- Variation: For a smoky twist, I sometimes swap out chili crisp for smoked paprika and add a dash of cumin — it’s amazing on the grill.
- Gluten-Free: All ingredients here are naturally gluten-free, making this perfect if you’re cooking for guests avoiding gluten.
- Lower Fat: If you want to cut down on the mayo or butter, try substituting Greek yogurt for mayo and using a little olive oil instead of butter for basting.
- Spice Level: Not a fan of heat? Just skip or reduce the chili crunch — the dish still sings with garlic and parm!
Step-by-Step: How I Make Garlic Parmesan Chicken Skewers Recipe
Step 1: Marinate Your Chicken
Start by cutting your chicken into about 1-inch pieces, which helps them cook evenly and makes skewering a breeze. Toss the chicken in a bowl with the seasoning salt, mayo, garlic powder, and grated parmesan. Mix everything until the pieces are well coated — this step is key because the mayo keeps the chicken tender and the flavors really cling. Ideally, cover and refrigerate this for at least 4 hours, but if you’re pressed for time, 20 minutes works too. I find that the longer it marinates, the more flavorful the results!
Step 2: Make the Garlic Parmesan Butter Sauce
While the chicken marinates, combine softened butter with minced garlic, chopped parsley, parmesan, chili crisp, and a touch of lemon juice in a bowl. Use a fork to mash it all together into a compound butter. Just before cooking, zap it in the microwave for about 5 seconds to loosen up for easy basting later on. This sauce is where the magic happens, so don’t skimp on fresh garlic!
Step 3: Skewer and Preheat
Thread the marinated chicken pieces onto metal or wooden skewers, making sure they’re not packed too tightly — you want some space so the heat circulates and cooks evenly. I personally prefer metal skewers because they conduct heat better, but wooden ones are fine if soaked in water beforehand to prevent burning. Preheat your air fryer to 400ºF if you’re using that method, or get your grill ready for a medium-high heat.
Step 4: Cook and Baste
Place 4 to 7 skewers in the air fryer basket but don’t overcrowd—this ensures a beautiful, even cook. Air fry for 6 minutes, then flip and cook an additional 3 minutes. Use a meat thermometer to check if they’ve passed 150ºF, which is the perfect point to baste. Brush on that garlic parmesan butter sauce on one side, cook for 1 more minute, flip and baste the other side, then cook for another 30-40 seconds. The final internal temperature should reach 165ºF for safe eating.
Step 5: Serve and Enjoy!
Once cooked, remove the skewers and sprinkle with a little extra parmesan and fresh parsley for color and a flavor pop. Serve warm alongside your favorite sides and get ready for the compliments—that’s the part I always look forward to!
Pro Tips for Making Garlic Parmesan Chicken Skewers Recipe
- Marinate Longer: I always find my chicken tastes richer when I let it marinate overnight rather than just 20 minutes.
- Don’t Skip the Thermometer: Using a meat thermometer helps avoid overcooking or undercooking — juicy chicken is the goal!
- Loosen Your Butter Sauce: Softening the compound butter just a bit before basting makes spreading easier and more even.
- Give Space on Skewers: Avoid crowding the chicken pieces so the heat circulates well and cooks the meat evenly.
How to Serve Garlic Parmesan Chicken Skewers Recipe
Garnishes
I usually top the skewers with extra freshly grated parmesan and a sprinkle of chopped parsley right before serving — it gives a fresh pop of color and a nice flavor contrast. Sometimes, I add a little squeeze of fresh lemon juice too just to brighten everything up.
Side Dishes
My favorite sides to serve with these skewers include a lightly dressed mixed greens salad, roasted veggies like asparagus or zucchini, and a simple garlic butter rice pilaf. They all complement the rich garlic parmesan flavor without overpowering it.
Creative Ways to Present
For parties, I like to stand these skewers upright in a rustic wooden board with a few small bowls of dipping sauces like ranch, extra chili crisp, or lemon aioli. It makes for a casual yet inviting way to serve, and guests love grabbing a skewer and customizing.
Make Ahead and Storage
Storing Leftovers
After they cool, I transfer leftover skewers into an airtight container and keep them in the refrigerator where they stay delicious for up to 3 days. Make sure to store the garlic parmesan butter sauce separately if you want to freshen it up when reheating.
Freezing
I’ve frozen cooked skewers before by wrapping each skewer individually in foil then placing them in a freezer-safe bag. They keep well for about 2 months. Just thaw overnight in the fridge before reheating to keep the best texture.
Reheating
When reheating, I like to bake them at 350ºF for 8-10 minutes, brushing on a little extra garlic parmesan butter mid-way to bring back moistness. Avoid microwave reheating if you want to keep the chicken juicy and flavorful.
FAQs
-
Can I use chicken breasts instead of thighs for this Garlic Parmesan Chicken Skewers Recipe?
Absolutely! Chicken breasts can be used, though I recommend cutting them into uniform pieces and marinating for at least an hour to keep them juicy. Just be careful not to overcook since breasts cook a bit faster and can dry out.
-
Is it okay to use wooden skewers instead of metal?
Yes, wooden skewers work just fine. Just soak them in water for at least 30 minutes beforehand to prevent burning during cooking. Metal skewers are convenient but not necessary.
-
What if I don’t have chili crunch or chili crisp?
You can substitute with a pinch of red pepper flakes or a few drops of hot sauce for heat. If you want more crunch, toasted breadcrumbs or crushed nuts can add texture without the spice.
-
Can I prepare the skewers completely ahead of time?
Yes, you can marinate and even assemble the skewers a few hours in advance and keep them refrigerated until cooking time. Just make sure to bring them to room temperature before cooking for even results.
-
How do I know when the chicken is fully cooked?
The best way is to use a meat thermometer; chicken should reach an internal temperature of 165ºF. Otherwise, ensure juices run clear and meat is no longer pink inside when you slice a piece.
Final Thoughts
This Garlic Parmesan Chicken Skewers Recipe holds a special place in my kitchen because it’s so reliable and loved by everyone I share it with. It blends simple ingredients into something that’s effortlessly tasty, and the method keeps it quick enough for weeknights but special enough for guests. Seriously, give this one a try—you’ll be amazed how a few staples transform into a juicy, garlicky, cheesy delight that everyone asks for again and again!
Print
Garlic Parmesan Chicken Skewers Recipe
- Prep Time: 15 minutes
- Cook Time: 10 minutes
- Total Time: 45 minutes
- Yield: 6 servings
- Category: Main Course
- Method: Air Frying
- Cuisine: American
- Diet: Low Lactose
Description
Delicious Garlic Parmesan Chicken Skewers featuring tender chicken thighs marinated in a flavorful blend of mayonnaise, parmesan, and garlic powder, then air-fried to perfection and basted with a rich compound butter sauce infused with garlic, parsley, chili crisp, and lemon juice. Perfect for a quick and tasty main course that serves 6-8 people.
Ingredients
Chicken Marinade:
- 1 1/2–2 pounds chicken thighs or tenders, cut in 1-inch pieces
- 1 1/2 teaspoon seasoning salt (such as Lowry’s)
- 2 tablespoons mayonnaise
- 1 tablespoon grated parmesan
- 1/2 teaspoon garlic powder
Seasoning Sauce (Compound Butter):
- 5 tablespoons softened butter
- 4 cloves garlic, minced or pressed
- 1 tablespoon fresh parsley, chopped
- 1 tablespoon Parmesan cheese
- 1-2 teaspoons chili crunch (or chili crisp)
- 1 teaspoon lemon juice
Instructions
- Season: Add the chicken pieces to a bowl and season with seasoning salt, mayonnaise, garlic powder, and grated parmesan. Mix well to coat the chicken evenly. Cover and marinate in the refrigerator for at least 20 minutes, ideally 4 to 16 hours for maximum flavor.
- Prepare Butter Sauce: In a separate bowl, combine softened butter, minced garlic, chopped parsley, parmesan cheese, chili crisp, and lemon juice. Mash together with a fork to form a compound butter. Microwave for 5 seconds to slightly loosen the butter for easier basting.
- Skewer the Chicken: Thread the marinated chicken pieces onto metal or wooden skewers evenly. Set aside.
- Preheat Air Fryer: Preheat the air fryer to 400ºF. This helps ensure even cooking and a crispy exterior.
- Cook: Place 4-7 skewers in the air fryer basket without overcrowding. Cook for 6 minutes, then flip the skewers and cook for an additional 3 minutes.
- Baste: Check the internal temperature of the chicken, which should be at least 150ºF. Baste the skewers with the compound butter and cook for 1 more minute. Then flip, baste the other side, and cook for 30-40 seconds more. The chicken should reach an internal temperature of 165ºF when fully cooked.
- Serve: Remove the skewers from the air fryer. Garnish with extra parmesan cheese and parsley if desired. Serve warm with your favorite sides and enjoy!
Notes
- For best results, marinate the chicken for several hours to deepen the flavor.
- If using wooden skewers, soak them in water for 30 minutes beforehand to prevent burning.
- You can substitute chicken breasts for thighs, but thighs remain juicier and more flavorful.
- Adjust the amount of chili crisp to your preferred spice level.
- Please ensure the chicken reaches the recommended internal temperature of 165ºF for safe consumption.
- This recipe works well on an outdoor grill if you prefer grilling over air frying.
- Serve with rice, salad, or roasted vegetables for a complete meal.
Nutrition
- Serving Size: 1 skewer
- Calories: 320 kcal
- Sugar: 1 g
- Sodium: 580 mg
- Fat: 22 g
- Saturated Fat: 9 g
- Unsaturated Fat: 11 g
- Trans Fat: 0 g
- Carbohydrates: 2 g
- Fiber: 0.3 g
- Protein: 28 g
- Cholesterol: 110 mg


