

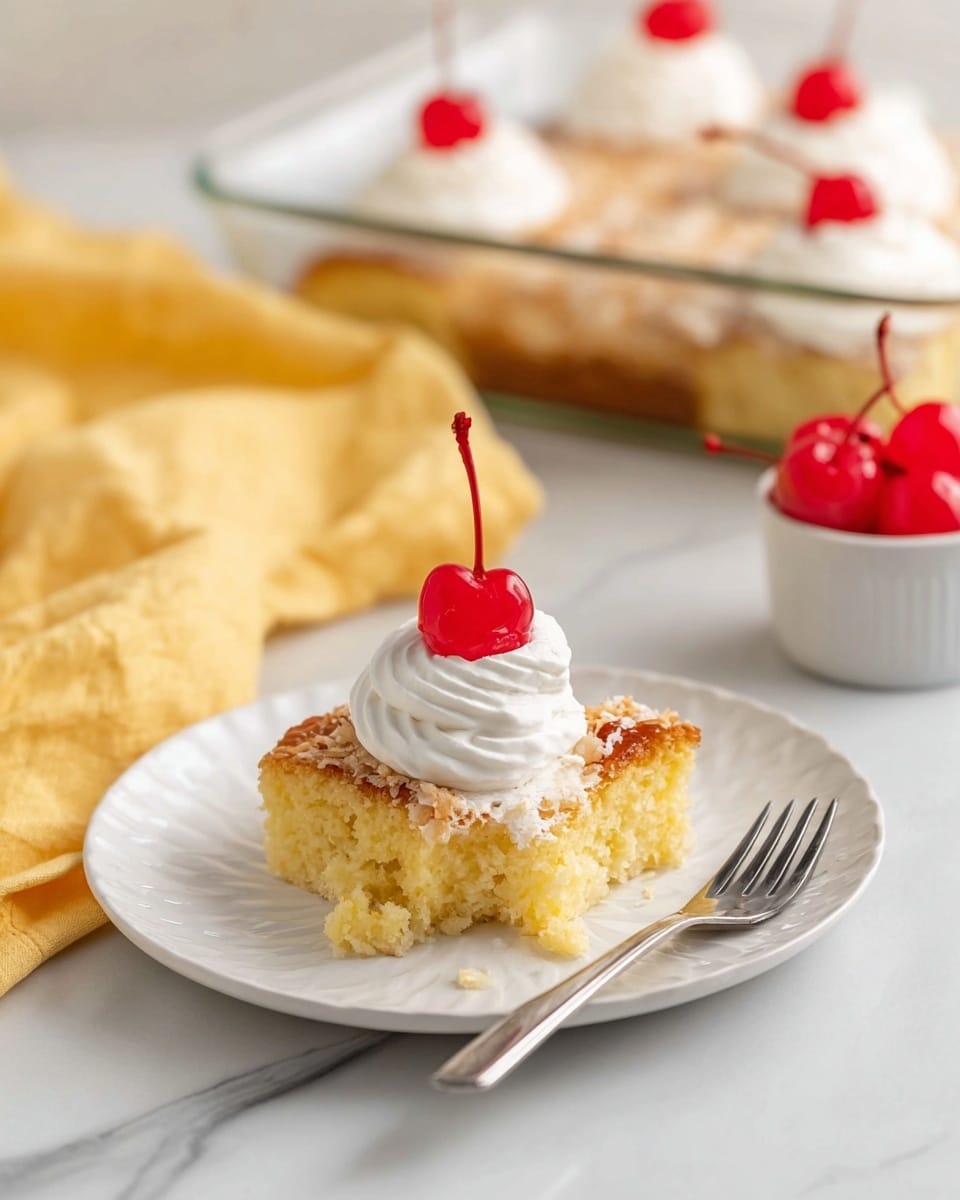
Pineapple Angel Food Cake Recipe
I’m so excited to share this Pineapple Angel Food Cake Recipe with you because it’s a total game-changer when you want something light, sweet, and just a little tropical. This cake is wonderfully airy thanks to the angel food base, but the crushed pineapple adds moisture and a fresh burst of flavor that makes it feel perfect for any summer gathering or a casual dessert after dinner. Trust me, this one is easy enough to whip up even on a weeknight when you want a special treat without stressing over complicated steps.
One of the things I love most about this Pineapple Angel Food Cake Recipe is how versatile it is. Whether you’re serving it at a BBQ, a picnic, or just enjoying a slice with a cup of coffee, it holds up beautifully and always feels like a little celebration. Adding the whipped topping on top makes it creamy and extra indulgent without weighing it down. Plus, decorating with bright pineapple chunks or cherries gives it that classic, cheerful look. You’re going to want to keep this recipe handy!
Why This Recipe Works
- Simplicity: Minimal ingredients and steps make it super approachable for any baker.
- Moisture Balance: Crushed pineapple packs in just enough juice to keep the cake tender without making it soggy.
- Lightness: The angel food cake base keeps things fluffy and airy, great if you want dessert without feeling heavy.
- Flavor Contrast: The whipped topping and garnishes add creaminess and visual appeal that really pop against the delicate cake.

Ingredients & Why They Work
Each ingredient in this Pineapple Angel Food Cake Recipe plays a simple but crucial role in bringing the whole dessert together. Using a good quality angel food cake mix keeps it easy, while the pineapple adds freshness and moisture—no extra oil or butter needed.
- Angel food cake mix: Look for a classic brand like Betty Crocker for consistent results and an airy texture.
- Crushed pineapple (un-drained): This keeps the cake moist and adds natural sweetness with a tangy touch.
- Whipped topping (thawed): Adds a creamy, light finish on top without overpowering the delicate cake.
- Pineapple chunks or maraschino cherries (optional): Great for adding a pop of color and a little extra citrus or sweet burst in every slice.
Tweak to Your Taste
I’ve found this Pineapple Angel Food Cake Recipe to be a fantastic base for personalization, so don’t hesitate to play with the garnishes or even add a hint of coconut for a tropical twist. It’s your cake, so tailoring the flavors to what you love is half the fun!
- Variation: Sometimes I like to fold in shredded coconut into the batter for a subtle crunch and extra flavor that pairs beautifully with pineapple.
- Dietary tweaks: For a dairy-free option, try using coconut whipped topping instead of regular whipped topping; it works surprisingly well.
- Seasonal twist: Add fresh berries along with pineapple chunks in the summer for an even more vibrant dessert.
Step-by-Step: How I Make Pineapple Angel Food Cake Recipe
Step 1: Mix It Up with Care
Start by preheating your oven to 350°F. In a medium bowl, I use a handheld mixer on medium-low to gently combine the angel food cake mix and the entire can of crushed pineapple, juice included. You want everything mixed well, but don’t overbeat—small lumps are okay here because they help keep the texture light. This step is really quick, but mixing thoroughly is key to a perfect crumb later.
Step 2: Bake and Watch the Magic
Pour the batter into an ungreased 9×13 baking dish—no need to grease it because the angel food mix is designed to rise without sticking. Spread it evenly with a spatula. Pop it into your oven and bake for about 30 minutes. You’ll know it’s done when the top is lightly golden and a toothpick inserted near the center comes out clean. Resist the urge to open the oven door too often, or it might deflate.
Step 3: Cool, Top, and Decorate
Once baked, let your cake cool completely—this usually takes around an hour on the counter. I like to use this time for cleaning up or prepping my garnishes. When cooled, spread the whipped topping evenly over the cake using an offset spatula for smoothness. Finally, sprinkle pineapple chunks or maraschino cherries over the top for a cheerful finish before slicing into 12 pieces.
Pro Tips for Making Pineapple Angel Food Cake Recipe
- Do Not Grease the Pan: Angel food cake won’t rise or get fluffy if it’s baked in a greased pan, so resist the urge to grease your dish.
- Use Freshly Thawed Topping: Thaw your whipped topping in the fridge overnight for best spreading texture—if it’s too cold or frozen, it won’t spread smoothly.
- Let It Cool Fully: Be patient and cool the cake completely before adding the topping to keep the whipped layer from melting and sliding off.
- Avoid Overmixing: Mixing too much air or overbeating the batter can make the texture heavy instead of light, so mix just until combined.
How to Serve Pineapple Angel Food Cake Recipe
Garnishes
I almost always go with pineapple chunks and maraschino cherries because they add that classic sweet and tangy contrast I love. Sometimes, I toss on a sprinkle of toasted coconut flakes for an extra layer of flavor and a little crunch—makes the cake feel a bit more festive without any fuss.
Side Dishes
This cake pairs nicely with fresh fruit salads or a scoop of vanilla ice cream for an extra special dessert plate. I especially like serving it alongside a bright mango salsa or a simple mixed berry compote to amplify the tropical vibe.
Creative Ways to Present
For parties, I’ve tried layering slices of this Pineapple Angel Food Cake Recipe with whipped cream and fruit in trifle bowls, which looks stunning and lets everyone dig in easily. Another favorite trick is to pipe whipped topping decoratively and add edible flowers for a gorgeous, photo-worthy dessert centerpiece.
Make Ahead and Storage
Storing Leftovers
Leftover pineapple angel food cake stores well in an airtight container in the fridge for up to 3 days. I usually cover it tightly with plastic wrap to keep that whipped topping fresh and prevent it from absorbing any fridge odors. Just let it come to room temperature a bit before serving again.
Freezing
Freezing slices isn’t my go-to because the whipped topping can get watery once thawed, but if you want to freeze the cake without the topping, wrap it tightly in plastic wrap and foil. It keeps in the freezer for up to 2 months. When you’re ready, thaw in the fridge overnight and add fresh whipped topping before serving.
Reheating
Angel food cake is best served fresh or chilled, so I don’t recommend reheating. If you want a warm dessert, pairing a cold slice with a warm fruit compote or a drizzle of warm sauce works beautifully instead of reheating the cake itself.
FAQs
-
Can I use fresh pineapple instead of canned for this Pineapple Angel Food Cake Recipe?
Absolutely! Fresh pineapple works great here, but make sure to crush it finely and include some of the juice to maintain the cake’s moisture. If your fresh pineapple is very watery, you might want to drain some juice so the batter doesn’t become too runny.
-
Do I need to grease the pan for baking the angel food cake?
Nope, don’t grease the pan. Angel food cakes rely on the cake mix clinging to the pan sides to rise properly and become light and fluffy. Greasing the pan can cause the cake to fall and become dense.
-
Can I make this Pineapple Angel Food Cake Recipe gluten-free?
To make a gluten-free version, you’d need a gluten-free angel food cake mix, which can be tricky to find. Alternatively, making a homemade angel food cake with gluten-free flour substitutes is possible but requires more baking experience.
-
How long can I keep the Pineapple Angel Food Cake in the fridge?
Stored well in an airtight container, your Pineapple Angel Food Cake Recipe will stay fresh for about 3 days in the refrigerator. Beyond that, the whipped topping may start to get watery, so it’s best enjoyed sooner.
Final Thoughts
This Pineapple Angel Food Cake Recipe has become one of my go-to desserts when I want something that feels both comforting and a little special without a ton of fuss. It’s light, flavorful, and easy to make, which means you get to spend more time enjoying it with friends and family and less time slaving away in the kitchen. Give it a try—you might find, like I did, that it quickly becomes a favorite for celebrations big or small. Plus, it’s just so pretty when served. I can’t wait to hear how you make it your own!
Print
Pineapple Angel Food Cake Recipe
- Prep Time: 10 minutes
- Cook Time: 30 minutes
- Total Time: 1 hour 40 minutes
- Yield: 12 servings
- Category: Dessert
- Method: Baking
- Cuisine: American
- Diet: Vegetarian
Description
A light and airy pineapple angel food cake that combines the sweetness of crushed pineapple with a fluffy cake base, topped with creamy whipped topping and garnished with pineapple chunks or maraschino cherries. Perfect for a refreshing dessert or a sweet treat at any gathering.
Ingredients
Cake
- 16 ounce (1 box) angel food cake mix
- 20 ounce (1 can) crushed pineapple, un-drained
Topping & Garnish
- 8 ounce (1 container) whipped topping, thawed
- Pineapple chunks or maraschino cherries for garnish
Instructions
- Preheat the oven: Set your oven to 350 degrees Fahrenheit to prepare for baking the cake.
- Mix cake batter: In a medium mixing bowl, combine the angel food cake mix with the un-drained crushed pineapple using a handheld mixer on medium-low speed. Mix until well combined, allowing some small lumps.
- Prepare baking dish and pour batter: Pour the batter into an ungreased 9×13 inch baking dish and use a spatula to spread it evenly across the bottom.
- Bake the cake: Place the dish in the oven and bake for 30 minutes or until the top is golden brown and a toothpick inserted in the center comes out clean.
- Cool the cake: Remove the cake from the oven and allow it to cool completely for about 1 hour at room temperature.
- Add the topping: Once cooled, use an offset spatula to spread the thawed whipped topping evenly over the surface of the cake.
- Cut and garnish: Cut the cake into 12 equal pieces. Decorate each piece with pineapple chunks or maraschino cherries as desired.
Notes
- Do not grease the baking dish, as angel food cake needs to cling to the sides to rise properly.
- For extra moisture, you can drain some of the pineapple juice but keeping it un-drained adds more flavor and tenderness.
- If desired, substitute whipped topping with freshly whipped cream for a more natural taste.
- Allow the cake to cool completely before adding the topping to prevent melting.
- Store leftovers covered in the refrigerator and consume within 2 days for best texture.
Nutrition
- Serving Size: 1 slice
- Calories: 180 kcal
- Sugar: 18 g
- Sodium: 150 mg
- Fat: 3 g
- Saturated Fat: 1.5 g
- Unsaturated Fat: 1 g
- Trans Fat: 0 g
- Carbohydrates: 35 g
- Fiber: 1 g
- Protein: 2 g
- Cholesterol: 0 mg

